Showing posts with label saving energy. Show all posts

How to Make a Simple Fuelless Cooker or Hay-box - No Power? No Worries. Hot Food.

Here's a quick and easy way to use less fuel, less water and still have a tasty and nutritious meal from a cardboard box. Get one ready in case of power outages or for hot food on a journey or emergency.


The Hay-box or fuelless cooker was a popular item around the turn of the 19th to 20th century. In particular during the World Wars and the Great Depression when people were often displaced and the price of fuel rose steeply and/or was rationed. Furthermore, it provided a form of cookery which used less water and in which, precious food, cooked at an even temperature by residual heat had no chance of burning and becoming spoiled. There was also the added and important factor that nutrients were retained through the slower and lower cooking times and temperature.


We cook all our meals and heat water with our wood-burning cooker. In the colder weather it is alight most of the day heating the house as well. As we move into the milder weather we tend to eat more raw food and as we have no need of the heating so the cooker is alight just around meal times. This poses a problem in that we do need hot water for washing hands when we come in from the garden prior to preparing our food .


We solved this problem by using a Hay Box to keep the water, heated at meal-times, hot. We made our first box from scrap wood and filled it with organic lucerne hay which we are given by the organic dairy farmer from whom we buy our chicken grain.

The idea is not a new one, in our 1920’s copy of Mrs Beeton's Book of Household Management the Fuelless cooker was used to cook meals for a fraction of the fuel cost. Nowadays it is just as important to consider the fuel-saving benefits of such a system as well as bearing in mind the possibility of providing hot food during power outages in the colder weather.
 

The principle is that the heated food is placed, in its pot or saucepan, into a well-insulated box , the lid which is also insulated is put in place and that’s it! The food takes about 4 times longer to cook completely within the box and may need to be reheated prior to serving but the only  energy consumed has been that needed to get it to boiling point. Of course, the ‘box’ part of the system is only required for safety and neatness and possibly transporting, I know of others that have simply wrapped duvets around the heated pan and achieved the same end result and have a warm duvet to boot!


ORGANIC LUCERNE HAY

ORGANIC TRITICALE STRAW

ORGANIC VEGETABLE FIBRES

ORGANIC HEMP AND LINEN

HOLZFLEX WOOD FIBRE

ORGANIC SHEEP'S WOOL


I used an ecological, non-toxic insulation for my box and there are a multitude of suitable insulation you can use: fleece material, multiple layers of corrugated cardboard, hay, straw even expanded polystyrene, the choice is yours. 

The first box I’ll share is the simplest and cheapest. We are very fortunate in having a local ecological building supplies company (in fact it’s next door to our organic supermarket) and I could buy single panels of  wood wool insulation 30mm thick for around $3,00. On  the same visit to buy the insulation we popped into the organic shop and picked up two cardboard boxes of similar proportions but different sizes. 


The insulation needs to be cut to line the four sides and base of the larger box and the smaller box should fit in the cavity that remains. I was able to find cartons whose sizes differed by about 60mm hence the 30mm insulation on the inside walls of the larger carton would be sufficient to form the space for the smaller carton.


To make the lid to the Hay Box I cut two rectangles of cardboard to the size of the larger carton and made a ‘sandwich’ with the insulation between them. The lid was held together with broad masking tape. I adhered the tape around the perimeter of the lid so as to seal in the insulation.


And that’s it, the box is ready to go. When the saucepan is put into the box, the voids at the box corners can be filled with triangular-shaped pieces of cardboard (a bit like ‘Toblerone’ boxes) or stuffed with tea towels, ideally any kind of insulating material which will reduce heat loss due to convection currents.


Next time I’ll share  my design for a wooden hay box, more robust than the cardboard one it is more suitable for carrying hot contents in a car so you can enjoy your own hot food on a journey.


Meanwhile, if you'd like to, sit back and enjoy the film:


Thanks for dropping by and please feel free to share this article, comment, ask questions and if you'd like to be assured of getting the next post, then sign up to follow this blog.

All the best, Andy

© Andy Colley 2014


Humanure - Two years of living with a dry toilet

For over two years now we have been using our home-made dry toilet and have just been able to start using the compost from our first bin which has been lying idle for over eighteen months. Idle perhaps isn't the correct word for in that time a whole host of activities have been occurring within it.

   Hands on Experience - Paying dividends after eighteen months.

Humanure is like death and taxes it's something we all know about but as the elephant in the room, are most loath to mention it. It is this inability to cope with our own waste which has led us down the path of least resistance, removing  it as far away from our dwellings as possible and leading many countries literally to the brink of overflowing. What we need to do is face up to the problem as individuals and stop flushing this precious resource along with equally valuable water down the pan. We need to stop being afraid.

Changing language - changing attitudes


The word humanure is an interesting one in that it seeks to redefine what was once perceived as waste and place it in the context of a resource. Along with chicken, horse, pigeon and cow manure, etc., humanure becomes no longer a waste material which needs to be disposed of but a useful product to be composted and recycled for reuse. 

So how does it work. Firstly, in order to run a dry toilet system efficiently and ensure a quality breakdown to a rich compost without pathogens, one needs two basic 'cover' materials to provide carbon, with which to balance the nitrogen in the humanure. These also have a role in absorbing moisture and preventing the escape of odours from both the dry toilet recipient and compost bin. The most popular cover for the former is sawdust and the latter straw. In our case we recycle the certified organic hay and triticale straw used in nest boxes, hen house floors and our hen-powered propagator. The further important function of the cover material once in the compost bin is to provide the tiny interstitial air spaces for the necessary aerobic thermophilic microbial reaction to take place.


Everything pivots around language and nomenclature, once the concept of humanure can be explained 'scientifically' rather than in the old 'muck and mystery' ways of the organic and ecological movements of the early 1920, many more people begin to feel comfortable with it. It is also important to remember that these systems are as removed from the old chemical toilet outhouses as they are from the modern flushing wc.


The aerobic decomposition of the humanure, or thermophilic composting includes a hot stage of 45 degrees C or hotter. There is no exact timing for this stage because it is dependent on a number of variable factors. These include, the mass and composition of the mix, ones geographical location, the ambient temperatures, changing seasons and humidity levels both inside and out. One of our reasons for including the lid on our bin is to prevent the excessive humidity caused by the ingress of Normandie rain! 

Human Pathogens: -  viruses, protozoa, bacteria and intestinal worms


There has been a great body of research carried out on the efficiency of the thermophilic environment in eradicating the above, with the conclusion that when composting has been carried out efficiently there are no pathogens detectable even in cases where the initial level has been a heavy one. It is after this initial hot stage that the next part of the process, the cooling stage begins, after which comes the work of nonthermophilic microorganisms and our old friends the compost worms, wood lice and fungi. Then follows a stage known as 'curing', which allows time for all the work to be completed.  This last stage leaves you with the dry friable mix and a valuable resource for your garden.
For a comprehensive essay on the above:
http://www.agrowingculture.org/2011/08/humanure-part-iii-thermophillic-bacteria-composting-stages-the-sanitization-of-compost-joe-jenkins/
and a well presented factual short article:
http://compost.css.cornell.edu/microorg.html

Facts and Figures: Our own system

 
Water Consumption: prior to installation 80m³ per annum.
Water Consumption: post installation  36m³ per annum.
Volume of  sewage:  which would have been sent for re-treatment in a year: 44m³ (over 99% of this would have been potable water!)
Volume of dry waste: actually produced per annum 0.24m³


From the above, the benefits of installing a dry toilet are great both to the pocket and to the environment. Furthermore, the astounding difference is in the amount of 'waste' or rather resource engendered by the process. This is particularly important to highlight because many people believe erroneously that only country people with land can use this sort of set up. Interestingly Sue and I gave several demonstrations over this Summer of all things repurposed, including dry toilets and I had a great conversation with guy from central Paris who has exactly the same set up as ours. His only problem is sourcing the sawdust! It is worth pointing out too that we also have a liquids only toilet within the bathroom, which we can remove when visitors come to stay and give them the choice which toilet to use.

Our system was designed and made for and from repurposed pallet wood and a minimum of fixings and comes out at a cost of under 10 $/Euros/£. The three films showing how to make the compost bin, cabin and toilets are all on this blog as well as on my Youtube site*. There are obviously a multitude of designs both to make and purchase and many of which are specifically tailored for an urban environment. 

*http://www.youtube.com/user/Organikmechanic 

Conclusions

 
The Industrial Revolution removed vast numbers of ordinary people physically from the land. However, it did more to them mentally, holding them captive in a system, where they no longer had dominion over the management of their own lives. Further generations would be taught to look down upon the provision of food and composting 'waste' until World Wars obliged governments to force them back to it. The rallying cry of the post war period was about spending,  consuming and throwing away and the scale of its repercussions are only just beginning to be openly realised on our personal health, happiness and our one and only Planet. In the present economic climate, more and more are moving back to the land by choice and finding joy in the rediscovery of old skills and autonomy. Dry toilets are just a leitmotif for this paradigm shift. It is up to personal choice where you put the resultant compost. It is also an individual choice as to what you include in your mix. We are purists and have a dedicated bin just for the contents of the dry toilet. When we raise a glass of kir containing home-made crème de cassis this New year we will be drinking to the success of another year of thermophilic microbial reaction or rather the toast will be: "To Muck and Mystery!"


Now sit back, if you will and watch our dry toilet 'reveal' and find the answer to the questions that decades of flushing can no longer keep from you. The film still below is of our current working bin just to show the 'cover' materials and the worm activity - nothing to worry about!


Thanks for dropping by and if you have enjoyed this post please share and feel free to comment and ask questions.

Thanks for dropping by and please feel free to share this article, comment, ask questions and if you'd like to be assured of getting the next post, then sign up to follow this blog.

All the best, Andy

© Andy Colley 2014

Horsepower, Pedal Power and Willpower - Sustainability is Our Future.

We are leaving our children with some really difficult environmental problems, so it's great to see innovative and original ideas like the following.
 

The pedal-powered Merry-go-round at Guichen's (Brittany) annual Organic Fair

I just chose a handful from our local area but this will be an on-going theme, which I hope will inspire and make you aware that so many people are already working towards a sustainable future for us all.


Horse-drawn Taxi


We loved this idea for an innovative and stylish Park & Ride system. It was used to carry people and their purchases back and forth from the Organic Salon to the car parks. 


Low on fuel, even if a little heavier on organic oats, this 'hippomobile' is  symbolic of the shift in organic agriculture back to animal traction and the welcome return of the Heavy Horse to farming.


Also operating before the event is a network for 'covoiturage' (carpool) which allows people going to the Salon to contact others on the same route both to save fuel and also meet others with the same goals and interests.

Pedal-Powered Carousel


This is both fun and educational because you can see that the children on the ride are equally interested in how the merry-go-round works. They are also playing with real physical materials, in this case sand rather than a virtual scenario in CGI!


As these are probably repeat customers, it's a great idea that every year the theme of the roundabout changes. Last year it was Sue's favourite with another great hands-on natural play environment - straw and papier maché poultry.


Manual Savoir-Faire


Another great idea for a sustainable future, a group of dedicated people, who pass on their skills in hand tools and workshop practice to the next generation of builders and craftsmen (and women).


A great message too on the group's van!

"Choose a job you love, and you will never have to work a day in your life."
Confucius 551-479 BC


Raw Organic Milk at the Press of a Button


The milk in this vending machine is straight from the morning's milking so you can't get much fresher than that. Comments on my Youtube channel have suggested that a cow, a three-legged stool and a tray of glasses would be even simpler but on a pavement in a neat little seaside town I think you'd be pushing it!  


Another great innovation for this year in Normandie is the production of the first ever AOC (Appellation d'origine contrôlée) Camembert  made exclusively from the raw organic milk of the heritage breed; la Vache Normande. This breed, reputed to have been brought to the Normandie coast by the Vikings, is a gentle and beautiful creature, which was completely decimated in the World Wars and brought to the verge of extinction. Now experiencing a welcome comeback mostly through the efforts of organic farmers, we see more and more of them in the fields around our area. See our blog on raw milk and A2 type cows here


Aaaaaaawwww!


Gold, silver or Galléco?


A local currency, which can be exchanged for Euros and used to buy environmentally and ethically responsible local goods. An interesting concept which takes money out of the hands of the too- Big-too-Fail and too-Big-to-Bail.


An Alternative Shopping and Social Centre


Fed up of all the rubbish in the shops at the mall? Well Guichen's new (under construction) straw bale shopping centre is taking the idea literally. 


One of its first shops will be stocked with all the stuff from the Dump, which can be repurposed and reused by others.


Where we lived in Warwickshire before we came to France, our local Dump financed itself from its own shop containing all the useful stuff removed from its skips. Bad news for all us scavengers but it's good news for the Environment!


Hoping you have found these ideas inspiring, I'll leave you with our film showing some of them in action.


Thanks for dropping by and please feel free to share this article, comment, ask questions and if you'd like to be assured of getting the next post, then sign up to follow this blog.

All the best, Andy

© Andy Colley 2014

Pallet wood compost bin an integral part of our dry toilet system. Let's Talk Rot


Dry toilet system from recuperated untreated pallet wood

 Dry Toilet System - Part of the Organic Garden Landscape


The Specification


The first stage in the dry toilet system is the construction of the compost bin, the specification for which is as follows:
Provide a wooden container to hold compostable material, protected from the weather and secure enough to prevent the ingress of vermin.
Easily erected 'on-site' with  minimum tools.
Access for emptying of the compost should be via the sidewall(s) of the bin.
Capacity should be adequate for at least 18months to two years compostable material.


The Design


To this end I opted for a completed bin size of 800mm x 800mm x  800mm.
All the wood used was recuperated from pallets. 
The unique design feature of this bin is that the walls comprise mainly of 'loose' planking which can easily be slid into (or out of) position.


The Fabrication


Four support posts (approximately 30mm x 80mm ) were cut to 800mm length. To make the front and rear walls, 800mm long planks were screwed to the top and bottom of each pair of posts thus producing a square frame. 


These planks have to be 3mm or so THICKER than the rest of the planks selected for the walls. On top of these planks and in line with the support posts were screwed two more 800mm planks (I call these 'corner post planks'). 


The front and rear walls were joined by four planks (once again the thicker wood) screwed to the top and bottom of the outside faces of the support posts. The top planks in this case were 100mm longer (900mm) than the lower planks and the additional 100mm projected from the rear of the now cubic frame so as to provide hinge points for the lid.


Finally, four more 'corner post' planks were screwed on top of the upper and lower side planks. As with the front and rear walls these were in line with the support posts.


The lid was a U-shaped frame made from pallet planks such that the frame fitted over the front and two sidewalls of the bin.  


30mm x 15mm laths were nailed to the top edge of the frame to support the waterproof covering (in our case it was roofing felt). prior to attaching the covering the frame was positioned on the bin and the hinge holes were drilled through the frame and through the overhang at the rear of the frame. 


Two 6mm x 70mm long coach bolts were used as the hinge pivots.


The waterproof material was cut and attached to the lid frame. I like to 'trap' the material with thin laths of wood which are screwed to the frame. 


Sufficient pallet planks were cut to 800mm length to make the walls. To fit in position each plank was slid in the gap between the corner post and the corner post plank. It was not necessary to fit the planks to the full height of the wall to but leave a gap at the top of about 10-20mm.

The bin was then dismantled, merely leaving the front and rear wall frames intact, so as to transport all the components to the desired location in the garden. 


Reassembly was reasonably rapid as all the screw holes were now pre-drilled.


Once the wall planks were slid into place composting could begin!

Obviously, to empty the bin of the compost, the wall planks are slid to one side and access is easily obtained. In addition it is possible to empty the contents from any side Thus if you wish to place another bin next to the first then its proximity will not affect the emptying operation of either bin.


Now sit back and watch the film:


Thanks for dropping by and please feel free to share this article, comment, ask questions and if you'd like to be assured of getting the next post, then sign up to follow this blog. Part Two - The cabin can be found here

All the best, Andy

© Andy Colley 2014

Moving off the Grid - Part Two - Heat Pumps

This will be part of an on-going series  on how and why people choose their source of energy.

Heat Pumps


Heat pumps move ‘heat’ from one point to another. Refrigerators are the most common example of a heat pump system. In our context we are looking at a system that takes heat  energy from a lower temperature body and by mechanical means extracts the heat energy which is then released at a higher temperature. The power  necessary to  enable this is usually electrical and one would normally expect to use 1kW of electrical power to produce 3kW of heat energy. Mostly the source for the heat pump is either the ground or the air but if available in sufficient quantity, water.
  

Practical and beautiful - one of the two lakes on the property.


 The Lady of the Lake – 35 years of heat pumps


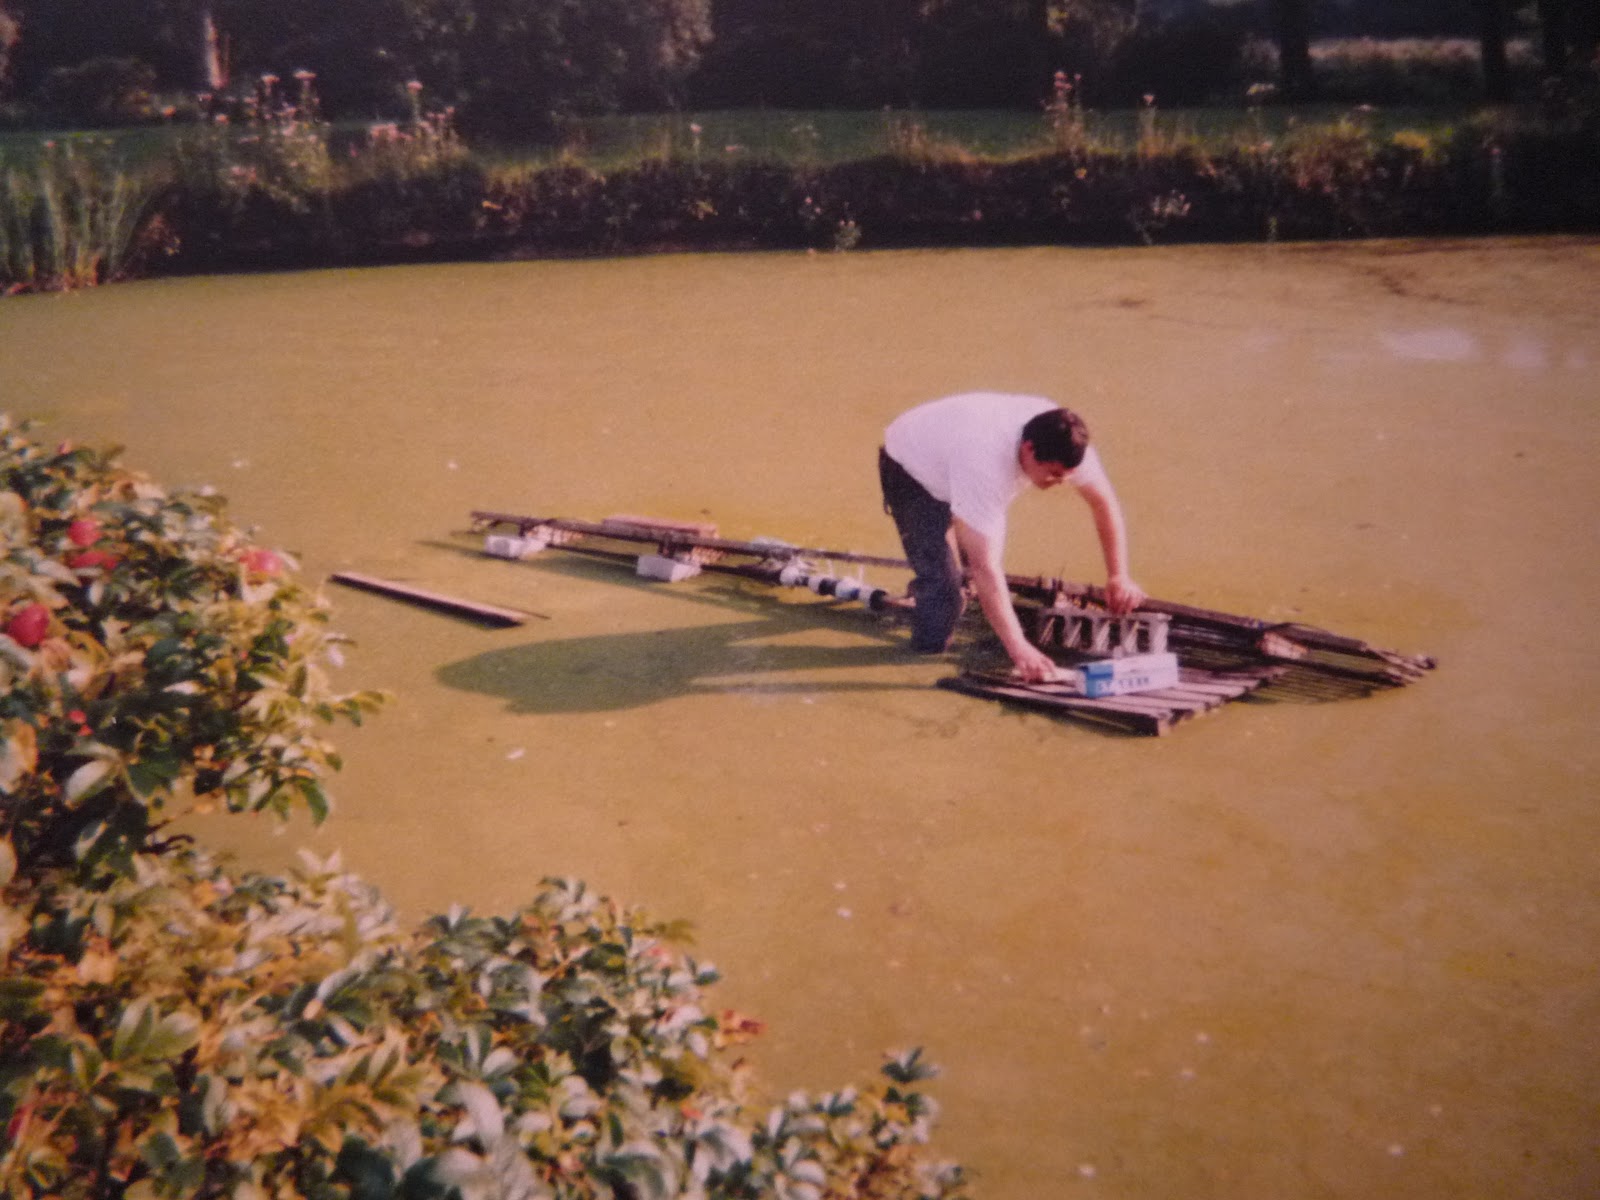
Some necessary maintenance - cleaning the exchanger.
Anne-Marie and Jean-Louis have always used heat pumps as their principal source of energy. Their first system was installed when they lived in a riverside property, where they had the right of use not only of the section of river which fronted their property but also an ancient lavoir (communal laundry). This latter gave them ample place in which to accommodate the exchanger. Thirty-five years ago this type of system was so new here in France that the technician who installed the pump didn’t actually have either the belief in, nor knowledge of, the system, just the technical competence to do the work. Anne-Marie and Jean-Louis were so pleased with the system that when they moved, some twenty years ago, to their present home they decided to go with the system again, this time with Jean-Louis building the exchanger himself. Their present system was built from scratch, as they had managed to find a beautiful piece of land with two lakes and a small dwelling, thus giving them scope to build their new home around its heating system. This is perhaps one of the drawbacks with this form of heating in that it is best installed in a newbuild as it requires pipes to be laid within the flooring. However, it is possible to retrofit the system, if one can break through the flooring or use a system of wall-mounted radiators. For Anne-Marie and Jean-Louis, who mostly worked from or at home it has been the perfect solution. The house is kept at a constant  ambient 19°C, except in the bathrooms where additional piping adds to the heating capacity and give a temperature of 23°C.


The constant temperature allows Anne-Marie to grow a whole range of orchids and succulents. A great and avid gardener she uses the heating system to its full advantage when growing some of the many difficult members of these plant families.


This brings us to another consideration with heat pumps, in that they require volumetric calculations for the designs and costings of the whole installation. This could add to the costs of start up, in that you may need to engage a professional to undertake such a study. However, some of the companies selling and installing heat pumps also include a feasibility study within the package – it pays to shop around. All in all this sort of system requires a physical mass, whether a body of water or area of land in which to install the exchanger and a significant initial outlay in time, money and possibly inconvenience for start-up. Anne-Marie and Jean-Louis found and then preserved a beautiful natural environment, which is home to a wide variety of rare and beautiful wildlife. The little grebe, frogs and moorhen paddle about the water lily pads oblivious to the system beneath.

It is also to be considered that the system they have heats a very large volume of living space. Anne-Marie’s original intent was to run a Bed and Breakfast, so their heat pump actually provides a constant 19°C and 23°C in six bedrooms and bathrooms respectively, as the system was also installed in the floorspaces on the upper floors. According to Jean-Louis many people opt for a system which heats just the lower floor and uses radiators above.

The Layout


The lake is some 50m from the house, the feed and return pipes to the exchanger were buried in a trench. Jean-Louis made the 3m x 1m exchanger himself, the tubes arranged in two layers to give a total exchanger area of 6m².


From left to right;-  150l hot water tank, heat pump for heating and hot water and heat pump for heating only.


There are two heat pumps in their system the first solely for heating the second for heating and hot water. Recirculating pumps deliver the anti-freeze laden water from the heat exchanger in the lake to the heat pump where some of its heat energy is absorbed prior to returning to the exchanger. The heat from the heat pump is then used to warm the water in the hot water tank, the system from then on being similar to any conventional wet  central heating system. Central heating pumps move the heated water around the matrix of underfloor pipes throughout the house. In the bathrooms the pipes are laid closer together to provide the elevated temperatures required (9cm apart as opposed to 14cm for the rest of the house). The floors act as massive heat sinks, if there is no heating supplied to the system for a 24 hr period, the temperature of the floor drops by only 1°C. The heat pump system is programmed to only run from midnight to 7a.m. thus taking advantage of the lower rate tariff. The financial implication of this is that their total energy bill for this whole house (floor area of 200m²) amounts to 1 350 Euros per annum.


The circulation pumps supplying the water from the exchanger in the lake. A well spaced out system like this is essential for ease of access in case of maintenance.


Upstairs feed manifold supplies heating water to the bedrooms and bathrooms. A similar arrangement exists for the ground floor.


Advantages


Reliable heating system furnishing comfortable temperatures throughout a large house.

Low maintenance costs.

No fuel storage necessary.

High level of reliability – few moving parts, no exposure to weather.

Long life expectancy

No pollution provided the integrity of the source loop (heat exchanger in lake) is not compromised.

Disadvantages


Initial capital costs high.

Underfloor installation work is messy in a retro-fit operation.

Electricity supply needed to make system work. Hence you have to have a backup source if there is a possibility of outages and you are still on the grid.
For example, in 1999 the hurricane we had here took down pylons with a resulting 7 day power outage.

Any leak in the heat exchanger will lead to system failure but also to contamination of the water source or land, although use of ecological anti-freeze reduces risk.

Repairs to heat pump requires specialist know-how.

Care has to be taken to ensure no corrosion to pipes and fittings arises from the water in the heating side of  the system.  Jean-Louis has had to change the fittings in the hot water feed manifold to stainless steel due to the acidity of the potable water. He also cites chemical attack from the concrete has caused further deterioration in some fittings.


Jean-Louis and Anne-Marie are so sure that this system is the right one for them that having put their house on the market they have already chosen their new house with a heat pump system as the prime consideration.


A heating system which takes full advantage of the landscape  but which has no visible presence within it.    

All the best and thanks for dropping by. Please feel free to share this article, comment and/or ask questions.

Cheers, Andy

© Andy Colley 2014