Showing posts with label saving money. Show all posts

Crosscut Saw Table - designed and made from recuperated materials

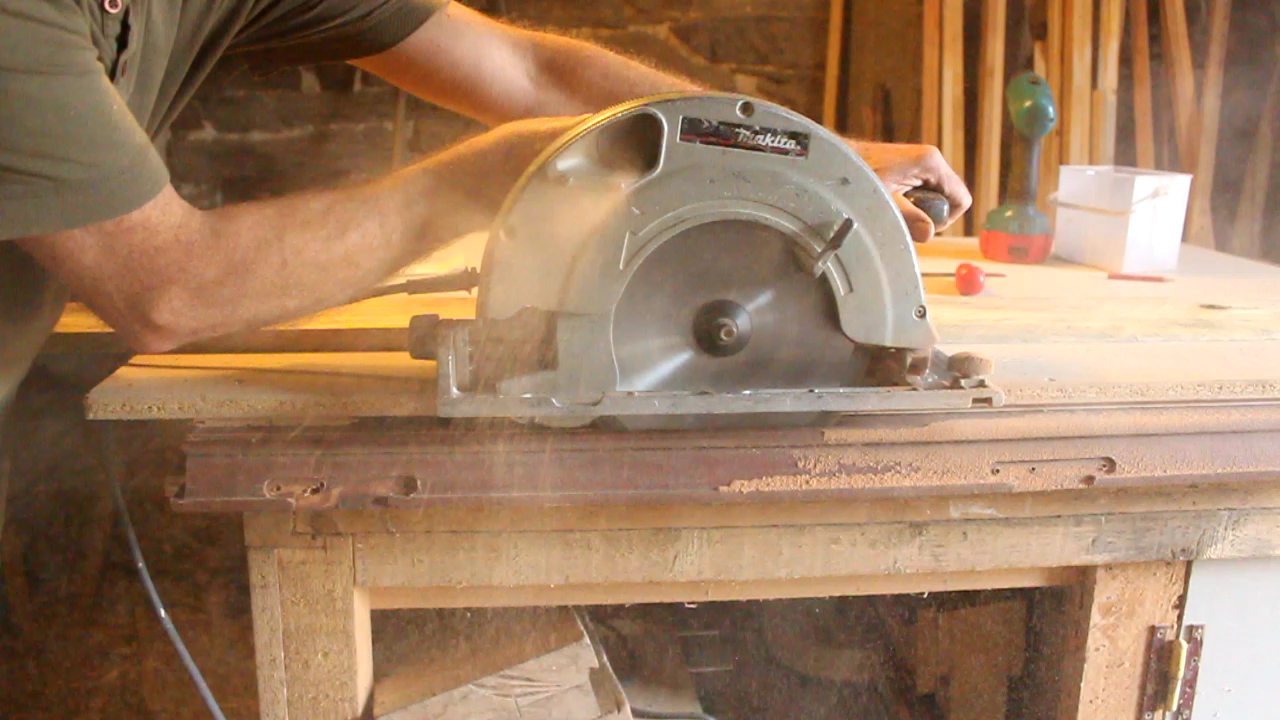
Amongst my tools I have two portable circular saws both are regularly used but my favourite is the Makita because it is so solidly built and provides the deeper cut. This is a saw our friends used to build their boat and once that was done they no longer needed it, so gave it to us. I often need several pieces of timber of the same length and likewise need a square 90° cut. Knowing that the circular saw when correctly set can furnish the latter I just needed to come up with a way of moving the saw on a controlled path when cutting.

Crosscut saw table from repurposed materials

On one of my regular visits for pallet collection, one of my ‘suppliers’ had thrown out a steel-framed transport dolly with small castor wheels welded to it. This was transported home with the pallets as I realised the castors were the essential final part in the plan I had to onstruct a crosscut saw table.

castors from a trasport dolly - crosscut saw table

Overview

I wanted the portable circular saw to fit onto some kind of sliding table, the exposed saw blade would be beneath the table and would cut stuff held in the blade’s path. Thus the castor wheels would be screwed upside down to a baseboard and the table holding the saw would run on the castors. The table’s movement would be restricted to a forward/backward motion by guides or tracks on the underside of the table into which the castors would fit.

Crosscut saw table mock-up for the design


Method

making a crosscut saw table
The first stage was to make the moving table into which the saw’s base would fit, using a rectangular piece of plywood recuperated from a pallet top. I positioned the saw centrally and traced the outline of the saw’s base upon it. The rectangular hole was cut with the circular saw guided by a straight edge clamped to the plywood. I used a pull saw to complete the saw cuts at the four corners.
fitting the saw into the crosscut saw table


I needed to remove a little more wood from the hole edges with a rasp to obtain the snug fit of the saw’s base in the hole.>


Making guide rails for crosscut saw table


On the underside of the table I attached four lengths of wood for the guide rails. The position of the ‘inboard’ guide rails were such that about 6mm (¼”) of the guides longest edge extended over the hole edge so as to be the support for the saw base.


Checking guide rail alignment - crosscut saw table


To ensure that the rails were correctly aligned, I used the cut-out of plywood as a guide. I affixed a straight edge to the rectangle such that the inboard guide rails' edge would butt up to it, this produced the 6mm overlap of the hole's edge. 


Using castors to check crosscut saw table


Once the first inboard guide rail was glued and screwed in place, the plywood cut-out was turned around to furnish the guide for the second inboard rail. The other two guide rails were attached a castor wheels width from the ‘inboard’ guide rails.


Completed section of crosscut saw table

Recuperating castors for crosscut saw table


The castors were of the swivel type so once removed from the dolly frame I separated the castor wheel and frame from the castor base by sawing through the swivel pin.


MDF topped pallet


had selected a table base from a pallet top made of MDF which I had checked for flatness.


Castor fitted to crosscut saw table


I knew the distance the castor wheels needed tobe apart (this being the guide width on the moving table) and screwed the first pair of wheels near to the edge of the MDF base.


Castors for cross cut saw table


The other two wheels were screwed in line with the first pair of castors at a distance slightly less than half the length of the moving table.


Stops for crosscut saw table


Once I had checked that the tracks on the underside of the moving table engaged correctly with the castors and would move to and fro with ease, I screwed stops on the front and rear edges of the moving table to prevent 'derailment'.


Guide edge for crosscut saw table


The final stage was to attach a guide edge at right angles to the saws' direction of travel.


Guide regulator on crosscut saw table


This was attached to the MDF base. I made a slotted hole at one end of this guide and clamped it to the base with a wing nut so as to provide a small amount of adjustment.>


Operation

Clamping home-made cross cut saw

When I need to use the crosscut saw table, I firstly clamp the base to a 'Workmate' or workbenchThe moving table is placed onto the castors and the saw baseplate is pushed into the rectangular hole at the same time holding the blade guard in the 'open' position (blade exposed).

Exposing blade on home-made crosscut saw table

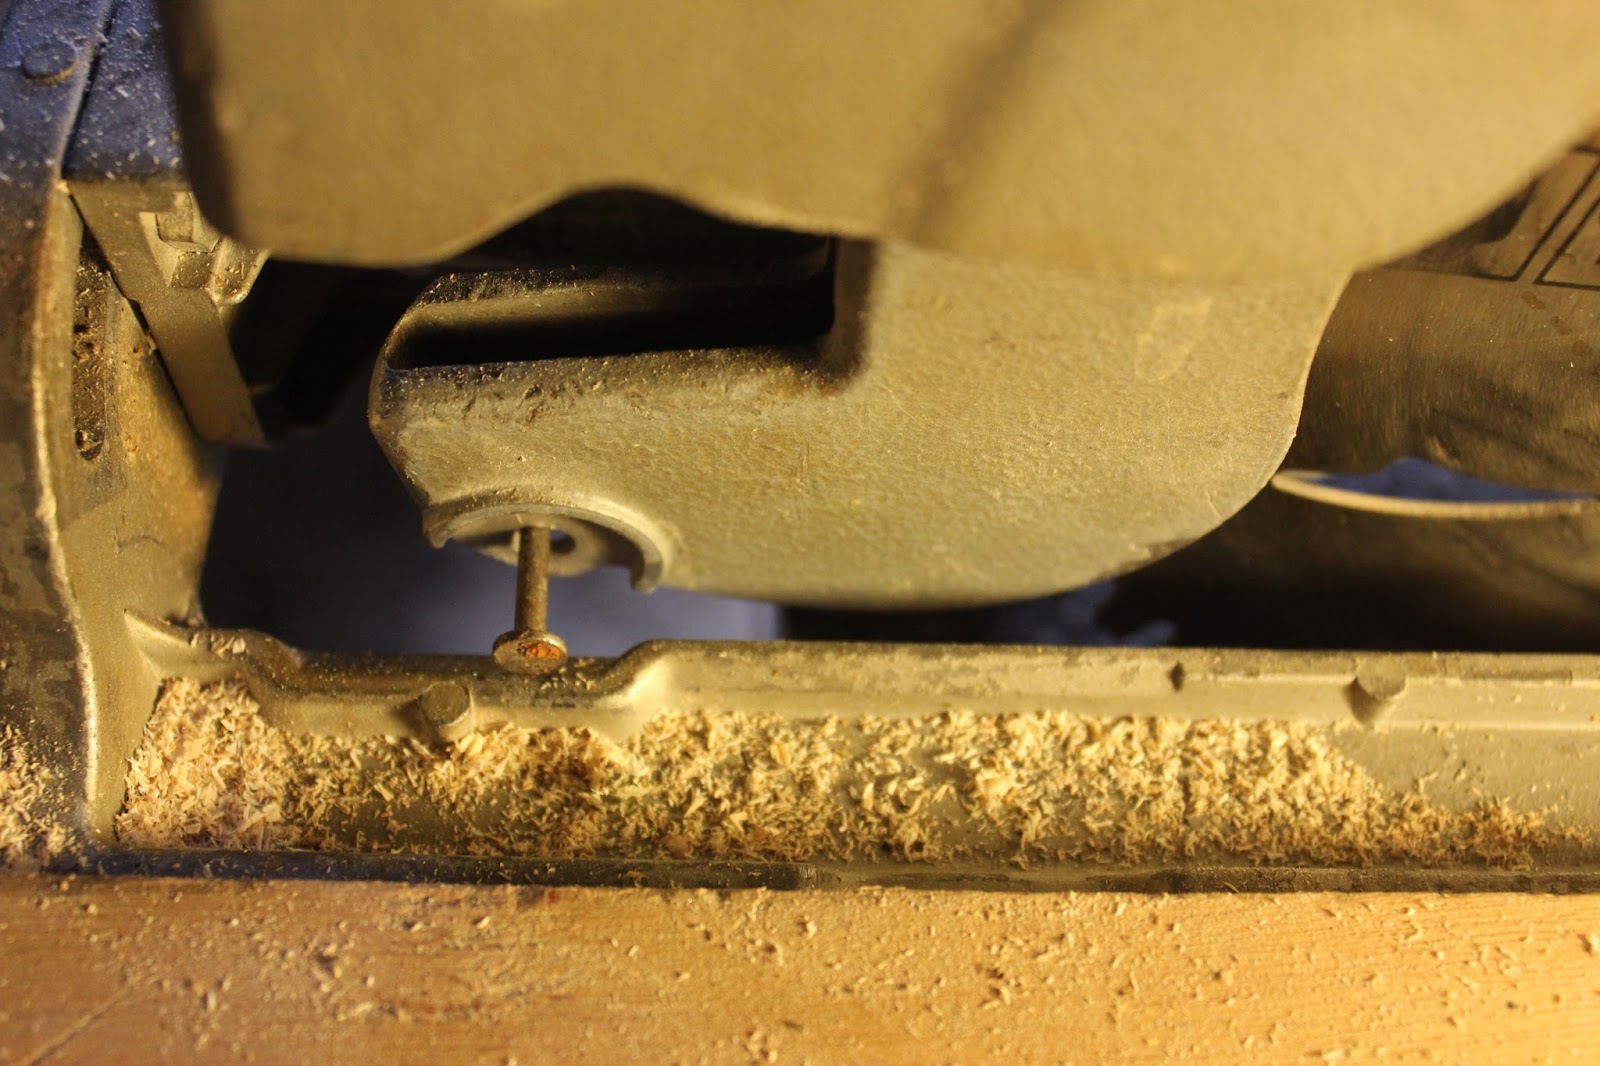
Once seated in position the guard is held open by putting a nail through a hole in the guard perimeter and letting the nail rest on the top face of the saw baseplate. Next, the saw blade cutting height is adjusted so that the blade touches the MDF table surface and then it is locked at this cutting depth.

Ensuring exact positioning home-made crosscut saw table

To cut the timber the saw is drawn back away from the guide, the timber is slid into place and held firmly against the guide edge. If I only need to cut one or two pieces of wood I mark the desired cutting point with a pencil and can see this mark through the hole in the baseplate (see image above)The stationary blade may then be brought up to the wood edge to ensure exact positioning with the mark. Moving the saw away from the edge prior to starting prevents 'snatch' .

Saw stop design for crosscut saw table
Another saw stop design for crosscut saw tableIf a greater number of equal length pieces are required I find it easier to clamp an end stop to the baseboard against which the edge of the timber can be held.

Improvements and modifications

I have definitely found the need for adding a small light over the table, specifically to illuminate through the hole in the saw baseplate so as to clearly observe the cutting marks.

Adding a light to the home-made crosscut saw table

The recuperated castors allow for a timber thickness of 50mm (2"). This I have found to fulfil my current needs but the saw is able to cut to a depth of 85mm (3¼"). To attain this one could use larger castors or raise the small castors on blocks.

Conclusion

The home made crosscut saw table has proven to be a valuable addition to the workshop and has made a robust hand power tool into a precision cutting tool at little cost. Equally important is that it may be easily and quickly converted from one form to the other.

Checking right angled cut from crosscut saw table

Now, if you'd like to, sit back and watch the film:


If you've enjoyed this article and found it useful please feel free to share it or to comment and/or make observations. All the very best and until next time,

Andy  © Andy Colley 2015
RETURN TO GREEN LEVER CONTENTS PAGE FOR MORE ARTICLES 

Tailgate gas strut fail? Pallet wood car repair solution - 2 methods

We live in an age of mass production, although I prefer to think of it as an age of mass assembly. Goods are made from a series of mass-produced 'outsourced' components, the difference often being that the durability of some components is less than the expected working life of the whole. As is frequently the case one component malfunction renders the product useless which is why so much stuff ends up as landfill.  

Shooting brake - Hunting for pallets

This is our Peugeot 405 break and apart from being a great little workhorse, we've just returned from our visit to family in Scotland and seen much younger cars defeated by the seasonal deluge. Mechanically very sound, it was the 'little' annoying things that started to fail just a few years after we purchased it second-hand.

Golden Sebright rooster and friends

What I wish to share is a simple solution to a less serious component malfunction but one which occurs often in ageing motor vehicles, the failing of a tailgate gas strut. Often tailgates are supported by two of these struts but I have found the need to just make the change to one side only. I must just add that this is not just a fault that happens with old cars, I recently saw a new car with the same problem!

Method


With the failure of the gas struts I had originally held the tailgate open with a pallet wood plank which was not perfect in that it was very easy to dislodge whilst loading, resulting in hurried grasps to prevent concussion.


Gas strut problems and solutions

I finally realised that by jamming a block between the top of the gas strut cylinder and the piston mounting, the weight of the tailgate would hold the block in place and could not fall. 


Pallet wood car repairs
To ensure a snug, secure fit, I made the block with a groove to fit around the piston.


Pallet wood tailgate gas strut repair - safety cord


Type 1

This (pictured above) is the simplest one to make as all you need is: a saw, drill and drill bit, screwdriver and screws, wood.

Using pallet wood to repair a tailgate gas strut

The block is made of three pieces of wood cut to the same length. I used pallet wood (of course) 

Wood pieces needed for gas strut repair

I selected one piece that was slightly thicker than the gas strut piston, this would act as the 'spacer' between the other two pieces. This middle piece was an offcut and was only about 15mm wide but it would be possible to obtain a narrow piece like this simply by splitting down a pallet plank.

Simple pallet wood gas strut repair

The narrower spacer piece was placed on top of one of the broader pieces and two screw clearance holes were drilled through them both. The third piece was placed on top so as to form the 'U' channel and fixed with screws. You could use a waterproof wood glue prior to screwing the block together.

Gas strut repair with pallet wood and minimum tools

After checking the block for fit on the strut, I drilled another hole through the block and attached a cord so that I wouldn't lose it.

Gas strut repair - attaching a cord


Type 2

In one way this block is less complicated in that it only uses one piece of wood, but it requires the use of a router

Using a router for a gas strut repair

I selected a piece of timber about 28mm by 30mm (11/8" x 1¼” approx) and used the router to cut a lengthways slot along the central axis of the narrower side to a depth of about 15mm (5/8"). The block was then cut to the desired length. 

Golden Sebright Rooster


I've used this system for over three years now and have never considered buying new gas struts as this works really well. Even Bob gave it his seal of approval. I've also furnished a farmer friend of ours with an extra long block to supplement his failed gas strut on the rear window of his tractor cab.

It is also possible to make the slot in the block using a circular saw, I merely set the cutting depth and made several lengthways passes moving the cutting guide by a blade's width at every pass. The result has been satisfactory but overall I have found that the one cut with the router to be the easiest to make.

Now, if you'd like to, sit back and watch the film.


If you've enjoyed this article and found it useful please feel free to share it or to comment and/or make observations. All the very best and until next time,

Andy

© Andy Colley 2014


Home-made strawcrete and stone storage heater Part 2 - building the wall

Looking backwards to go forward, our introduction to storage heaters, came about because we moved down to England from Scotland and bought a wonderful ruin of a 1930’s semi, which had been subject to a whole host of abandoned heating systems, spanning several decades, one of which was an electric storage heater. The start of this project, creating the strawcrete pad can be found here


Art Nouveau Fireplace

Previous experience with storage heaters and why we decided to make our own

 
In the front downstairs room of the house, which was to become our dining room, there was was an electric storage heater. This was powered with a low tarif supply but as far as we were concerned it was ugly and inefficient, being placed on the wall between us and the neighbour. We had already decided to remove the sixties era fireplace in this room and replace it with a  cast iron Art Nouveau one we had bought from a builder and open up the chimney.

Art Deco Fireplace

At the same time the storage heater would be moved upstairs  to a spacious front bedroom, with fine views of Warwick castle’s firework displays, great acoustics for its concerts and which we intended to use as a sitting room. Its function would be to supplement the superb original 30's Art Deco bedroom fireplace. To do this, the heater was isolated from the power supply and dismantled.

If you’ve never seen  what's inside one of these heaters then you ain’t missing much. Basically, they comprise an electrical resistance, running between heavy bricks. The heat output being regulated by a moveable flap to control the warmed air leaving the unit.


The inside rear wall is covered with a pad of insulation. A word of caution: Asbestos was often used as the insulating material in storage heaters and although you will see on many professional websites, dates of 1970 and 1980 quoted as marking the end of its use, you really need to find out exactly if the model you have contains Asbestos before you start taking it apart. Be warned that further to the obvious dangers of Asbestos, this form of insulation, when old can become powdery and thus ever more hazardous to the lungs. It is also of tantamount importance to ascertain if and when Asbestos was banned for use in household appliances/building materials in your particular country of residence. For example, when we moved to our present ruin, here in France, we found that the roofing material on an old abandoned rabbit hutch, attached to a Bread Oven in the garden, contained Asbestos but thankfully,  there were disposal procedures in place, which we could follow to rid ourselves of it.

Old Normandie Bread OvenOld asbestos roof

Far left showing rabbit hutches roof cover, thus prior to Asbestos removal and right a couple of years later on.


The key point of our old storage heater’s relocation was that it was to be placed against the internal brick wall of the upstairs room which incidentally led directly onto the stair well. Over a period of days after reconnecting the heater in its new room, we began to notice that this wall had started to store heat as well, such that as one ascended the stairs from the entrance hall, one could feel that there was a significant amount of heat emitted. So although we had known that locating it on an inner wall made sense, we got a much greater benefit from the heater than we’d originally expected. This was a valuable lesson to us of how useful it was to be able to store heat. The means of supply (electricity) was certainly not ideal but the way in which a house could benefit from the simple method of charging up a mass with heat and letting convection do its stuff, was.


Strawcrete and stone storage heater - Godin stove


Fast forward 20 years and back to our non-toxic storage heater, by appointment to the genius loci


It took about four or five days for the strawcrete to start to feel firm, I was still able to dig into the surface with my fingernail and the surface still felt damp. Nevertheless, I decided to remove the shuttering from around the pad so as to expose more faces to the drier air in the kitchen. 

Strawcrete pad for a homemade storage heater

I also decided to turn the pad upside down exposing the smooth bottom face to the air and I laid the pad onto an old wire shelf from an oven so that air could circulate freely around it.

Strawcrete and plain lime comparison of colour 
 
After a further seven days, the strawcrete felt firm and resisted my finger nail, it also felt considerably lighter. If you compare the colour with the little pure lime sample you are immediately struck by the warm golden colour the straw has imparted to the lime, something we exploited when we used strawcrete as the foundation layer for our hemp and lime insulated walls in our kitchen.

Work could then progress on making the wall. 

Chimney sweeping kit

The first thing I did was move the stove off its plinth and sweep the chimney, I’ll describe this exercise in another post. 

 
Shuttering for making a DIY ecological storage heater
Next I put the strawcrete into position on the tiled surface, the smooth, flat side down. I had decided to fit shuttering on three sides of the plinth to act as a guide for laying the stones and to prevent excess mortar from the joints from dropping into the gap between the rear wall of the heatsink and the lounge wall. I used chipboard sheets recuperated from pallets for this. The rear wall was a coated sheet but the side walls were bare of any such coating and thus I covered these with a layer of polythene so as not to  draw moisture from the mortar. Across the front elevation I screwed two narrow strips of pallet wood so as to allow me access for laying the stones. 

Cleaning stones prior to use in homemade storage heater


We have plenty of stones in the garden, some are from the house where we have removed parts of walls for windows and doors and some have been dug up over the years of our gardening. I needed stones that had ‘flat’ faces and were fairly regular in shape. The selected stones were cleaned of any soil or clay using a scrubbing brush and water. 

Stone work on homemade storage heater 


Prior to laying the stones in mortar, I first tried various selected ones, altering their orientation until I felt I had achieved the best fit, then removing them and laying them to one side in the same configuration. I’d decided that any large gaps between the stones would be filled with mortar and small stones. The other point in the construction was to lay longer stones front to back so as to conduct heat into the body of the wall, thus certain ones were selected to go onto the next layer. This also would make a strong bond within the wall i.e. there would be little or no mortar seam running continuously vertically down the wall. 

P.S. Extra repurposing tip - see the natty overall - we found a laundress who has a market stall, on it she sells old company overalls when they are 'past their sell-by-date'. They are really good quality and very cheap. We even once got a life-boat man's suit, which was great for heavy building work - and really good in wet weather!'

The mixing of the lime mortar and the laying of the stones and testing of the new storage heater will be dealt with in a separate blog.

Victorian cast iron fireplace


Left -  another great find for our old house, this time at a yard sale, it replaced a sadly defunct Rayburn anthracite heater with a burnt-out back boiler.


The continuation of this project can be found here

If you've enjoyed this article and found it useful please feel free to share it or to comment and/or make observations. All the very best and until next time,
Andy

© Andy Colley 2014


Replacing a 'sick' Double-glazed Window with another Recuperated Window

Our house, a vernacular longère was never meant to have glass windows and as it had rarely been lived in during the hundred years before we bought it, that aspect had hardly changed. When we came to think about glazing, we decided use the vast amount of discarded windows available. Luckily there was so much raw material, we found a near match for just about every opening. Below is the raw state of our sitting room (middle of photograph), just a few years after the sheep vacated it. As if to add insult to injury and coincidentally a few months before we came out to start living in our house permanently and begin the renovations, hurricane Lothar hit.

Hurrican Lothar and the Longhouse

Our ruined ruin

Nowadays, we tend to forget and thus to appreciate the value of glass windows, which is probably why people are so ready to replace perfectly good ones and dump them. In past centuries, even the nobility could afford only one set of such precious materials and would ferry them between homes as they moved from Town to Country and back again. The farm where Sue was born had one big picture window bricked up to a tiny 'porthole', due to Window Tax, a stark reminder that even daylight can be subject to payment.

Recuperated double-glazed and single-glazed windows

Introduction


There is a previous post which covers the recuperation of old windows, where and how to find them - it can be found here

In this post I am going to start with the first of my three window projects for this Autumn, the easiest one, replacing an existent recuperated window (above left). 

recuperated double-glazed window


We luckily recuperated a pair of these double-glazed units some ten years ago and I made a frame for and fitted one of them into our sitting room. In the past few months this window has began to look foggy or 'sick' as the seal between the two layers of glass had started to deteriorate.


Method


All double-glazed windows have a frame with an elaborate profile to ensure a watertight, draught proof joint. 

Work in progress - recuperated double-glazed window

The frame for the window was made using softwood (pine) and if I remember correctly was cut from floor joist wood left over from when we put floors in this part of the house. The wood selected was as thick as the window. On completion the outside face of the window rested against a rebate cut into the frame. The interior face of the window had a 'lip' 10mm thick on 3 edges (top, bottom and latch) which butted against the frame. The lip extended 10mm from the window edge thus, the interior height of the window was 20mm more than the exterior height. The fourth (hinge) edge of the window was not originally cut square but was cut at an angle (inset above).  I could not hope to achieve this when making the frame, so, after removing the hinges, I cut out the angle and made this edge the same as the top and bottom and made the frame to match. 

The profile on the latch side of the window (the one opposite the hinges) was slightly more elaborate in that it had a stepped profile to accommodate the latch mechanism and a rubber seal running the full window height. This meant that in forming this part of the frame I had to make two additional cuts with the circular saw to produce the matching profile.

recuperated double-glazed window


Throughout the the life of this window I have never detected any draught so consider the fit was more than adequate.  


recuperated double-glazed window


Thus with the replacement, after the overall dimensions were found to match the old unit, the hinges were removed. In the following photographs you can see the steps I took to cut the edge square using a circular saw.  

Work in progress - recuperated double-glazed window


The desired cut was 10mm less than the full depth of the wood so as to ultimately furnish a lip that would match those on the other three sides of the window. 

Making a flat surface - Work in progress - recuperated double-glazed window

In my workshop I do not have a saw table but I do have an excellent circular saw. So, whenever possible, I do not use the guide on the saw but use a clamped straight edge against which the baseplate of the saw can slide. In the case of the window I also lacked a surface upon which the saw could move. So, to furnish this I screwed a flat piece of chipboard (recuperated from a pallet top) to the uppermost (inside) face of the window. It is to this surface that I screwed the straight edge to act as the saw guide (below). The second and equally important point about using the chipboard is that prudent packing beneath it brought its upper-face level with the stool (the projecting profile that sheds rain water onto the sill) so that the depth of the saw cut remained constant. You can see the packing in the picture above and below (I used 10mm thick pieces of cladding wood).

Fixing guide - recuperated double-glazed window

NOTE
When I unscrewed the hinges I had two screws that sheared off in the frame, these I then had to drill out so as not to damage the circular saw blade, maybe I should have put a few drops of release oil on the screws prior to trying to get them out.

Circular saw  - recuperated double-glazed window

It is crucial to set the saw depth to produce the lip the same as on the other sides.


In making the second cut to produce the lip, the guide and chipboard were unscrewed and the window placed on the floor, held vertically by clamping one end between the jaws of a 'Workmate'.

Work in progress - recuperated double-glazed window

I clamped a flat piece of timber along the window edge to provide additional support for the saw so as to help maintain the 90º cut along the length. The depth of the cut was set so as to intersect the bottom of the first cut.


Once the cut had been made I was left with the desired square cut edge except that the lip produced was slightly too long, This lip length was important as this is the where the hinges are mounted. 

Work in progress - recuperated double-glazed window

Laying the window back onto the workbench I screwed the straight edge to the uppermost face so as to guide the saw in its third and final cut.

Recuperated barrel hinges

The existing window was hung on screw-in barrel type hinges and as they were in a perfect condition, I intended to use them again. I obviously had not removed the one half of the hinges from the window-frame so I needed to remove the other half from the old window and screw them into pre-drilled holes in the replacement. 

fitting hinges for recuperated double-glazed window

To ensure the holes were drilled vertically into the edge (of the lip), I rested the window on a pallet which was made to be parallel to the workbench top, the window resting against the leg of the workbench. I used a try-square to check that the window was at right angles to the workbench top and used wood packing between the window and leg to achieve this. Once all was checked OK for being square I drilled pilot holes at the pre-marked positions using the small drill press on the top of the workbench,  thus ensuring the hole was square going into the 10mm thick lip of the window. 

fitting hinges for recuperated double-glazed window

I next opened up the holes by drilling once again but with a larger bit, the pilot holes ensuring the bit did not ‘wander’.

Fitting recuperated double-glazed window

When I had finished drilling, I tried the window in place to ensure the fit was good.

fitting hinges for recuperated double-glazed window

Once done, I could remove it and insert the hinges. The hinges had an M6 thread and I have found with exotic hard woods that by running the matching tap into the holes it makes it much easier to screw the hinges in.

What was then required was to lift the new window onto the hinge counterparts in the window frame, again some adjustment was necessary to ensure exact alignment with each hinge. This can be the most time-consuming part of the operation as it may require the screwing in or out of each hinge until the precise alignment is obtained. 

Using recuperated glass windows 

 
When the window was satisfactorily mounted. I could check that it still fitted in the frame, some slight sanding was required and that the closing mechanism also engaged with the existing holes in the frame.


Et Voilà! - a new window!

replacing a recuperated double-glazed window

Now if you'd like to, sit back and watch the film:


Thanks for dropping by and please feel free to share this article, comment, ask questions and if you'd like to be assured of getting the next post, then sign up to follow this blog.

All the best, Andy

© Andy Colley 2014