Showing posts with label composting. Show all posts

DIY dry toilet system for 8 Euros or $11 - Part 2 The Cabin

It's been about two and a half years since we set up our dry toilet system in the garden and it was only the other day when I was looking through the Green Lever archive that I realised we had not written a post about the cabin and the seats. These will be long posts because there is a lot to share, so without further delay here is the first, the design, construction and assembly of the cabin (pictured below).


Introduction


We've long been talking about building our own Eco-house. Much of the work we've done in restoring the 300 year old Longère in which we now live, has been experimental in trying out more environmentally-friendly techniques and using ecological materials. Our Eco-house is to be completely off-the-grid including being autonomous with our own water supply. This being the case, reducing water consumption is essential and the biggest consumer of our water is the flush toilet. We also decided to have an extra liquids only toilet in the house and so, except for offering the choice to visitors, our flush toilet became totally redundant. In Setting up a dry toilet, which we wrote back in July 2012, we posted our water bills, showing how our  consumption and thus costs, dropped by two thirds once we stopped flushing. The extra added bonus, apart from feeling a lot less wasteful, is that we can now grow beautiful flowers in what was once some very poor soil!

Design criteria for the whole system


We decided that the toilet would be located in the garden because it would be easier to empty the contents into the composting bin and also, as we spend most of our time in the garden or workshops, muddy boots would not be a problem. Thus, we needed a cabin to house the toilet, a seat and a composting bin. I also wanted a design that could be made in and transported from the workshop. Wherever the intended siting, it is always better to have something which can be fabricated inside in comfort, rather than outside in the rain. It also makes for a practical design if you want to use this system for somewhere such as; your allotment, social garden, a field or even set up a business making them for others.


The seat 
For ease of composting we decided to separate liquid and solid waste at source, hence a dual seat arrangement seemed to fit the bill. Beneath each seat would be bucket. The solid waste would be covered with sawdust after each visit and emptied into the composting bin when full. The contents of the liquid bucket would be diluted with rain water to be distributed around plants in the garden.
N.B. this latter has recently been updated in order to accommodate people who live in extreme climates and the post which covers this update can be found here: Composting urine using a straw bale
 
 
The cabin
Tall enough to stand up in, the cabin had to be wide enough to accommodate the dual seat, with enough 'leg-room' for comfort. It needed to offer privacy and protection from the elements and had to be easily transportable from the workshop to its site in the garden.


The composting bin 
For this we decided to use the same successful design that I came up with some time ago for garden/vegetable waste i.e. horizontal sliding wall planks that allow for ease of access and very easy to transport for assembly on site. For its design and construction see my post: Untreated Pallet Wood Compost Bin


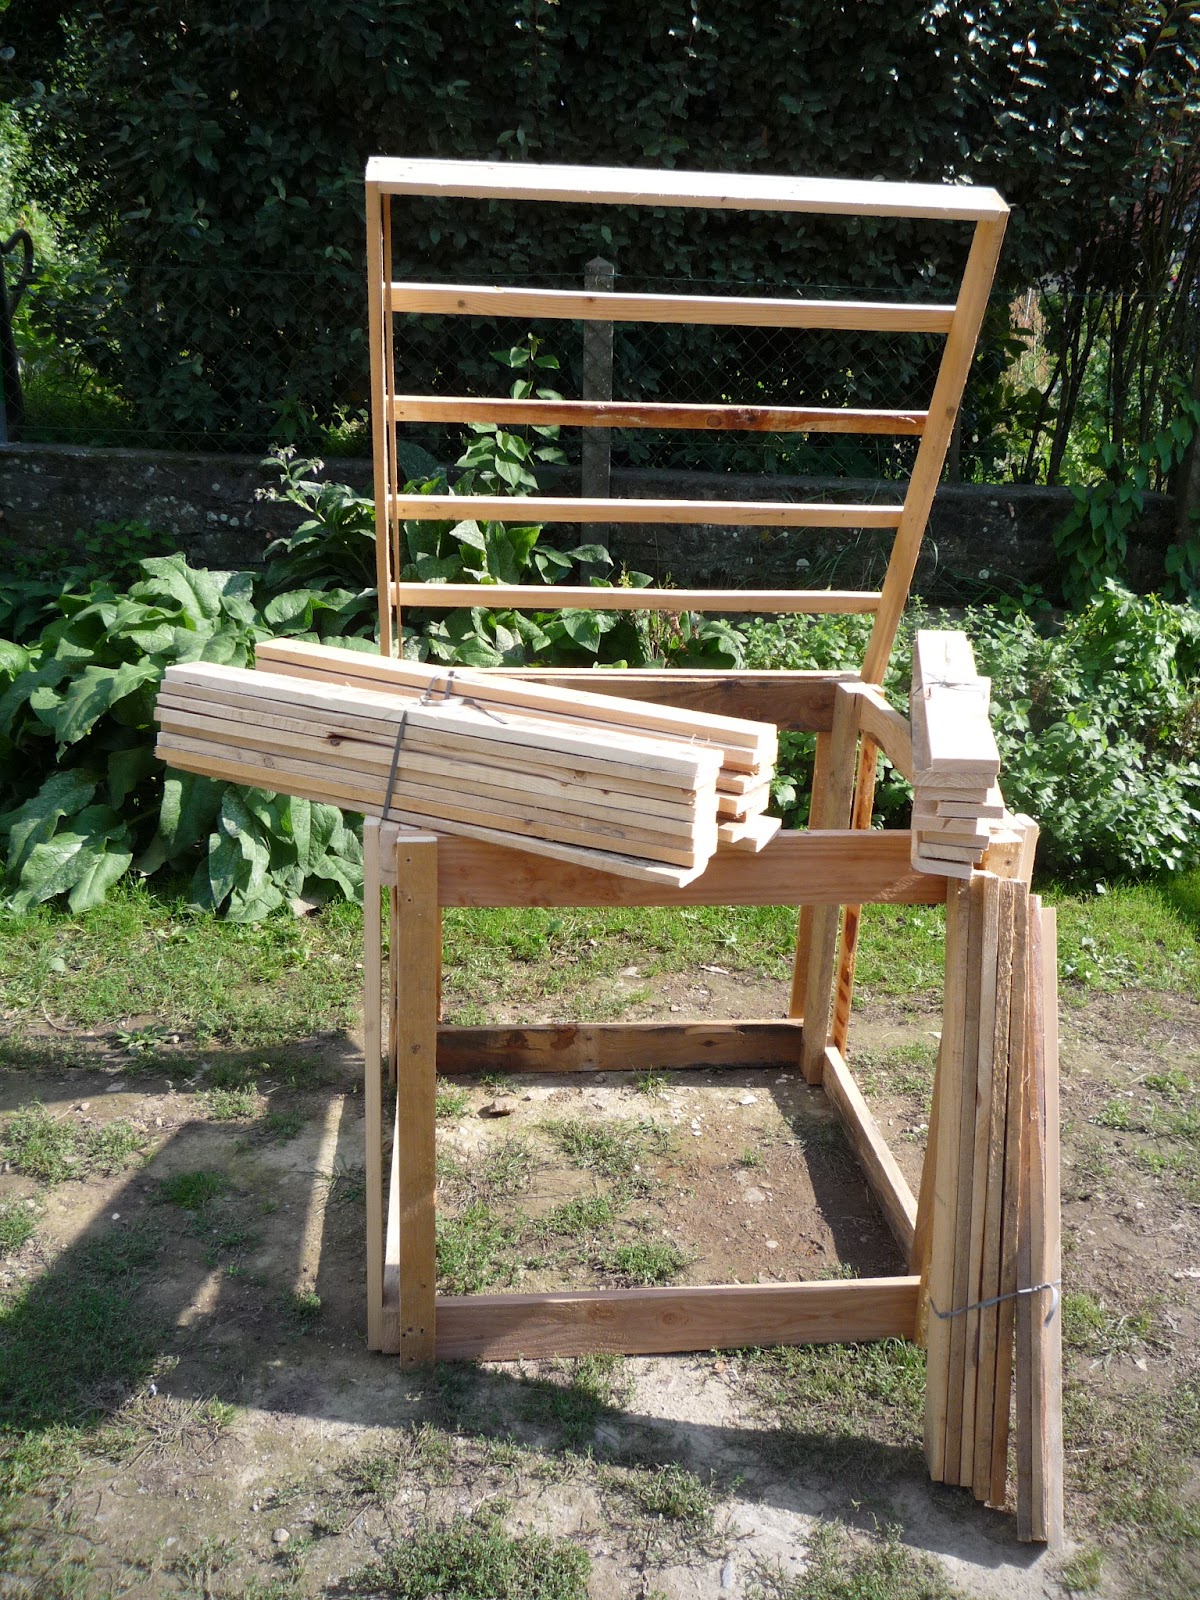
Fabrication of the Cabin


I decided the cabin would comprise a modified pallet base that would be placed on a stone chipping foundation. Corner posts would be fitted to which the framing for the two side walls and rear wall would be secured. The walls for these would be vertical pallet planks slid between the frame wood (very much like the compost bin). On the front elevation would be a pre-assembled panel and a door. Cross-bracing connecting the diagonally opposite corner posts at the top would stiffen the structure and the whole would be covered with a pitched roof .

On one of my regular pallet-collection runs I obtained a non-standard sized pallet 100cm x 120cm this was perfect for the cabin base, the 100cm width was enough to fit the double seat. The first step was to fill in the gaps between the existing pallet planks with planks of the same thickness so as to make an even floor.


Turning the pallet over I then attached planking around the edge of the pallet such that about 2cm of wood protruded all the way around the pallet perimeter. 


Each corner post was made by screwing together two 210cm long pallet planks so they formed an 'L'-shape which would fit against the two outward-facing sides of the pallet's corner blocks. These posts rested on the 2cm protruding wood and were screwed to the pallet blocks. Thus all of the vertical weight of the posts, additional wall framing and roof structure, was supported by the protruding wood attached to the underside of the pallet. The screws merely stopped them from moving around. 


I cut planking and fitted it around the pallet base so as to prevent any openings that a small hen or pigeon would find 'interesting' once the cabin was erected in the garden. This planking furnished the edge upon which the wall planks would rest. 


Planks were cut to length and screwed to the outside faces so as to connect horizontally the corner posts. Six planks were required for each side wall and the rear wall, They would form the retaining rails when the wall planks were slid into place.


The vertical position of the retaining rails were; near to the 'floor', at the top of the corner posts and an intermediate rail at a height such that a standard 120cm pallet plank would be about half way up the width of the middle plank when it (the 120cm plank) was standing on the edge of the 'hen/pigeon preventer' plank. The next three retaining rails were screwed to the inner faces of the corner posts at the same vertical heights.

In addition, diagonal braces were screwed to the inside of the corner posts to stiffen the structure further. A horizontal brace in the form of an 'X' was screwed to the top of the corner posts. This skeleton structure became very rigid with the addition of the 'X' brace.


For the front elevation I made a narrow panel the full height of the cabin from three 190cm long pallet planks. The door was made to fit the space left between this panel and the corner post.

The roof on the first design of cabin was a simple rectangular frame, larger than the footprint of the cabin, to which were nailed broad laths. A heavy-duty tarpaulin was secured to the outside of the frame.

The corner posts on one side elevation were reduced in height by about 25mm so that the roof had a pitch when it was put into place,

Subsequent cabins have had a double-pitched roof requiring the construction of two triangular panels which fit onto the top of the front and rear elevation. Two rectangular panels again with laths nailed to them are attached to the sloping faces and again a heavy duty tarpaulin fitted.


Assembly of the cabin.


Once erected in the workshop and everything checked for squareness the cabin was dismantled for moving into the garden. The frames for the sidewalls were left attached to the corner posts, the position of each plank for the rear wall frame was marked with its' location prior to unscrewing from the corner posts. Hence, there were two frames for the side walls each frame had two corner posts.

The whole cabin could then be moved outside to the prepared foundation of small stone chippings tamped down so as to feel firm underfoot. Obviously, I checked this to be not only flat but also level. 

Portable toilet anyone? Loading up at a Garden Open Day in Normandie

As long as the position for each component is clearly marked, assembly is a breeze, I know this as we have shown this homemade system at several exhibitions in the Region. On one memorable occasion, we displayed the whole system at two exhibitions in two towns in two days!

So now, if you'd like to, sit back and watch the film.


Thanks for dropping by and please feel free to share this article, comment, ask questions and if you'd like to be assured of getting the next post, then sign up to follow this blog.

All the best, Andy

© Andy Colley 2014


Pallet wood compost bin an integral part of our dry toilet system. Let's Talk Rot


Dry toilet system from recuperated untreated pallet wood

 Dry Toilet System - Part of the Organic Garden Landscape


The Specification


The first stage in the dry toilet system is the construction of the compost bin, the specification for which is as follows:
Provide a wooden container to hold compostable material, protected from the weather and secure enough to prevent the ingress of vermin.
Easily erected 'on-site' with  minimum tools.
Access for emptying of the compost should be via the sidewall(s) of the bin.
Capacity should be adequate for at least 18months to two years compostable material.


The Design


To this end I opted for a completed bin size of 800mm x 800mm x  800mm.
All the wood used was recuperated from pallets. 
The unique design feature of this bin is that the walls comprise mainly of 'loose' planking which can easily be slid into (or out of) position.


The Fabrication


Four support posts (approximately 30mm x 80mm ) were cut to 800mm length. To make the front and rear walls, 800mm long planks were screwed to the top and bottom of each pair of posts thus producing a square frame. 


These planks have to be 3mm or so THICKER than the rest of the planks selected for the walls. On top of these planks and in line with the support posts were screwed two more 800mm planks (I call these 'corner post planks'). 


The front and rear walls were joined by four planks (once again the thicker wood) screwed to the top and bottom of the outside faces of the support posts. The top planks in this case were 100mm longer (900mm) than the lower planks and the additional 100mm projected from the rear of the now cubic frame so as to provide hinge points for the lid.


Finally, four more 'corner post' planks were screwed on top of the upper and lower side planks. As with the front and rear walls these were in line with the support posts.


The lid was a U-shaped frame made from pallet planks such that the frame fitted over the front and two sidewalls of the bin.  


30mm x 15mm laths were nailed to the top edge of the frame to support the waterproof covering (in our case it was roofing felt). prior to attaching the covering the frame was positioned on the bin and the hinge holes were drilled through the frame and through the overhang at the rear of the frame. 


Two 6mm x 70mm long coach bolts were used as the hinge pivots.


The waterproof material was cut and attached to the lid frame. I like to 'trap' the material with thin laths of wood which are screwed to the frame. 


Sufficient pallet planks were cut to 800mm length to make the walls. To fit in position each plank was slid in the gap between the corner post and the corner post plank. It was not necessary to fit the planks to the full height of the wall to but leave a gap at the top of about 10-20mm.

The bin was then dismantled, merely leaving the front and rear wall frames intact, so as to transport all the components to the desired location in the garden. 


Reassembly was reasonably rapid as all the screw holes were now pre-drilled.


Once the wall planks were slid into place composting could begin!

Obviously, to empty the bin of the compost, the wall planks are slid to one side and access is easily obtained. In addition it is possible to empty the contents from any side Thus if you wish to place another bin next to the first then its proximity will not affect the emptying operation of either bin.


Now sit back and watch the film:


Thanks for dropping by and please feel free to share this article, comment, ask questions and if you'd like to be assured of getting the next post, then sign up to follow this blog. Part Two - The cabin can be found here

All the best, Andy

© Andy Colley 2014

Setting up a Dry Toilet - Stop flushing the Planet's Precious Resources and Your Money down the Sewers. Introduction


Preamble: A Few Facts and Figures 


(in French but bills are bills in any language!)


Before
&
After


 and in financial terms too.....


What is interesting about the above bill is that the actual water used has gone from 45 cubic metres to 13 cubic metres, so the water consumed now costs us over two thirds less than before. The main cost is the standing charge, which is now equivalent to nearly double the price of the water we consume! Even more of a reason, in our new place, to get a borehole dug. A good gauge to tell you when you should be off the grid and consequently off mains water, is when your consumption costs are less than the standing charges or line rental.


Three Great Reasons to Sort out Your Own Manure


Two years ago due to a change in car-parking, we ended up entering our usual visit to the Salon Ille et Bio - Guichen Organic Fair, via the front entrance, Community Hall rather than our usual way through the Community Organic Garden. For the first time we noticed a whiteboard, where visitors could express themselves with some sort of observation or thought for the day. The visitor in front of us took up the marker pen and wrote "Flush toilets are an abomination - they should be banned". Travelling home, an hour's drive, gave us plenty of time to think over and discuss this amongst other great things we had seen at the Fair.

Time was in the essence because an EEC Directive meant that our village was now to be put on mains sewage. The result would mean that like it or not in the following years instead of grey water eventually filtering back into the land, which was fine by us, we use no chemical products whatsoever, all our water would end up in the Sewage Treatment Plant. For the past few years we had had a waterfilled recycled wine bag in the cistern to cut down the volume of water at each flush this but this now seemed insignificant. The water, the urine and the solid mater, were all a useful by-product of us eating and drinking organic food, we decided the time was ripe for us to take control of our own valuable resource. We needed to break away from an insane system, which pours chemicals and energy into water to get it to potable standard only to flush it down the sewers. If we needed a further incentive, then saving money completed the deal. When we got back home we started to draw up plans.
 
My system costs under 10Euros/Dollars, I started with the compost bin, which can also of course be used as the model for a standard compost bin for your garden and household waste. The recommended time for the humanure to be  ready for use is two years but already after three months you will find it has started to rot down. The bin is made of untreated, recycled pallet wood and the only other item you will need to make this work is the sawdust. Trust me it does not smell!. In the following articles I will show you how I set up our dry toilet, the woodwork involved and my system of minimal metal fixings which allows for movement of the planking and minimum costs. There are also updates and an alternative composting system for very cold climates:-

Pallet Wood Compost Bin and Dry Toilet Project Part 1

I opted for a completed bin size of 800mm x 800mm x  800mm, the wood used was recuperated from pallets.The unique design feature... read more


DIY Dry Toilet System for  8 Euros $11. Part 2 The Cabin

A practical design if you want to use this design for somewhere such as; your allotment, social garden, a field or even set up a business making them for others.... read more

DIY Dry Toilet System for  8 Euros $11. Part 3 The Seats


The toilet seat is for the ‘two bucket’ system. One side is for collecting liquid and the other is for solids...read more

DIY Dry Toilet System Part 3 The Seats continued

Continuing the above project with fitting out the interior...read more

Composting Urine Using a Straw Bale. Dry toilets for all climates.

A great way to process dry toilet liquid for around 6 Euros or 5 Dollars worth of materials... read more


Humanure - Two Years of Living with our Dry Toilet

Humanure is like death and taxes it's something we all know about but as the elephant in the room, are most loath to mention it...read more


Thanks for dropping by and please feel free to share this article, comment, ask questions and if you'd like to be assured of getting the next post, then sign up to follow this blog.

All the best, Andy

© Andy Colley 2014