The cardboard box version of the fuelless cooker as described in my post a few days ago is fine as a 'quick fix' or an emergency back-up. In this post I'll share how to make a more robust model which you can keep to hand in the kitchen or, as we show in the film, to take in a car to provide hot, nourishing food on a journey. There are two ways you can use a fuelless cooker, firstly you can use it to cook a whole meal, this was the way it was used in previous centuries both for men and women working in the fields and long distance travellers and how we used it in the film. Secondly you can use it in your kitchen, to save energy when cooking a stew or similar dish, which requires slow cooking. We actually did this too with our cassoulet when we returned home in the evening, taking it from the box, where it was still quite warm and transferring it to our wood cooker. I have to tell you that after several years of making and eating this dish it was the best we had ever eaten! Furthermore we had saved on four hours of fuel.
Design and Materials
Our wooden box sits next to the telephone and is robust enough to act as a comfortable low seat. It was made using pallet wood and 10mm (3/8") thick pine cladding. This latter was left over from when I made the hen house last year. The insulation was 45mm (1¾") thick organic hemp and vegetable fibre, purchased in a 1250mm x 600mm (4' x 2') sheet for about $5.00.
I based the design of the box around our largest saucepan and for ease of loading when hot, the lower portion of the box was not much higher than the two handles on the side of the pan (as seen above). The box lid was deep enough to fit over the portion of the pan standing above the box rim.
Both the base and the lid were made in the same way, that is the vertical sections that made up the inner and outer walls were stapled to an upper and lower square frame, the width of the frame was the thickness of the insulation.
I arrived at the box dimensions from the size of the saucepan. This size would be the minimum internal dimension of the box. To arrive at the outside wall height for the box base I had to add the thickness of the box bottom, the insulation and the thickness of the platform wood. I always tend to regularly check the measurements especially prior to cutting the wall material - better to be safe than sorry!
I had originally thought of making the frames like picture frames, with mitred corners but decided against it for two reasons, one is I'm pretty crap at achieving consistently accurate cuts, especially at 45° and secondly and more importantly I didn't believe that sort of joint would be strong enough to cope with the load from a pan full of hot stew!
Construction
Select the pallet wood for the frames, cut to width (that of the insulation thickness) plane it smooth and cut to length.
Four frames are needed (2 for the base and 2 for the lid). To ensure they are all exactly the same size assembled them in a jig. I made this by screwing three straight pieces of wood in a 'U' shape to a piece of chipboard. The size of the U being the size of the frame and the corners at right angles.
Position the two vertical legs of the 'U' against the sides of the jig and check that they touch the bottom jig edge, apply wood glue (PVA) at the corners and put the third, horizontal part of the 'U' along the corresponding jig edge. Ensure that all 3 pieces are pushed firmly against their guides and staple or nail where they overlap. Turn the, now joined three wood pieces around in the jig so that the fourth, open side of the 'U' is sitting against the bottom jig edge. Once again glue the corners and position the fourth piece of the frame on top and staple or nail.
The reason I used a 'U' shaped jig and not a complete square is that it is much easier to remove the frame by sliding it out rather than trying to lift it.
Repeat for the other three frames and then stack all four frames and clamp at each corner and leave to dry.
The bottom face of the box has pallet wood planks nailed to the frame to form a solid support.
Turn the base over and cut and fit two extra pieces of wood to the frame. This is to furnish a vertical face to which the box walls can be attached.
The saucepan is to sit on an insulated platform made to fit into the square recess created in the previous stage. The platform is about 20mm smaller than this recess to account for the wall thickness and is deep enough to fit a square of the 45mm thick insulation beneath it. Being removable it can be taken out and cleaned if there is any spillage.
Now comes the clever bit, I already know the height I need for the box base so I measure the internal wall height and include the height of the insulated base. Cut the 10mm cladding to this length.
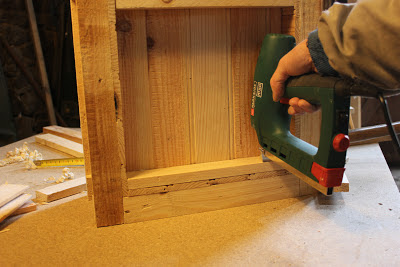
Use panel pins to attach the walls to the base. Ensure a good fit at the corners.
The base now looks like this.
Prior to fitting the top frame to the base, attach two additional wooden pieces, so as to make a flat surface to the frames upper face.
The box now looks like this. The outside walls can be cut to length and the insulation cut to size for the walls and the insulated platform.
The insulation should be a good, close fit to ensure maximum efficiency.
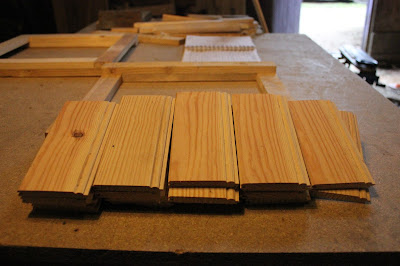
Attach the outer cladding. I tend to use the stapler because it's less tedious but panel pins are fine.
Cut two carrying handles and fix to the box, screwed through the walls into the upper frame.
The insulated platform can then be dropped into the completed base.
The construction of the lid is similar to that of the base except that the top outer cover of the lid is put on last. I found that this makes it easier to attach the inside walls to the frames.
First, cut the interior walls to length, which is the height of the pan and lid projecting above the box base plus the insulation thickness and the thickness of the cladding covering the insulation.
Fix the interior walls to the lower frame........
............and the upper.
To make the space for the insulation at the top of the lid cut two 45mm wide pieces of wood to the internal dimension of the lid and wedge them in place at the top of the lid, with a few millimetres protruding above the uppermost face.
Cut cladding to fit to these two pieces and attach. The cladding must not overlap the edges.
Tap it flush to the upper face of the frame..........
..........and attach to frame.
Cut insulation for walls and
top, cut cladding and attach.
Cut and attach two handles, securing them, as before, by screwing them to the upper frame.
To ensure a snug fit of lid to base, cut four pieces of fruit crate wood (5mm pine), to fit around the inside of the lid perimeter and chamfer one edge of each piece.
Staple, or nail these pieces to the inside wall of the lid, chamfer facing out and protruding about 10mm. This acts as a guide to align the lid to the base and produces a more effective seal to prevent heat escaping.
And there it is all ready for the next power outage, energy price hike or picnic.
Bon appétit! Now if you'd like to sit back and watch the film:
If you would like a cheap and cheerful project, which is great fun to make and use, then take a look at my cardboard box fuelless cooker design
Thanks for dropping by and please feel free to share this article, comment, ask questions and if you'd like to be assured of getting the next post, then sign up to follow this blog.
All the best, Andy
© Andy Colley 2014


