Showing posts with label smallholding. Show all posts

DIY Pallet Wood Hen House Chicken Coop Part 2 - Dismantling and Foundations.

Be it ever so humble - There's no place like home!

It may be small and compact but a couple of these pallet wood hen houses will be all we'll need in the way of temporary living and sleeping accommodation, when we finally get that couple of hectares in the back of beyond (Brittany or Italy). Like most of what we have done here over the past twelve years, this too will be both a learning experience and an experiment in greener living. I noticed a recent post on a friend's facebook in which a councillor, who is blocking a small, sustainable homesteading development in the UK, ironically described her reasons as: "Nobody would subject themselves to that way of life. You might as well be in prison". Read the whole illuminating story here: http://www.lowimpact.org/blog/2012/Sep/smallholding_is_like_prison.htm 
All we can think of is how much more freedom, intellectual, spiritual and physical energy we have gained by changing our own lives. A small laboratory with no windows or perpetually putting Sue's life in risk out driving between eight schools on treacherously fast roads, really was  incarceration for both of us.


Leaving the dear old home


But whose home? The old hen house actually started life as the quail run. Later Sue raised quails under bantams, who got the chicks so good at foraging they outgrew living in runs and could thrive and do great work in the greenhouses.


It's also weathered some incredible storms and conditions and still kept everyone cosy.


So this last breakfast must be taken with mixed feelings by all concerned!


Dismantling


When taking anything apart, we're always aware that even after years of use there may be items of metal fixings, woodwork or waterproofing that can still serve in another capacity. So it can be quite a lengthy process.


These doors, which formed part of the roof, were themselves recuperated from a joinery firm, a good supplier of recycled materials. In the end we had too many and didn't need them for the main house renovation but now they have been released from service they will be put to good use elsewhere.


Actually, the doors are reused sooner than expected. Recuperating as many screws and wood as possible makes for a slow dismantling rather than a speedy demolition. The job is going to carry over to the next day, so the doors serve as a temporary roof to get the chickens back inside. They will not be spending the night here but it gives them an assembly point for us to ferry them across to the outbuildings.


Next morning, it's an early start and on with the job. Another beautiful Summer's day in the offing.


The Foundations


The foundations on the old house will be recycled for the new but fewer than half of the concrete blocks will be used due to the design., I'm ever trying to use less and less of non-ecological material. If I hadn't already had these blocks, I would have used a foundation of broken stone, retained by a pallet wood perimeter, as used in the dry toilet construction.


The soil under the blocks provides a layer of excellent compost, which we ferry down to the greenhouses. Via the recycled pallet wood wheelbarrow, of course!

As usual, I get a lot of help from the hens sorting through the soil before I load it into the wheelbarrow. They are fantastic at scooping up all the woodlice. This is Apricot, one of the new twelve Cochin chicks hatched in April. If you want to see them in action: Our Homestead/Smallholding


After pegging out the footprint of the Hen House, we can now start laying the foundation blocks, ensuring they remain level as the job progresses. Once this is done, the rest should be a piece of cake!


...and talking of cake, why not sit back now and enjoy the video and see what will be coming in the next post, which can be found here


Thanks for dropping by and please feel free to share this article, comment, ask questions and if you'd like to be assured of getting the next post, then sign up to follow this blog.

All the best, Andy

© Andy Colley 2014

Renovating a tiny house continued - Learning from the Longère. Sourcing and using ecological materials.

Good for you, good for the planet and good for generations to come. There is an increasing body of evidence, if you needed it over the dictates of common-sense, linking toxic materials used in homes and working environments with disease and allergy.


Tiny House - Upgrading from Garden Retreat to Home from Home.


Preamble: Why bother using ecological materials?


You may be eating organic food, exercising, managing your weight and stress levels but you can still, in effect, be being poisoned in your own home. It's a strange sensation and one that is perhaps difficult to quantify but when you walk into a house that has been built or renovated with ecological materials you have an instant feeling of being in a healthy environment. In sourcing building materials we have always gone by a simple rule of thumb, firstly, we always read the packaging, research the ingredients and furthermore if the product sports a hazard warning, we don't usually want either to work with it or use it in our own home. 

One of the problems or rather for us the joys of working with ecological materials is that they 'respond' to changes in climate so on a warm, dry day you may have to work faster or mix less. By its very nature an organic plant material will not have uniform properties, so in each batch you mix you may need to factor in more or less water or leave the mix longer before use. These are the reasons why working with ecological materials is so much more interesting and challenging but for some this would seem like, well, bother. This is potentially one of the reasons why until recently there were so few professional builders willing to use ecological materials. One of the most recent and innovative steps has been the invention of the hemp motar mix 'spray machine' for the use of ecological building materials in commercial buildings and on industrial estates. Years down the line when the building is finally dismantled it is composted. How about that as an alternative to kilometres of twisted metal, mountains of glass wool and tons of concrete all ending up in landfill!

Consulting the 'genius of the place'


After buying our home, which was a typical Celtic Longère/Longhouse, Sue was lucky enough to find an excellent book on vernacular architecture, which explored the function of every feature in the house. What we tried to do was to keep as many of these as possible from the 'built in' wall cupboards to the remaining original thatch-supporting roof carpentry. The materials we chose to renovate would have been the same ones originally used, those readily available, repurposed oak beams, lime, sand, clay and organic matter such as straw, linen and hemp. The roof insulation was the one place where we compromised, as at the time we could not get any ecological materials at all and opted for the least harmful polystyrene. Now thankfully there is a choice of roof insulation and as we have used the wonderful hemp fibre panels in reupholstery we would go on to use them in the roof.

Profiting from the lessons already learnt from working on the Main House


After re-roofing, the logical progression was to think about what to do with the interior. We had already started to work with lime mortars in pointing the main house walls and wanted to go on to use an ecological material to cover the walls. Many people who renovate vernacular houses leave the stone walls uncovered but there are several reasons we did not wish to do this. The most important one being that historically the walls were never meant to be of bare stone. The quality of stones used is neither aesthetically pleasing nor by its very nature, thermally efficient without an insulating covering. Our first idea was to look at what we had available with which to cover the walls, which was a whole loft full of straw. In the main house, in what was to be the Kitchen we covered the walls with a 5cm layer of lime mixed with the straw which we chopped by modifying a redundant electric lawn-mower and collecting the 'cuttings' in an attached black plastic dustbin bag! The first year we only had time to cover the North wall of the kitchen before the onset of Winter but we really noticed the difference in heat retention.


The first job was to remove the old plaster and lime wash. Old farm buildings traditionally were painted with a new coat every year. At one point the people who owned this property had actually painted around all the furniture so the walls were decorated with the surreal ghostly outlines of an armoire, grandfather clock and a box bed!


In the 18th Century this farmhouse would not have warranted glazed windows. Architecture tells us a social history of the period, one window per room on the South side, positioned so as to give maximum light to the fireplace to aid cooking. The doorways were wide because every night the farm animals were walked through the farmer's living quarters to get to theirs. Longhouses comprise alternate human/animal housing and the heat of the animals and the straw above meant warmth and insulation. We decided to open up a window in the North wall for a view of the garden and better natural light. We also replaced the lintels over the back doors, where needed. We mostly used oak but here, where a suitable oak beam could not be fitted in the available space, resorted to making our own from reinforced concrete.


The stone over the fireplace was attractive so we left it visible. Over the lime/straw we  added a layer of lime and chopped hemp. We covered a small, unobtrusive patch and then leaving it to dry, ascertained that the golden colour of the straw was drawn through into the lime giving the Kitchen a very pleasing warm glow. We insulated the floor with the linen/lime mix.


In the Sitting room, lately home to a couple of sheep, we used linen and lime on the walls. We  found it easier to work with than hemp. The colour was not pleasing, all the straw had gone so the linen went on to bare stone and came out a dismal grey on testing. Sue added a dark red earth pigment to each mix, which was just enough to lift the colour.


We also had an interesting problem with the flooring in that the house not only slopes from East to West but also from North to South. If we had tried to make the floor level it would have come up to the sill on the front window!


We solved the problem by making a split level floor, which was actually quite logical as it enhanced the enfilade through from the kitchen to the back door and out into the garden.


Sourcing green materials without going into the red.


There were two major problems when we started out to source ecological materials, twelve years ago they were very difficult to find and then when we could obtain them they were prohibitively expensive. Undaunted we decided to improvise and we could do this because we were renovating a farm building not a chateau. Firstly we used up all the straw we had available and then we started to work with hemp. The hemp which was sold in bags in various grades through specialist shops was very expensive but the same material sold as mulch and was certified organic for use in horticulture was a fraction of the price. Normally hemp for wall covering is applied to walls firstly as a coarse layer, then sometimes there is a medium grade layer and then lastly a fine finishing coat. Our grade of hemp was equivalent to the coarse layer but because of the nature of our house it was eminently suitable. We bought it directly from an agricultural supplier through the help of a friend who is an organic market gardener and had used it both as a mulch and as a building material in his newbuild eco home. 

Later he suggested we tried linen as he had found this easier to work with. Both Sue and I had found hemp very tiring because making it bond with the wall needed quite an initial force to make it adhere before it cures. The linen absorbed water better than the hemp and was much easier to work. We sourced our chopped linen from that sold in bales for horse boxes


Some thoughts on lime


Lime is one of the rare materials we use which does carry a hazard warning. It does however come in two different forms and we always choose to use the more benign one. Aerated lime, or quick lime is a very tricky substance to use. Traditionally it is the one used in mortars because it has a much longer drying time than hydrated lime, thus it can be kept in a useable state, covered with wet sacking for a period of several days. This is particularly useful if you are working on a large expanse of wall, where you are looking for uniformity in finish. Personally we would rather have a few uneven sections in the wall and work with something much less dangerous. Actually unless you are working on a very hot and windy day you can easily finish a whole wall and match up sections before any of it dries out. Unless you are working on a church wall that is going to be used for frescos, I'd steer clear of it. I taught on a day course at an Eco Centre a couple of years ago, where they used aerated lime, We provided all the protective clothing and I gave an introductory talk on the materials and still someone managed to get some lime in their eye. Luckily we had made provision for bottles of water to be available everywhere on site so a quick eyebath was at hand.


When working on a wall to prepare it for receiving a coat of insulation, you should first point your wall with a lime and sand mortar. For pointing the ratio of lime to sand is as follows: six parts sand to one part lime. First rake out all loose and spalled mortar and then dampen down the wall. Pointing not only strengthens the wall bond but it also has two other functions one being financial, it enables the bonding of the insulation viz hemp/lime and also it cuts down the amount of this latter you have to use. Lime and sand are relatively cheap particularly if you buy them at a traditional builders' merchant, where you load them directly into your car and pay by weight.


Know your sands


There are different grades of sand and at a traditional builders' merchant you will find them labelled as such. If you are not sure what you should be using, just ask. For the finer jobs such as the lime mortars we used as a finish around the windows in the sitting room you will need a fine washed 'blond' sand but for stone work and pointing the cheaper unwashed sharp sands will suffice. Do not be tempted to collect your own sand from beaches or river beds, for one thing in most countries this is illegal and secondly it is one of the major causes of mundic or concrete cancer, in that impurities in the sand begin to oxidise in the dry mortar over time causing a weakening of the structure.

Up next 'Tackling the Tiny House'

In this garden the people are fenced in, otherwise you get a chicken on your dinner plate, literally!


Thanks for dropping by and please feel free to share this article, comment and/or ask questions.

Cheers,
Andy

Home-made low cost pallet wood greenhouse, viable, safe, year-round food production.

The following article goes into detail on materials, uses, modifications and upgrades to suit your needs, budget and woodworking experience. 

The 5 Euro/Dollar/Pound Greenhouse...


its organic produce..

Home-made low cost pallet wood greenhouse - $5
Good companions, Courgettes and Tagetes erecta

its tenants..


We use our organic poultry to weed a control pests in the greenhouses. Depending on the scale of the job we alternate between the chickens and the quail. Above, Vladamir, Diavolo and Co., pretending not to notice that the quail have a big heap of compost to play in. At the end of the courgette season the quail move in to clean up the woodlice from the rotted compost so that we can plant the next lot of vegetables.

and its next lot of produce..
  

In line with tradition, we planted our garlic on the shortest day and harvested it on the longest.


Build a greenhouse to suit your budget

Anybody with the ability to assemble flat pack furniture can get to grips with this design in its cheapest form.

Home-made low cost old window glass and pallet wood greenhouse


We designed three models of greenhouse, which were made on the same principles of construction. The most expensive (left), made from recycled glass windows and pallet wood, will cost more if you purchase the leaded light and wooden posts. Our cost was 50 Euros but I estimate it would cost around 100 Euros if you needed to purchase the above items.

With water shortages, uncertain weather and continuing fallout from Fukushima, you can provide your family with year round vegetables, fruit, herbs and flowers. The 7 Euro Greenhouse incorporates an old glass window and has purchased polythene on all sides. In Summer, its gable ends and door panels can be swapped for wire mesh, to allow for  ventilation.Home-made low cost old window glass pallet wood greenhouse


The glass greenhouse has walls made of recuperated windows, is more robust and remains warmer longer, once heated by the sun. With the addition of fleece covers, we can grow more tender vegetables throughout the year. In addition we can grow medicinals and tropicals. For more information see link at end of this article.
Start small - work up!


Our first design - the 5 Euro Greenhouse is still up and running after 4 years and a couple of mini hurricanes as well as deep snow.

Home-made low cost pallet wood greenhouse $5 greenhouse

Materials - Pallets

For the sides and door: I used 6 of the pallet wood shelving frames (illustrated below), which if you can't get you can make from 5 standard pallets (120cm x 80cm), this would mean 3 sections each side rather than 2 in my design.
For the roof trusses: 4 standard pallets
For the bottom rails to allow raised beds: 1.5 standard pallets
To make the jig for the trusses: 2 standard pallets

Home-made low cost pallet wood greenhouse - pallets


The greenhouse walls were made using the vertical uprights taken from a set of pallet shelving which originally had served to hold pot plants. They were 80cm wide and 170cm tall. I was able to recuperate some wire fencing from our local dump and cut it to fit these rectangular frames. I have since recuperated several of these shelving systems so they seem to be a standard throw-away pallet item. If however, you can not get hold of them just use your stock of pallet wood to create something similar. I used four of these frames (shown opposite) for the side walls and two more for the door and end wall.


Mass Production: Home-made pallet jig

Home-made low cost pallet wood greenhouseThe first thing I always consider, in a design of this sort is to create a way of getting a uniformity of construction. This is not just for aesthetics but because it makes everything easier when you come to fit the project together! To this end I set up a simple jig - out of pallet wood of course!

Make a cheap but robust pallet wood greenhouse

To fabricate the 5 identical roof trusses needed for this design, I constructed a jig from two pallets joined together to create a work-surface of roughly 2.40m in length. Wooden blocks were then screwed at key positions so as to act as 'stops' when the truss components were laid onto the pallet.

Something perhaps not so obvious in the Youtube film, is that my design incorporates a vertical piece of wood at the lower end of each truss. This enables each truss to be fitted to the inside face of the greenhouse wall. Once screwed into place, this addition prevents the tendency for the truss to move outwards. I felt that this vertical piece of wood, pushing against the inside face of the greenhouse, would be more secure than just relying on a screw or nail to hold the truss in place.

Once attached to the opposite walls the trusses were joined to each other at the side of the roof apex using pallet wood planks. This way of linking each truss means the whole roof structure becomes stiffer and provides a 'smooth' surface for the polythene roofing at the apex. See photo above.


To upgrade the 5 Euro Greenhouse, purchase some horticultural grade 200 micron polythene for around 30 Euros.

Pallet wood greenhouse design and construction

Our Little Helpers

And now if you'd like to, sit back and watch the film:


RELATED PROJECTS with live links to our detailed articles


If you're feeling more ambitious and have a good local source of discarded glass windows, then you might think of building our Glass Window Greenhouse 


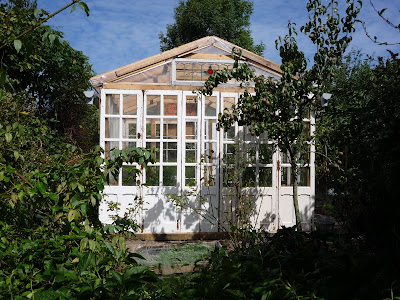
Our Pallet Wood Chicken Coop - Hen House design and construction. This is also a prototype Tiny House and can be made in kit form and transported easily to where needed.


Our Dry Toilet System Save water, save money and make yourself some great compost!

Wheelbarrow rebuild using pallet wood

I made a pallet wood replacement for our wheelbarrow and it served its purpose for about 8-10 years. During the last few months of life, I could see the inherent mechanical weaknesses in my version and so as the frame and wheel were still in running order, I determined...read more


All the best and thanks for dropping by. Please feel free to share this article, comment and/or ask for further information.

Cheers, Andy
© Andy Colley 2014

Including more greenhouse projects)


Why The Green Lever? Leaving Town for a simpler, better life in the Country.

“Give me a lever long enough…and I will move the World” was Archimedes’ claim. He was writing of mechanics but in this blog I will be pursuing the reality of moving or changing two worlds, our own individual milieu and by knock-on effect, that of the Planet. Perhaps the thing people fear the most is change but we have arrived at a point of mass consumerism that makes change inevitable and so we either take control now and direct it, or just let it happen and become a victim. Green Lever is also a play on words because it explains what we did with our own lives. Simply put, we left and became more green. Yes, we were low consumers of the Earth’s resources and we were eating organic food but we never felt we were doing enough to help the Planet. Green Lever too because it was a new adventure and we didn’t quite know how well it would work out.


Going backwards to go forwards and not being ground down


The overall effect of  taking control of your consumption of resources such as energy water and food and then going even further and starting to provide them for yourself, is to free yourself from the consequences of inevitable incremental or catastrophic collapse. That was our thinking. Some friends and relatives put it another way, they believed we were mad, leaving jobs, wasting the years we spent in education to go playing peasants in a derelict 18th Century longère in a country, where only one of us spoke the language.

Over the past ten years, living in a rural backwater with a 1000 m² of garden we have had both opportunity and time to experiment with reducing our consumption. Concurrently we have expanded our knowledge of and practical skills in, smallholding, growing and storing food, alternative medicines, animal husbandry and ecological building materials and techniques. I have used my knowledge of engineering in a practical way and have gained another language. In fact neither of us have ever used our education and skills to such an extent as in these past few years.


Living off the Land – Waste not want not


The best 1000 Euros we ever spent!
The amazing paradox of present-day society is, that without the legacy of decades of mass consumption, we recyclers, upcyclers and back-to-the-land homesteaders  would not have the basic materials with which we work. Wherever you live you will have access to resources, these may be local, natural building materials such as earth, clay, stone and straw or man-made detritus such as tyres, pallets, discarded windows and doors. When thinking about energy, you should look at the best use of available resources. We chose to heat with wood originally because there was plenty of wood available. Over the years we stopped buying wood, firstly because we didn’t like killing trees and secondly because we found a major source of free wood, which was either being burned in bonfires or going into landfill. Over these next weeks I want to visit and film some of my friends homes where they have chosen different forms of energy production, these will include, heat exchangers, solar, wind, vegetable oil generators, geothermal and woodchip.

However, let’s start with just one of  them. We heat our home and water with it, cook with it and use it to build a myriad of things for our home and garden.

The Ubiquitous Pallet 


A film showing how to dismantle a pallet to maximize the recuperation of usable construction wood. Including the tools you will need and three separate pallet 'scenarios'.  

Thanks for dropping by and feel free to share this article, comment, ask questions and relate your own experiences. Hope to see you next time.

Cheers, Andy

© Andy Colley 2014