Showing posts with label Tiny House. Show all posts

Hen House Chicken Coop Mark 2 - using pallet wood instead of store-bought tongue & groove.

We are building a new hen house to replace the oldest one of the three in our garden.  The design will be the same as that illustrated in my four blog posts. The first is: http://thegreenlever.blogspot.fr/2012/09/pallet-wood-hen-house-and-prototype-for.html and with two accompanying Youtube films. The old one (below) was built from recycled floorboards, thrown out by a neighbour as storm-damage in the 1999 hurricane but they did a great job as a wall covering. 


It has a Japanese theme and the roof was built by my father-in-law from bamboo he split down, again something a neighbour was throwing out. It was also partly a green roof as the bamboo was ideal for rooting sedums. Now however, after taking a pounding in the heavy snows and rain last year, the floor has finally given up on us and the flock has expanded and needs new accommodation.

This is the last of our hen houses to be updated and it has a charm, which has only increased with age but now is the moment and I have a new source of untreated wooden pallets. These pallets are non-standard in size and the planks are much thinner than normal. I have decided to use them in the construction of the roof panels instead of purchasing tongue & groove panelling.
In the past, I have used tongue & groove as a roof covering, prior to the final waterproof layer because it makes a homogeneous, light-weight roof panel. I also had several packs of this material left-over from renovating the house and had been given a few damaged packs by a DIY shop, who deemed them unsaleable. I would now need to purchase them and am not happy with the present quality on offer. Although I can use lower grade tongue & groove in such jobs, recently I have seen much more damage or missing tongues within the packs. Although by careful planning and cutting, I can lessen the waste, I still resent the additional time and moreover paying for what often ends up as expensive kindling! So, with my new source of lighter pallet planks and still needing to minimise the weight of the completed roof panel, this is what I came up with.


The problem and its solution 


The design of this hen house was conceived to cover the various needs, both of ourselves, hence the height and pitch of the roof and those of the flock. This in particular because of the inordinate amount of rain here in Normandie throughout the Winter months and conversely the high temperatures in Summer, due to the fact of it being situated within a walled garden.


In this job, where the wooden roof panel is to be protected from the rain, the lateral tongue & groove is no longer critical. However, what is necessary, is that the end of the individual planks should be joined. This because the pallet wood planking is not long enough for the panel and needs to be joined, so as to give the roof enough overhang. This latter was factored into the design, both to protect the walls from rain, to give our hens enough dry space for Winter dust bathing and to provide shade and keep the interior cool for laying or brooding in Summer.


Butt joints vs tongue & groove


Tongue & groove has both lateral and end jointing and as we explained above, only this latter is important in the construction of our roof panel. A butt joint is an old fashioned and simple way of joining two planks either end-to-end or side-by-side, using nails, screws, wooden pegs, biscuits or metal fasteners to reinforce the joint.


Making the butt joint work 


Conventionally the butt joint is used when two pieces of wood are to be joined at a right angle rather than here, where the joint is end to end. In our butt joint a 50mm nail is driven half-way into the end of the shorter plank, the nail head is then cut off with wire cutters and the plank is positioned and hammered into place, thus joining the two planks with a single nail (see below). The shorter plank can then be nailed to the cross-brace.


Cross-braces


As you can see in the above photo the panel design incorporates an additional cross brace to support the extra planks. You may therefore, be wondering why we didn't just use additional cross-braces to support each of the plank ends, instead of the nailed butt joints. The answer is, that a single cross-brace would not suffice, we would have been nailing too close to the end of each plank. In addition, each cross-brace is secured with two screws to the side of the panel and an additional cross brace would be wasting wood and more importantly screws, which are considerably more expensive than the nails used in the butt joints. The nail usage would also have doubled.

Below is a photo of the finished panel.


Now if you'd like to, sit back and watch the film:


Thanks for dropping by and please feel free to share this article, comment, ask questions and if you'd like to be assured of getting the next post, then sign up to follow this blog.

All the best, Andy

© Andy Colley 2014


Renovating the Tiny House - A detailed look at sourcing and using lime/hemp & lime/linen mortars for wall-covering and insulation.


The Cream of the Crop: Lovely Linen and Lime.

Understanding the material


Like all organic matter linen and hemp react to their environment so although there are some indications as to the quantities used to make up plaster, there are no actual hard and fast rules. When making up your mortar consideration should be made for several factors.

The moisture content in the air on the day you are using the plaster.

The air temperature both inside and outside.

The movement of air both inside and out.

The particular batch of linen/hemp (I have never found two the same).

The grade of linen/hemp used. (see paragraph below)

The grade and type of lime used. (see below)

If you think this sounds complicated, it isn't. It is something you get to know instinctively the more you work with natural materials. If I can make an analogy, I might think of eggs. Most people, who don't keep hens, think that eggs come in uniform sizes, they don't, they just get graded that way commercially but on average a standard egg weighs 65g. Therefore in our case when we use our bantam eggs we weigh the eggs.

As a general rule these are the measurements we use:

For Hemp:
6kg lime
1kg hemp
6 litres water
Coverage about 1m² at approx 2cm thickness on an uneven wall

For Linen:
6kg lime
1kg linen
6 litres water
Coverage between 0.7 - 0.75m² at approx 1.5cm thickness on an uneven wall


Grades of fibres - Going green without getting into the Red


You can find ecological wall covering, which is not designated as such, sold at a much cheaper price than that at a special Ecological Builders' Merchants. For example, the hemp we used was actually organic hemp mulch, sold mainly for organic horticulture. The linen was  baled and sold for using in horse boxes. Our house is an old vernacular 18th Century farm and these grades of finish suit it. If you are thinking about your budget and using these materials in a less rural setting, then you can still economise by just using the finer grade of these materials as a final coat. As with most things it pays to shop around. The price of ecological materials is ever changing, as more farmers grow organic linen and hemp and as more people buy and use it, the price will begin to drop. In France the production of hemp is limited at the moment and thus the price, other than in mulch-grade, remains stable. However, when you consider that this is a one-off wall covering and that it is doing the double job of decoration and insulation and that above all it is giving you a healthy environment in which to live, it is worth paying the additional costs. Additionally if you are living in an old house, it overcomes the problem of what to do with the walls, which are often uneven and constructed of misshapen and unattractive stone. Furthermore, these stones were never meant to be seen but were yearly covered with a new coat of limewash. Houses like ours only ever had one window, a permanently lit fire, little through-draft and were kept even warmer by the sheer volume of life, both animal and human living within.

Lime


As already stated this house is of a vernacular rural nature and the 'roughcast' wall surface suits it admirably. We were doubly happy about this as neither of us wanted to use quicklime, which is dangerous stuff and makes a beautiful plaster, which keeps elastic for days and allows for the realisation of a smooth finish between batches. It was also used in the fine plastering on Church and manor walls to provide a surface ready for decoration with fresco. There is no reason not to use it if you feel confident about it but just be aware that it burns. 

There are various grades of hydraulic lime which are available and we found NHL 3.5 both easily obtainable and fit for purpose.


Preparation


In order to maximize the coverage of expensive linen or hemp lime mixture,  a lot can be saved by preparing the wall. This is also necessary for making a good solid surface for the plaster to adhere to. We firstly removed any loose materials between the stones of the Tiny House walls. This farm was built with clay and stone, clay being a very good natural insulation and mortar. We then pointed the joints with a lime mortar, made up of: six of sand to one of lime. We also rebuilt any of the areas which had lost stone, again thinking of costs, every bit helps!

Mixing and using the hemp or linen and lime plaster


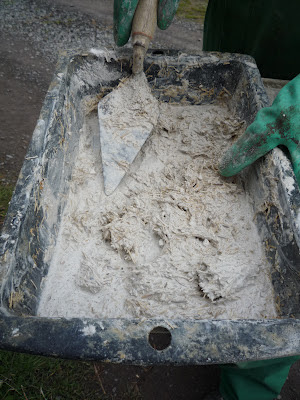
Once we got used to the mix we used a cement mixer to make large batches of plaster but at the beginning we just mixed in a trug. Mix ingredients in this order: measured quantity of lime, slowly add water, mix in hemp or linen, leave to repose for approximately 10 minutes.


Just a small amount I mixed as a demonstration. Note the use of thick protective gloves, as even hydrated lime is extremely aggressive to the skin. When removing lime from the bag, we also wore eye protection and a mask. We also wore the same protective gear when using the cement mixer as it is easy to inhale lime dust at the beginning of the mix and get splashed by lime before the hemp or linen are thoroughly mixed together.


         Hard hats useful for low doors!      


For getting the plaster onto the wall you can simply use your hands, or alternatively a plasterer's float. To create the natural textured finish and also to retain the maximum insulation do not over-work the medium once it is on the wall. Hemp plaster needs more initial pressure to get it to adhere to the wall and is therefore much harder to work with than linen.


The walls of the Tiny House finished. Any lines where the different days' work shows can be smoothed down with a wire brush. For this reason never work to a straight edge because otherwise it is much more difficult to hide the join. This is the one drawback of using hydrated lime, it has a much quicker drying time than aerated and on a hot day can be drying as you work!


A final word about straw


When we first started thinking about renovating the main house we decided to start with what we had available. This was a large volume of straw, which had been left by the previous owner. Using a converted electric lawnmower, we cut the straw into short lengths and mixed it into the lime. Even after the first application on the North interior wall of the Kitchen (all we could get done before the onset of that Winter), we noticed an enormous difference in the warmth of the room. So if you can get hold of a suitable chopping machine and have access to organic straw, which at the moment here in France is 1 Euro a bale, it could make a very cheap and viable alternative to the above.


These plasters should not just be considered as purely wall insulation. Sue laid these floor tiles onto a 'raft' of linen and lime mixture, which in turn, we had laid on top of a gravel foundation. This insulated the floor and stopped the problem we had had with condensation forming on the previous concrete floor in the Summer. 


Renovation on our house is on-going, here is a film on some recent lime mortar pointing I did up on the workshop. Up being the operative word...


Thanks for dropping by and if you enjoyed this article, please fell free to share it and do ask if you need any further information.


All the best,
Andy

© Andy Colley 2013

Renovating a tiny house continued - Learning from the Longère. Sourcing and using ecological materials.

Good for you, good for the planet and good for generations to come. There is an increasing body of evidence, if you needed it over the dictates of common-sense, linking toxic materials used in homes and working environments with disease and allergy.


Tiny House - Upgrading from Garden Retreat to Home from Home.


Preamble: Why bother using ecological materials?


You may be eating organic food, exercising, managing your weight and stress levels but you can still, in effect, be being poisoned in your own home. It's a strange sensation and one that is perhaps difficult to quantify but when you walk into a house that has been built or renovated with ecological materials you have an instant feeling of being in a healthy environment. In sourcing building materials we have always gone by a simple rule of thumb, firstly, we always read the packaging, research the ingredients and furthermore if the product sports a hazard warning, we don't usually want either to work with it or use it in our own home. 

One of the problems or rather for us the joys of working with ecological materials is that they 'respond' to changes in climate so on a warm, dry day you may have to work faster or mix less. By its very nature an organic plant material will not have uniform properties, so in each batch you mix you may need to factor in more or less water or leave the mix longer before use. These are the reasons why working with ecological materials is so much more interesting and challenging but for some this would seem like, well, bother. This is potentially one of the reasons why until recently there were so few professional builders willing to use ecological materials. One of the most recent and innovative steps has been the invention of the hemp motar mix 'spray machine' for the use of ecological building materials in commercial buildings and on industrial estates. Years down the line when the building is finally dismantled it is composted. How about that as an alternative to kilometres of twisted metal, mountains of glass wool and tons of concrete all ending up in landfill!

Consulting the 'genius of the place'


After buying our home, which was a typical Celtic Longère/Longhouse, Sue was lucky enough to find an excellent book on vernacular architecture, which explored the function of every feature in the house. What we tried to do was to keep as many of these as possible from the 'built in' wall cupboards to the remaining original thatch-supporting roof carpentry. The materials we chose to renovate would have been the same ones originally used, those readily available, repurposed oak beams, lime, sand, clay and organic matter such as straw, linen and hemp. The roof insulation was the one place where we compromised, as at the time we could not get any ecological materials at all and opted for the least harmful polystyrene. Now thankfully there is a choice of roof insulation and as we have used the wonderful hemp fibre panels in reupholstery we would go on to use them in the roof.

Profiting from the lessons already learnt from working on the Main House


After re-roofing, the logical progression was to think about what to do with the interior. We had already started to work with lime mortars in pointing the main house walls and wanted to go on to use an ecological material to cover the walls. Many people who renovate vernacular houses leave the stone walls uncovered but there are several reasons we did not wish to do this. The most important one being that historically the walls were never meant to be of bare stone. The quality of stones used is neither aesthetically pleasing nor by its very nature, thermally efficient without an insulating covering. Our first idea was to look at what we had available with which to cover the walls, which was a whole loft full of straw. In the main house, in what was to be the Kitchen we covered the walls with a 5cm layer of lime mixed with the straw which we chopped by modifying a redundant electric lawn-mower and collecting the 'cuttings' in an attached black plastic dustbin bag! The first year we only had time to cover the North wall of the kitchen before the onset of Winter but we really noticed the difference in heat retention.


The first job was to remove the old plaster and lime wash. Old farm buildings traditionally were painted with a new coat every year. At one point the people who owned this property had actually painted around all the furniture so the walls were decorated with the surreal ghostly outlines of an armoire, grandfather clock and a box bed!


In the 18th Century this farmhouse would not have warranted glazed windows. Architecture tells us a social history of the period, one window per room on the South side, positioned so as to give maximum light to the fireplace to aid cooking. The doorways were wide because every night the farm animals were walked through the farmer's living quarters to get to theirs. Longhouses comprise alternate human/animal housing and the heat of the animals and the straw above meant warmth and insulation. We decided to open up a window in the North wall for a view of the garden and better natural light. We also replaced the lintels over the back doors, where needed. We mostly used oak but here, where a suitable oak beam could not be fitted in the available space, resorted to making our own from reinforced concrete.


The stone over the fireplace was attractive so we left it visible. Over the lime/straw we  added a layer of lime and chopped hemp. We covered a small, unobtrusive patch and then leaving it to dry, ascertained that the golden colour of the straw was drawn through into the lime giving the Kitchen a very pleasing warm glow. We insulated the floor with the linen/lime mix.


In the Sitting room, lately home to a couple of sheep, we used linen and lime on the walls. We  found it easier to work with than hemp. The colour was not pleasing, all the straw had gone so the linen went on to bare stone and came out a dismal grey on testing. Sue added a dark red earth pigment to each mix, which was just enough to lift the colour.


We also had an interesting problem with the flooring in that the house not only slopes from East to West but also from North to South. If we had tried to make the floor level it would have come up to the sill on the front window!


We solved the problem by making a split level floor, which was actually quite logical as it enhanced the enfilade through from the kitchen to the back door and out into the garden.


Sourcing green materials without going into the red.


There were two major problems when we started out to source ecological materials, twelve years ago they were very difficult to find and then when we could obtain them they were prohibitively expensive. Undaunted we decided to improvise and we could do this because we were renovating a farm building not a chateau. Firstly we used up all the straw we had available and then we started to work with hemp. The hemp which was sold in bags in various grades through specialist shops was very expensive but the same material sold as mulch and was certified organic for use in horticulture was a fraction of the price. Normally hemp for wall covering is applied to walls firstly as a coarse layer, then sometimes there is a medium grade layer and then lastly a fine finishing coat. Our grade of hemp was equivalent to the coarse layer but because of the nature of our house it was eminently suitable. We bought it directly from an agricultural supplier through the help of a friend who is an organic market gardener and had used it both as a mulch and as a building material in his newbuild eco home. 

Later he suggested we tried linen as he had found this easier to work with. Both Sue and I had found hemp very tiring because making it bond with the wall needed quite an initial force to make it adhere before it cures. The linen absorbed water better than the hemp and was much easier to work. We sourced our chopped linen from that sold in bales for horse boxes


Some thoughts on lime


Lime is one of the rare materials we use which does carry a hazard warning. It does however come in two different forms and we always choose to use the more benign one. Aerated lime, or quick lime is a very tricky substance to use. Traditionally it is the one used in mortars because it has a much longer drying time than hydrated lime, thus it can be kept in a useable state, covered with wet sacking for a period of several days. This is particularly useful if you are working on a large expanse of wall, where you are looking for uniformity in finish. Personally we would rather have a few uneven sections in the wall and work with something much less dangerous. Actually unless you are working on a very hot and windy day you can easily finish a whole wall and match up sections before any of it dries out. Unless you are working on a church wall that is going to be used for frescos, I'd steer clear of it. I taught on a day course at an Eco Centre a couple of years ago, where they used aerated lime, We provided all the protective clothing and I gave an introductory talk on the materials and still someone managed to get some lime in their eye. Luckily we had made provision for bottles of water to be available everywhere on site so a quick eyebath was at hand.


When working on a wall to prepare it for receiving a coat of insulation, you should first point your wall with a lime and sand mortar. For pointing the ratio of lime to sand is as follows: six parts sand to one part lime. First rake out all loose and spalled mortar and then dampen down the wall. Pointing not only strengthens the wall bond but it also has two other functions one being financial, it enables the bonding of the insulation viz hemp/lime and also it cuts down the amount of this latter you have to use. Lime and sand are relatively cheap particularly if you buy them at a traditional builders' merchant, where you load them directly into your car and pay by weight.


Know your sands


There are different grades of sand and at a traditional builders' merchant you will find them labelled as such. If you are not sure what you should be using, just ask. For the finer jobs such as the lime mortars we used as a finish around the windows in the sitting room you will need a fine washed 'blond' sand but for stone work and pointing the cheaper unwashed sharp sands will suffice. Do not be tempted to collect your own sand from beaches or river beds, for one thing in most countries this is illegal and secondly it is one of the major causes of mundic or concrete cancer, in that impurities in the sand begin to oxidise in the dry mortar over time causing a weakening of the structure.

Up next 'Tackling the Tiny House'

In this garden the people are fenced in, otherwise you get a chicken on your dinner plate, literally!


Thanks for dropping by and please feel free to share this article, comment and/or ask questions.

Cheers,
Andy

Re-roofing a tiny house including carpentry.

Would you be brave enough to buy this? No? Neither would we.


This is the start of a project which was forced upon us some ten years ago. We blame Napoléon. The Napoléonic Code for inheritance still holds good in France. It provides for all issue and states that you may not disinherit any of your children. It also means that your property must be divided equally. This can lead to some interesting anomalies and some pieces of property division are so obscure they are sometimes missed altogether when the sale takes place. We once met a guy, who only found out he actually owned the village football field when the greensmen turned up at his door to ask if they could start mowing the pitch for the beginning of the season.

Preamble - the background history to this project


Like many old vernacular Celtic houses ours is very hard to date. The oldest coin scratched up by the Chicks in the garden is a Louis XIII double tournois from 1615.

Looking back in time from the Bake House
We were told by a local historian, that the ancient granite arched doorway would have been taken from a nearby abbey during the Revolution. Under the Bourbon Restoration priests were sent out to scour the countryside looking for bits of looted architecture but this being at the back in an enclosed garden was no doubt overlooked.


Our little extra item, which doesn't even show on all of the deeds was a lovely little derelict 'Bake House' at the bottom of our garden. In the 19th Century our property was converted from a longère (longhouse farm) to a Post House. At that time it comprised, stables, offices, sleeping accommodation for postilions and a huge kitchen with a fireplace large enough to roast an ox. Our neighbours' house, comprised the Post House restaurant and two other neighbours' homes completed the complex, with the Blacksmith's House and the Forge. The land around which all this accommodation sits came with the property we bought and the little Bread Oven (below), which sadly had swapped its clay oven for some dilapidated rabbit hutches, was included in the deal.


This is what the little house looked like when we first bought the property. Very much in need of a little tender loving care. The house on the left was the Blacksmith's home later converted to two stories and in the distance the large red roof designates the much enlarged ancient Forge.


We had removed the long dead electrical installations and the rabbit sheds. Our time in France, in the ten years before we came to live here permanently, was always spent in and on the garden. Like most of the French, 75% of our day was lived outside, whatever the weather.


The tempest of 1999 destroyed a great raft of tiles, which came off like falling dominoes, all the way along the front of the main house.


These red, post-War terracotta horrors, which had replaced the original thatch, were now themselves recherché. The only emergency option we could come up with, was to remove and swap with those from the Bake House and totally re-tile the latter with new.

With the roof off and all the timbers removed the Bake House had almost disappeared. Now we had to put it back together again and in the right order.

Being in a hurricane was something neither of us had experienced before. The sound was incredible, like the TGV express train permanently rushing through the lane at the front of the house. Sue, having heard from her grandma that during the bombings of WWII, the whole family took shelter under the staircase, we decided it was the wisest choice. When the next morning we found part of the chimney had actually fallen through the roof into the stables we were really glad we did. I think it was not a good idea at the height of the storm, as we were drinking cocoa to the sound of the tiles being ripped from the roof, for me to suggest that we sung the theme tune to 'Titanic'. Actually we had neither of us seen the film but when Sue asked me what I thought we should do next, I'm afraid I couldn't resist.

Renovating a tiny house - an on-going project


Our main criteria for the job was to remove and preserve as many of the tiles as possible and to be really circumspect about the solidity of the old roof timbers. We'd always had a pretty good idea that the carpentry wasn't too brilliant but once we removed the tiles, we realised the full extent of the job. As you can see the main ridge beam was actually split along its length and was sagging. It was, in fact, being held together with a chain twisted as a Spanish windlass, this 'temporary' repair had, by witness of the rust, been effected some many year before. So we ended up starting from scratch, just with the four very solid walls you see at the start of this post. I was happy my years in engineering would give me the grounding for calculating and accomplishing the carpentry work

.....but neither of us were too pleased about the rain...


Pointing the walls with a lime mortar mix requires protective gloves for the hands but the diver's mask and snorkel are entirely optional.

Our cheerful neighbour at the back, kept leaning through the hedge to suggest we demolish the whole lot but we loved this little house and thought it deserved some tlc. That said if we had seen a property like this for sale, we would never have had the courage to touch it, which just goes to show that you never know what you're capable of until you get forced into it. There was one really positive thing going for a job like this and I think it is one reason why so many people love working on tiny houses - low roof! We held on to this thought just until we got up there. We had forgotten that the neighbours' house on the far side of the tiny house was excavated out of the bank. We just didn't look that way too often!

One thing that was slightly worrying was the weight of the new tiles. When they were delivered and had to be moved to the back of the house, Sue found she couldn't carry them in their banded-together state of 6 tiles. In fact she started out only being able to carry a couple of individual tiles at a time. This would mean the job, when we actually came to the tiling, would take longer than we hoped because of the time getting tiles up onto the roof. However day by day she gradually became more and more accustomed to carrying them until when she came to start tiling she was actually carting them up bands in tact. For my part I had to steel myself into going up onto the roof, as I had acquired vertigo from swimming underwater. However, a good ear treatment of hydrogen peroxide and a knowledge that it was raining and that nobody else was going to do the work soon got me going. This is something that the  hurricane taught us, you really have to be prepared to take on every job yourself.


The ridge purlin was lifted into place with a ladder and supported with a rope from outside. Just as we were doing this our neighbour leaned through the hedge to suggest we had cut it too short. My how we laughed!


I cut the timber for the 'A' Frame, jointed and pre-assembled it on the ground, to ensure my measurements were correct! The frame was then dismantled and assembled piece by piece in situ.


There are no conventional foundations to any of these old houses. They are built directly onto bedrock with outer and inner faces of laid stone on clay 'mortar' and between them a 30 cms infill of clay and rubble. There was quite a bit of pointing to be done and a deal of stone work before we could seat in the wall plate. We used lime mortar throughout.


Rafters going on and stone work capped off at gable ends


The oh so happy feeling when you begin to get a cover back on the roof.


Laths being nailed in place.


Fitting a layer of roofing felt provides an additional waterproof barrier - very useful for future hurricanes!


A really good buy from a discount store was this tradesman's waistcoat I wore on the roof. It had pockets for nails and loops for tools.


The first one was the easiest! They had to be bedded into mortar and I was working off a roof ladder.


Finished.


A few years on....


..and the brash red tiles have mellowed


and the view from the Bake House door has changed too.


To be continued.......

If you have enjoyed this post and found it useful, feel free to share it, comment and ask questions.

All the best from Normandie,

Andy

RELATED ARTICLES

Renovating the Tiny House 2 - Sourcing and Using Ecological Materials

You may be eating organic food, exercising, managing your weight and stress levels but you can still, in effect, be being poisoned in your own home...read more

Sourcing and Using Lime/Hemp & Lime/Linen Mortars

Like all organic matter linen and hemp react to their environment so although there are some indications as to the quantities used to make up plaster, there are no actual...read more

Using Natural Earth and Mineral Pigments in the Home and Garden 

The Alchemy of Artists' Materials - whether painting a leaf motif or a window frame, it's  so much more fun than opening a tin of paint...read more


Mixing and Using Lime Mortar

I’ve used lime mortar a lot in our present house firstly because it is obviously appropriate to a 300 year building, as it is sympathetic to the original build of stone laid on a bed of clay mortar...read more


© Andy Colley 2014