Showing posts with label Pallet wood creation. Show all posts

Simple and Elegant Hanging Wall Planter from Orange Box and Pallet Wood

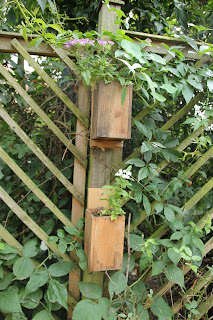
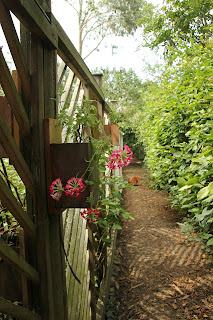
These planters are very easy to make with hand tools, look stylish, can be finished with earth pigments to suit your colour scheme and despite their delicate appearance are robust and long lasting. The boxes pictured are in their fourth year of use and have all been kept outside.

How to make a reclaimed wood hanging planter


Not only are they decorative but practical too in that they can be used to grow edible flowers, herbs and other compact food plants. They are also good at retaining water and encouraging root growth because their design allows for a substantial depth of soil.

How to make an easy and elegant reclaimed wood hanging planter


MATERIALS


The ubiquitous untreated pallet and fruit crate wood, the latter is the sort that contains oranges and we find it easily at our local organic shop but any similar scrap wood will work. 
Wood glue
Small nails or panel pins
screws

How to make an easy and elegant reclaimed wood hanging planter

How to make a easy hanging pallet wood planter from recuperated wood DIY recuperated wood hanging planters How to make pallet wood and orange box wood hanging planters


CONSTRUCTION


Start by cutting four side pieces from the box wood, you can cut the square for the base at this point or if you'd rather, wait until you have assembled the sides.

Hanging planters work in progess


Use a pallet block as a support when gluing and nailing the sides.

Hanging planters from recuperated wood
recuperated wood hanging planterMake the planter box in two halves and then join these together. The reason for this is to allow the two right angled sections to support each other for the final assembly.

Recuperated wood hanging planter how to
The base of the box can now be cut to fit and then glued and nailed.

On some of my later boxes I used a power stapler, which I found to be quicker.

The boxes can be coated with linseed oil or with a water-based acrylic varnish and we used natural earth and mineral pigments to obtain the colours. We have an article on mixing and using these pigments on this blog (link at the end of this article).

Cut a piece of pallet wood to use as the backing board for the hanger and also cut a supporting piece, from a square section of pallet wood, make it slightly narrower than the backing board for aesthetic reasons.

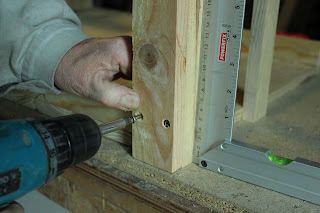
Drill holes into the backing board and screw the supporting piece in place.

Drill a hole at the top of the backing board to enable you to screw it to your chosen support.
Drill a hole at approximately a 45 degree angle into the top of the planter box, so that it can easily be screwed into the backing board.

Lay the box onto the backing board, making sure it is resting on the supporting piece. Then screw the box to the backing board. Thus the vertical weight of the planter is held by the supporting piece.  The single screw in the box is just there to hold it in place on the backing board.

Fill with soil and plants.

Screw the planter to the support and then sit back and watch it grow!

And now sit back and watch the film.


How to make a recuperated wood hanging planter

Please feel free to share this article, comment and/or ask for further information.

Until next time!

Cheers, Andy


© Andy Colley 2017


RELATED ARTICLES 

Using Natural Earth and Mineral Pigments in the Home and Garden 

The Alchemy of Artists' Materials - whether painting a leaf motif or a window frame, it's  so much more fun than opening a tin of paint...read more


Pallet Wood Garden Gazebo Part 1 - Posts & Framework

We want to spend as much leisure time in the garden as possible. Much as we love our poultry we do draw the line with sharing our meals with them...read more

Pallet Wood Garden Gazebo Part 2 - Trellis and Door

The perimeter of the garden gazebo now being complete,  the next stage was to make it chicken proof, starting with the door...read more


Make Your Own Indoor Trellis Planter Part 1 - The Base

Many people complain that pallet wood isn't a suitable material for use in anything but rough and ready...read more
  

Make Your Own Indoor Trellis Planter Part 2 - The Trellis

The trellis back to the planter provides a structure up which climbing plants could grow and provide us with more space for growing food...read more


RETURN TO GREEN LEVER CONTENTS PAGE FOR MORE ARTICLES 

Dove table from pallet wood, ply pallet tops and recuperated tongue & groove

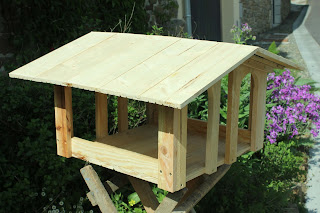
Our neighbour has a pair of collared doves nesting in her garden and their size prevents them from feeding at the existing bird table so she asked me if I could make a larger one to accommodate them. As she has an elegant mix of formal and wild gardens, with some very interesting and eclectic pieces of garden furniture and sculptures, I wanted my design to mirror both garden styles.

How to make a dove table from pallets

Temple d'amour Temple of love Malmaison
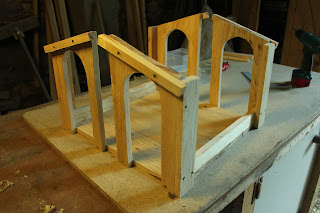
Rising to the challenge of rusticity and formality combined I, of course, chose untreated, recuperated wood and sketched a Classical design which had a shallow-pitched roof  supported by corner posts. These posts were never used as I felt a much sturdier and attractive roof support was to construct ‘walls’ attached to opposite sides of the table. The appearance of the table was significantly improved by making a Norman-arch shaped cut-out  in each of the four wall panels, a suitable motif for people and doves living in Normandy. According to Sue, this makes it a dead-ringer for the Temple D'Amour in the grounds of Malmaison, see what you think.

Fabrication


The Table Base


Dove feeding table made from pallet wood
Having selected suitable pallet planks,  four equal length pieces were cut. As. I had decided to make the base of the table by gluing together the cut planks along their longest edges I planed them to obtain smooth, flat surfaces. In addition I glued and screwed a rectangular rail along the top face of the now formed feeding table at both ends of the planks. Not only to act as an additional means of holding the planks together, this rail also was intended to form a lip to stop food being knocked off at feeding time.

The Walls


Copying roof pitch using an adjustable bevel
Once the table base was made I spent some time trying different roof pitches for the wall height I had chosen and settled on the one that ‘looked right’. Each wall panel was to be screwed to the edge of the table at the table corner and a second screw nearer the middle of the edge of the table.
 

wall supports for dove table made from pallets

To ensure that each panel would not lean out from the vertical position a length of pallet wood cut to about 30mm width was screwed along the shorter vertical wall edge,  When the walls were fixed in place this piece was screwed to the rail that was acting as the lip on the table edge.


designing an arch in pallet wood


I cut the one end of the planks to the desired roof pitch angle with the table saw and then marked and cut them to length. Each piece was marked for the cut-out of the arch.


tips on cutting shapes in pallet wood


When cutting the arch in the wall, I used a wooden straight edge to act as a guide for the jigsaw and then removed this when cutting the curved portion.


how to make arched doorways for a bird table in pallet wood


Each wall panel was made from two cut planks held together at the wall ‘top’ (the sloping edge) with a ‘rafter’ glued and screwed in place.


using pallet wood to make a dove table


As previously mentioned, I then screwed to the shorter vertical leg of the wall a piece of 30mm (1¼”) wood cut to the same length so as to form a corner.


recuperated wood bird table how to


The walls were then screwed to the table, a try square being used to ensure each panel was at 90° to the table top.


Greco Roman bird table from pallets


When the four wall panels were screwed in place, the roof could be made.


The Roof


recuperating pallets
A few days before I started this project I recuperated  a pallet with a plywood top (5ply) and I decided to use this material as the base for the roof as it would cross-brace and hence stiffen the structure. Knowing that it would be difficult to weatherproof this plywood I chose to cover it with roofing grade underfelt which in turn would be covered with tongue and groove pine coated with linseed oil.

How to make a dove table from recuperated wood

work in progress - make a dove table from pallets
For keeping the table’s contents and it’s customers dry (above Bungle the Polish bantam checks for headroom) I had decided to give the roof a large overhang of about 50mm (2”). The two pieces for the pitched roof were cut and screwed to the ‘rafters’ attached to the walls, ensuring that the edges at the apex were butted together.

waterproofing - How to make a dove table from pallets
(Image above) I made two gable-end plates on the inside face to join the walls together.


A layer of  roofing paper was stapled to the upper face of the plywood.

Make a dove table from pallets


For aesthetic reasons I then cut and stapled cut lengths of recuperated pine tongue-and-groove panelling onto the roof which was then coated with linseed oil.


How to make a dove table from pallets


Once this was dry I stapled a band of roofing paper along the apex to seal the joint.


...and now if you'd like to, sit back and watch the film...


All the best and thanks for dropping by. Please feel free to share this article, comment and/or ask for further information.

Until next time!

Cheers, Andy
© Andy Colley 2016
RETURN TO GREEN LEVER CONTENTS PAGE FOR MORE ARTICLES