Showing posts with label DIY glass greenhouse. Show all posts

Home-made, Big, Low Cost Greenhouse from Free Recuperated Glass Windows Part 3 - The Roof

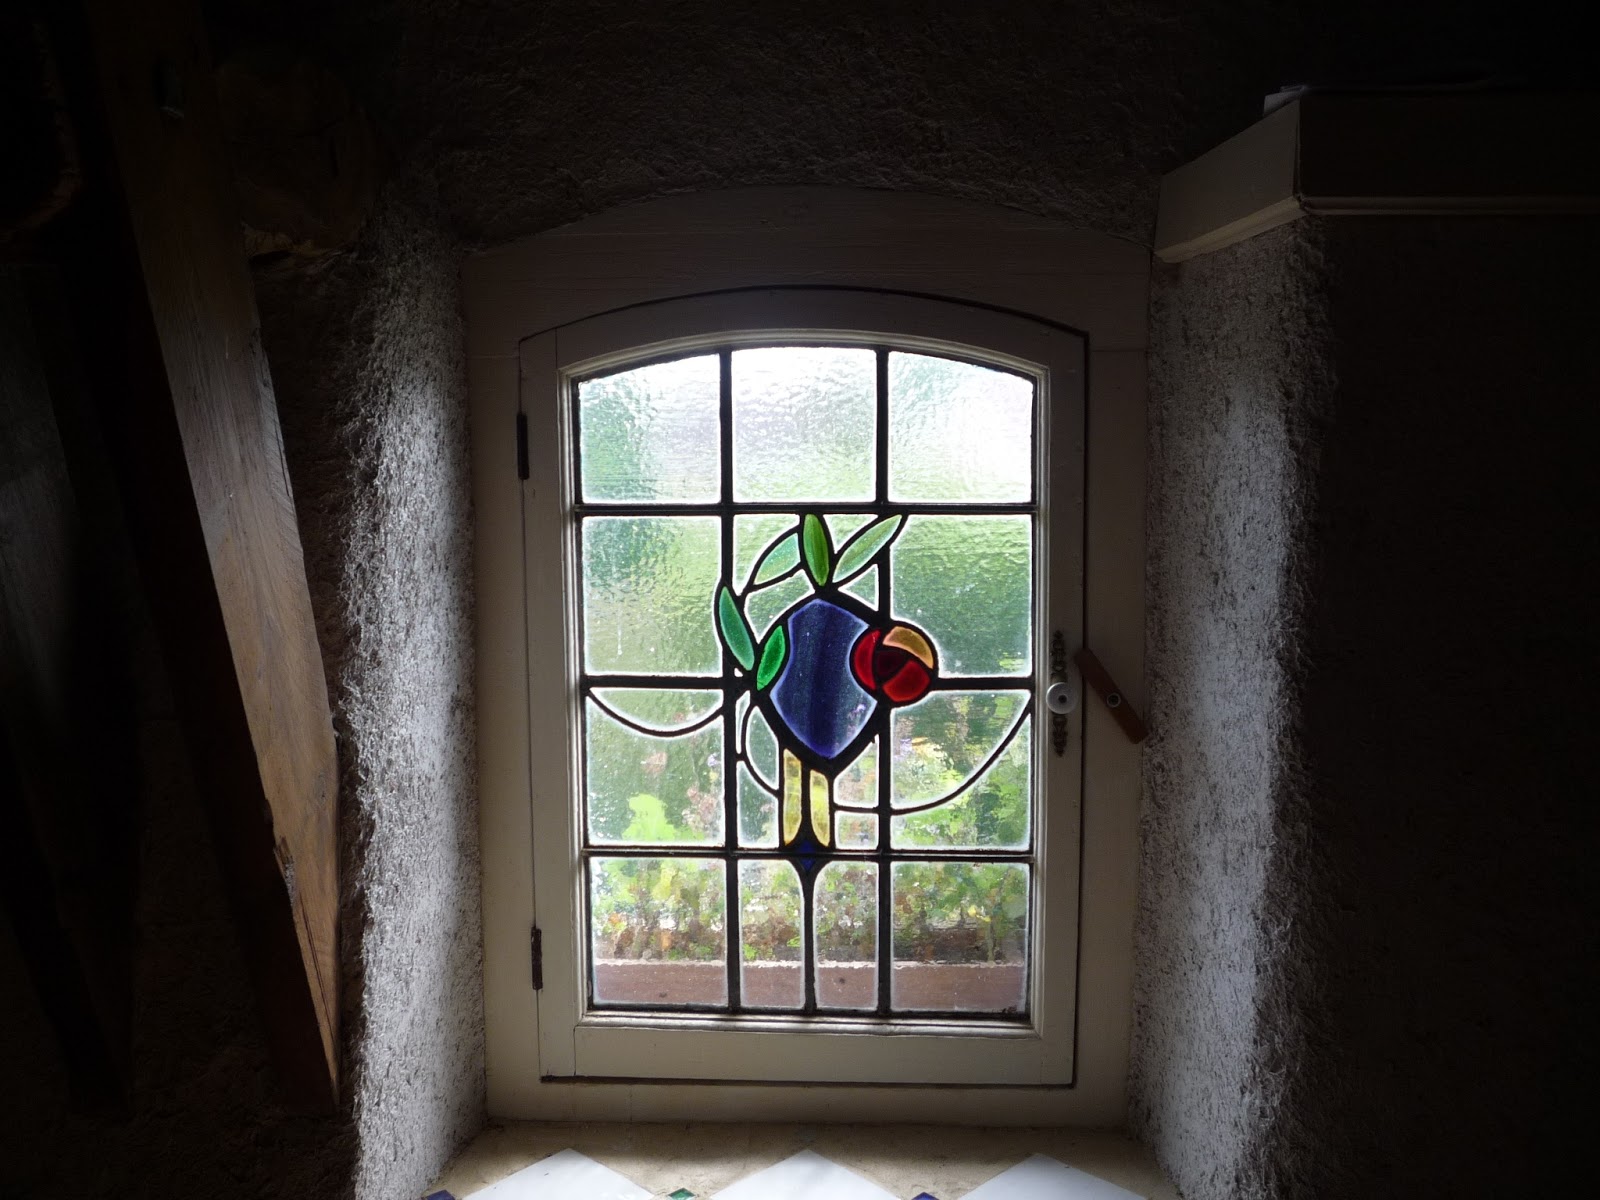
The roof can be the crowning glory of the greenhouse and for this reason we decided to include a piece of leaded light in the design. England's old industrial heartlands of the Midlands and North are ever in a state of flux, a constant cycle of demolition and rebuild. You can if you are lucky still pick up some great examples of glass work, we have used many pieces in the house and in previous houses and gardens. My sister-in-law once obtained a few hours reprieve on an old Northern tram station, huge panels of leaded lights and thick pine panelling before the breakers got to it. If you see someone about to demolish aka smash up some great building and its materials, it's always worth just asking.


How to make a greenhouse from old windows


The Roof 


Roof detail greenhouse made from old windowsThe polythene used for the roof was attached to seven equispaced roof trusses. The span of each truss was 3.3 metres so that there was an overhang of 15cm (6") on each side. The pitch of the roof was 25 degrees.

detail of roof trusses on greenhouse made from old glass windowsEach leg of the truss was 1.8m in length and at the time I built this I hadn't sufficient recuperated timber to make all of the trusses of solid timber so I decided to make the gables and centre trusses from 100mm x 40mm (4" x 1.5") timber and the other four trusses from a 'sandwich' of shorter lengths of 100mm x 25mm (4" x 1") planks, screwed and nailed together at the overlap.


As all of these trusses had to have the same angle, I made a jig to ensure that this could be easily attained. I used the exact same method when I built the 5 Euro greenhouse (photos above). Here is the link to that project.

Companion planting in a glass greenhouse made from old windows

The gable-end trusses and the central truss were bolted to the 3" square wooden posts, the other 4 trusses were screwed to the top-edge of the windows. The trusses were joined to each other with pallet planks screwed to the underside face of the truss. These planks acting as purlins stiffened the whole roof structure.

Greenhouse made from old windows in harsh climate

IMPORTANT NOTE In the subsequent two greenhouses I've built, the trusses were connected with pallet planks at the apex of the structure. I've found that this ridge purlin arrangement looks more aesthetic than that in the glass greenhouse. Also, for the glass greenhouse roof I rounded off the apex of each truss so as not to pierce the roof covering in severe loading conditions.

Using the ridge purlin arrangement the whole roof cover would be much better supported. Nevertheless, even in heavy snow conditions the roof material has never been compromised.

Old window glass greenhouse and chickens

One other important feature of this construction is that the two steel-staked  posts that were half way along the greenhouse were driven in place after the pallet walls were assembled. This was because I thought it was too difficult to obtain an exact matching point as the windows within each wall were of differing widths. I found that it was much easier to put the post in once the walls and windows were up.  I chose the nearest window to the midpoint aligning the post to the window's stile (vertical part of the frame). A thick piece of timber (approx. 50mm  2" and pictured above far right) filled the gap between the post and the stile. I knew that the posts would not be directly in line with each other but decided that the central roof truss could be attached to the opposite faces of the posts to compensate for this.

Covering the roof


The roofing material of 200micron UV-stabilised polyethylene, was held  in place with wooden laths screwed through it into the truss and window timber. Initially I was concerned about piercing the material fearing at best  a leaking roof and at worst a point of propagation for tears. Neither has happened despite several Winter's worth of gale force winds, although in fairness we have grown shelter belt hedges in the garden to reduce the effect of the wind.

Recycled glass greenhouse from old windows

Rainwater recovery from the roof is via gutters along each side of the greenhouse emptying into barrels. We have also found it beneficial for the barrels to be inclined slightly such that in the event of their overflowing the water runs towards the greenhouse.

Home-made glass greenhouse

If you have enjoyed this article and found it interesting then share it with your friends on social media or suchlike. Please also feel free to ask questions and or make comments and if you found this helpful and would like to support this site you can always Buy Me a Coffee at ko-fi.com


Cheers, Andy

© Andy Colley 2014

RELATED ARTICLES

The 5 Euro/Dollar/Pound Greenhouse

Home-made low cost greenhouse designed to use free untreated pallet wood. How to build a viable, safe, year-round food production system...read more 

Home-made, Big Cheap Glass Greenhouse from Old Windows Pt 1 - Design

The idea for the greenhouse was to have something that was both decorative and practical...read more

Home-made, Big Cheap Glass Greenhouse from Old Windows Pt 2 - Construction

Although it is a large sized greenhouse and in itself quite an imposing feature, it actually fits very well into its surrounding landscape...read more

DIY verandah-style greenhouse, sunspace, draught lobby

I love this greenhouse, it seems so right in the surrounding rural scene and it's made from an interesting eclectic mix of recuperated materials...read more

DIY verandah-style greenhouse, sunspace, draught lobby from recuperated materials.

I love this greenhouse because it seems so right in the surrounding rural scene and because it is made from such an interesting eclectic mix of recuperated materials including ships timbers, giant industrial packing cases and discarded pairs of French windows (here in France they are called 'door windows'). It also has multiple uses, providing water for the sheep and poultry from its roof, a reading room on a wet day for grandchildren, as well as the usual and expected year-round food production. 

Recuperated glass verandah-style greenhouse

I also view it as a prototype for something we want to build, which is a sun space on our own tiny house.

Verandah-style greenhouse suitable as a sunspace

Preamble


Eight years ago, when my neighbour, Bernard saw the recuperated-glass greenhouse I’d built, he wanted to follow suit and build his own. It took 7 years for him to ‘bite the bullet’ and finally fulfil his ambition. It was well worth the wait in this robust yet deceptively 'light' and 'airy' design.


Using recuperated glass windows for a greenhouse

Recuperated Materials


Before retiring, Bernard was an engineering technician and was involved in the installation of steam turbines at sites in Europe and the Middle East. He very prudently recuperated the wood from the crates used in transporting the turbines and brought it home to be stored in his shed. He also took some old ship timbers stored on his sister's farm before it was sold, these he used in the central roof support (see below).


Recuperated glass greenhouse under constructionFor the recuperated windows I took him to the joinery company from where I obtain all mine. The proprietor had already expressed his gratitude that someone (me) was taking his ‘rubbish’ and putting it to good use. Fortunately for Bernard on the day we went to see what was available, we found that the company had just completed a contract for replacing the windows in a large house. The result was that we filled Bernard’s trailer with 7 pairs of  wood-framed double-glazed French windows.

recuperated concrete curbing used as ring beam for greenhouse


Some years’ ago there was a strip of land that ran alongside Bernard’s garden owned by a retired guy who grew vegetables on it. He sold this to Bernard when he moved away and on removing the fencing that separated the plots Bernard also removed the concrete foundation for this fence. These reinforced concrete beams were moved into his lower field for ‘safe keeping’. You can see them here, put to good use.


Construction


Bernard had erected a garage-sized ‘shed’ on his land in which he stored recuperated timber. The western elevation was chosen as the rear wall for the greenhouse. The garage/shed was steel-framed and clad in corrugated steel sheet. And had a single-pitch roof sloping to the western elevation.


The concrete beams were laid directly on the ground to form a ring beam and a mild steel  angle iron was secured to it. Vertical wooden posts were secured to the garage wall from which the roof rafters could be attached and these in turn were attached to a wall plate supported by three uprights extending up from the ring beam. 
Homemade steel joist hangers 

Bernard fabricated his own joist hangers, to support the rafters, from scrap steel sheet. Additional support for the roof sheets was provided by noggins nailed between the rafters.


The windows were supported on the ring beam and were bolted to the upright face of the angle iron and to the wall plate at the top.


Recuperated doors for glass greenhouse


Provision was made for a door at each end of the greenhouse and once again suitable ones were obtained at our friendly joinery company.


The roof of the greenhouse was of clear, rigid plastic. Bernard was able to match the profile of the roof sheet to that of the metal roof cladding of the adjoining shed. Thus, by sliding the plastic sheet beneath the edge of the metal one, there was a weatherproof joint which would allow rainwater to run from the shed roof into guttering on the greenhouse roof perimeter.

rigid clear plastic roofing for recuperated glass greenhouse

Rainwater harvesting


Ex food container for rainwater harvesting from greenhouse roof

As mentioned above, a gutter was fitted to collect the rainwater run off from the combined roofs (approximately 50 m²) and this was stored in a 1m³ food grade plastic container, thus providing adequate supply of water for irrigation in the greenhouse and as a bonus providing a clean water source for the animals grazing in the field.

In conclusion


After almost 2 years use, Bernard is really pleased with the increased yield from the prolonged growing season in the greenhouse and his only regret is he did not do it sooner. The cost for the roofing was obviously the biggest expenditure in this construction, but the resulting benefits of rainwater harvesting and structural integrity have proved it was a wise investment. The sheep and chickens are happy too!

Sheep and chicken in meadow


I really like this project because it is a robust, weatherproof construction which could easily be adapted to provide a conservatory or draught lobby to a house.


It looks as if this is what we’ll be undertaking later this year in front of our tiny house in the garden. I’ll keep you posted!!

Now if you'd like to, sit back and watch the film.


Thanks for dropping by and feel free to, ask questions, comment and/or share this article. Hope to see you next time. Cheers, Andy

© Andy Colley 2014

Home-made, Big, Low Cost Glass Greenhouse from Free Recuperated Windows Part 2

The very first step in constructing the greenhouse was to decide on the size for it. We'd earmarked a vegetable plot where it was to go and as it had a hedge along one edge and a rose border on another, both of which we wanted to retain a practical size of 5m long by 3m wide was decided. This gave adequate space for access with ladders or steps during construction.


Although it is a large sized greenhouse and in itself quite an imposing feature, it actually fits very well into its surrounding landscape. Being surrounded by greenery as it is now, obviates the need for shade cloths, which in the early days were necessary to prevent the scorching of leaves in the very hot, clear days of Summer. We live near the sea and at times the light here can be very intense.


The roof covering was to be of 200 micron polythene UV stabilised (polytunnel material) and this could be purchased by the metre and was 7.5 metres wide. As the roof was to be gabled we bought a 4m length, the polythene width was more than enough to cover the greenhouse length.


For the south 3m wide end I had recuperated some French windows and these and the entrance door on the North end set the wall height of the greenhouse.

Having now decided the overall dimensions of the greenhouse the preparatory work could begin.

All of the windows I'd collected were casement windows, that is, windows that open on hinges attached to one vertical side of the frame. Most of them were paired and had a weather strip where the two windows met in the middle.


Along the bottom edge of all these windows was a weatherboard to deflect rain running off the window onto the window sill. As the casement window fits into a frame this moulding is not flush with the bottom but is attached about 10-20mm from the bottom edge.

Apropos of hinges

The hinges need to be removed as they will interfere with the fit.

Recuperating old windows to make a greenhouse

Some hinges can be removed by unscrewing but, bearing in mind that these are old windows, the screw heads will usually be sealed under several coats of paint. Nevertheless, with a little care they will usually come out. I clean the paint away from around the screw heads with a sharp awl and ensure the screw heads have all the paint removed so that the screwdriver fits tightly. If after all this effort the screws refuse to budge then you have to resort to drilling out the heads, it won't matter if the rest of the screw remains in the frame. Alternatively, you can use a hacksaw or angle grinder to remove any protruding part of the hinge and leave the remaining metal plate complete with screws in place.
.


To bring the windows' heights to that of the French windows I decided to support them on walls made from pallet wood. Now that I knew the wall lengths I could sort the windows to fit, number them and mark their position on a plan.


Before making the walls, the bottom of each window projecting beyond the weatherboard was sawn off providing a wider face to rest on the wall.

TIP: (photo above) Screw a plank of the appropriate thickness to the face of the window so as to ensure that the saw blade will cut a square face to the bottom of the window. 


The wall panels were made from pallet wood planks nailed to a rectangular frame. Each frame was again of pallet wood but I selected planks for this from more robust pallets (approx 100mm x 22mm, 4" x 1"). These planks were screwed together to form the frames and the pallet wood planks were nailed to what was to become the outside face thus forming a box.


There were seven 75mm (3") square wooden posts, each bolted to a galvanised steel stake driven into the ground (one at each corner, one midway along the longest sides and one to form the doorway). A line running from post to post marked the perimeter to which the wall panels needed to abut.


In addition, I made T (Tee) shaped stakes from 22mm thick pallet wood, which were to be driven into the ground on the inside of the greenhouse. These would provide a solid support for the wall panels.


All the above preparation meant that when we finally came to construct the greenhouse it went together as a kit.

The roof trusses too we pre-fabricated in the workshop too but for clarity I'll deal with these in a separate post
.


If you are thinking of building a glass greenhouse and would like to know of some of the extra plants, in particular tropical spices you will be able to grow, then sit back and take a look at this film:


Thanks for dropping by and please feel free to share this article, comment, ask questions and if you'd like to be assured of getting the next post, then sign up to follow this blog.


All the best, Andy

© Andy Colley 2014

Home-made, Big, Low Cost Glass Greenhouse from Free Recuperated Windows Part 1

Over the next few weeks I will be involved in several projects using recuperated glass windows and doors and I thought I'd start by taking a retrospective look at the greenhouse I designed and made 5 years ago. 

Several of you have commented on this greenhouse, which has been shown in various films and blogs. Sadly, when I designed and made it, we did not have a digital camera with which to take detailed step-by-step photographs. Therefore, I am taking this opportunity, whilst it is being restocked with Spring plantings, to take some shots of the fabric of the interior for a detailed explanation of the design and construction. This will form Part Two of this post. In the next few weeks, I will also be giving a hand to my neighbours, who are in the process of constructing a large lean-to, verandah-type greenhouse, so there will be another design, both in film and blog form to share. 


What, where and how to get supplies

Unfortunately for the good of the Planet and paradoxically fortunately for us, there seems to be an unlimited supply of virtually brand new, as well as interesting and beautiful old,  glass doors and windows. To judge by the veritable mountains outside joiners and carpenters businesses en route to landfill, many people change their windows as often as others might paint the frames. Over the years we have collected dozens of examples, including, in the UK some very pretty leaded lights. These latter turn up in architectural salvage yards or 'junk' shops, with the very best examples finding their way into auction rooms and antique shops. In a greenhouse or house these can be used to great effect. 

For a supply of general glass windows and doors though, there is nothing like your local joiner's shop or doubleglazers. I made contact with the owner of our local one, having seen a huge pile of useable material in his yard and he was delighted we wanted to take it away and make use of it. We also sent him photographs and film links for everything we made and when we were looking for a front door for the house, he even carefully got us a door with the doorframe and keys intact! As a matter of fact over the past five years, from just this one source, we and our friends have glazed two entire houses (one of them completely doubleglazed) and built several greenhouses.


Stand Alone Greenhouse - The basic design criteria


The idea for the greenhouse was to have something that was both decorative and practical. In particular as it was going to form the centrepiece for the flower garden. We wanted plenty of height both for aesthetics and because we intended to grow many climbing vegetables and flowers and also to incorporate our solar shower.


We had been collecting suitable materials for some time and in all we used 24 windows/French windows of various ages and designs but which overall seemed to fit pleasingly together. The sides and the back were to be made of windows set on pallet wood walls, similar in design to those of the hen house. On each side there was also to be guttering for the collection and harvest of rainwater.


The front was designed to incorporate a matching set of old French windows and glazed panels with the addition of a panel of leaded lights incorporated into the gable end. The French windows and the door on the rear elevation were both of the same height and these together set the height for the greenhouse.


It's all in the planning


There are two ways to go when designing a glass greenhouse, you can either plan it around available materials or you can plan it first and then search for the windows to fit. We actually were lucky, in that five years ago PVC mania hit our part of the coast and we had a plethora of great windows to choose from. In effect, the whole design was built up around the French windows, matching panels and leaded light, which were really elegant when placed together. The planning of the design was in fact the most difficult part of the whole operation, in that the location of the windows had to match the desired length for each side. Furthermore, any difference in window height had to be accounted for in the construction of the pallet wood walls to ensure that the overall height was respected. In conclusion though, we were left with a unique bespoke greenhouse which would have cost us several thousands of Euros.

Here is the film we made about this greenhouse, showing both exterior and interior views and giving some initial pointers to the design. See you in Part Two


Thanks for dropping by and please feel free to share this article, comment, ask questions and if you'd like to be assured of getting the next post, then sign up to follow this blog.


All the best, Andy

© Andy Colley 2014