Starting the Conversion - Break Up to Make Up
MACHINE
This is the really easy, fun part for me and it's a great way to start because it is going to familiarise you with your washing machine and how it works. In this section we are going to figure out what bits we can take off, what to ignore and what components are essential to the workings of our new machine. This is also a great exercise in thinking-on-your-feet because you can sometimes find, as I did in this case, unexpected, specific items for reuse that can save both time and money on the project.
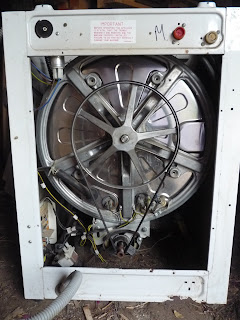
As I'd already established which side of the machine the drive was on, my first step was to remove that side panel of the machine. On our 'new' top-loader the side panel was held in place with several bolts at the machine's rear BUT I initially was unaware of a front screw at the very base of the panel which also needed to be removed. Thus I learned a valuable lesson: scrutinize the whole of the component prior to removal!
A Note About Front-Loaders
If this is the type of machine you are to be converting then it is much easier to access the motor and drive assembly simply by removing the rear panel. As front-loaders are in general more common than top loaders, this is perhaps the most available machine you will be likely to convert. However, as the seals on front loaders can wear out over time and because of the versatility of adding washing and water to the top-loader, for say a mixed load of washing, these make for excellent conversions so do look out for them!
Back to the Present - Top Loader
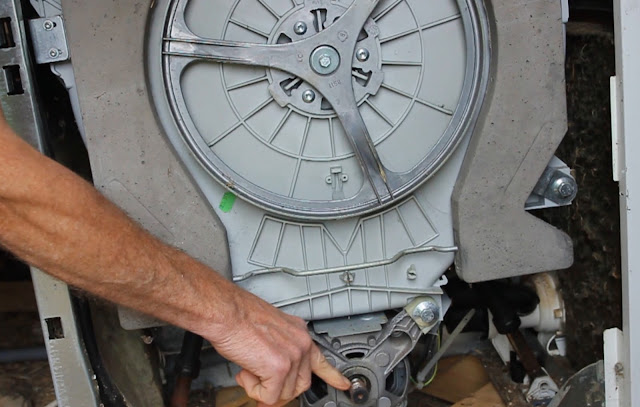
Once the side panel was off, the motor and drive was visible. The first thing to do was to remove the motor and drive belt, the motor is quite heavy so it may need supporting to remove the bolts - I always keep the old fasteners (nuts, bolts, washers, screws) for use in later projects. The new drive from the bicycle was going to be attached to the face of the large pulley that was connected to the drum of the machine. Something that was very evident was how freely the drum rotated now the motor was removed.
I also removed all wiring that was readily accessible either disconnecting the contacts or simply snipping the wire out with cutters.
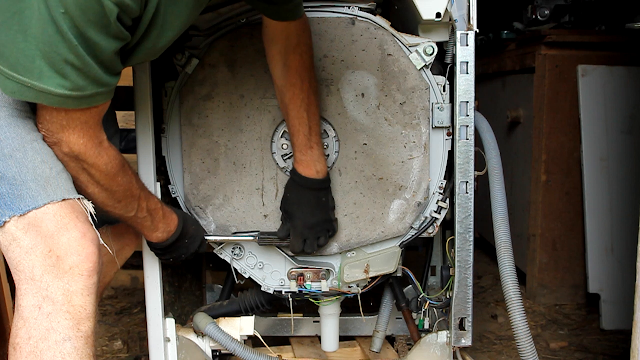
On the side of the drum could be seen a large concrete block and I could get my hand around the other side of the drum and feel a similar one on the opposite side. These are used to help damp out vibration especially when the drum is being driven at elevated speeds i.e. spin drying. The more sedate speeds of pedal-power render these blocks useless and so I removed it from the drive side. The block was heavy and so I had to be ready to support the weight when the last bolt was removed, again keeping the bolts and washers for later use.
 With the one block off one could see that the drum moves on suspension springs and/or hydraulic dampers these are another part of vibration removal to prevent the machine from waltzing around the kitchen or utility room again I wanted to remove them but before doing so I needed to support the drum directly to the chassis of the machine.
The drum does not need to have any ability to move freely in its supports. With our old machine I had fashioned two large wooden wedges (see left) which were forced between the outer drum and the steel walls of the machine body. I thus decided that with this conversion I would fix the drum to the chassis.
Important Note:
Many automatic washing machines have two steel 'transport brackets' securing the drum to the rigid carcass of the machine. As the name suggests this is to prevent the suspended drum from bashing about whilst being shipped. If you are fortunate to have these you can re-attach them for pedal power.
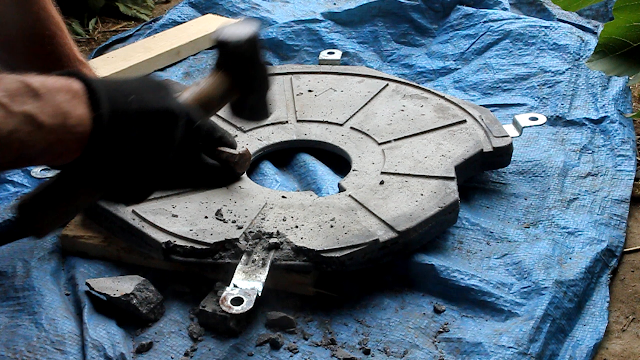
The second side panel can now be removed and the concrete ballast dealt with similarly. However at this point I realised that the concrete block support brackets would make excellent anchoring brackets for the drum.
The second side panel can now be removed and the concrete ballast dealt with similarly. However at this point I realised that the concrete block support brackets would make excellent anchoring brackets for the drum.
This provided some fun smashing up the concrete and why I need safety equipment! At this point I also cleaned out all the now superfluous wiring from the old heating system.
As you will see in the following articles, these basic brackets were modified, bent and drilled to become the drum fixing brackets. This is an example of how you can 'eat (almost) all the buffalo' in recuperation projects. One wit on my YouTube channel did suggest that we could have made a cowboy garden statue out of the concrete!
With the second side of the machine removed we can now see the pump. This can be ignored because for draining the machine the flexible hose is simply lowered below the level of the drum and the water will pass through the pump chamber with little or no interference. Removing the pump would mean reconnecting the exit hose from the drum to the flexible drain hose and these diameters are not the same. This is a case where knowing when to leave well alone is really important!

Specific Design Considerations
N.B. With both sides of the machine removed it is very clear how flexible this design of machine becomes, i.e. that the side panels contribute markedly to the structure of the machine. You should therefore not attempt to use the machine even with pedal power without these side panels in place as the machine would collapse! Another observation on the design is that the drum is supported on bearings on both sides. A front-loading machine has no bearing on the door side, ultimately meaning it is less robust! Again this is a consideration for long-term pedal power, that you should try to obtain a top-loader.
BICYCLE
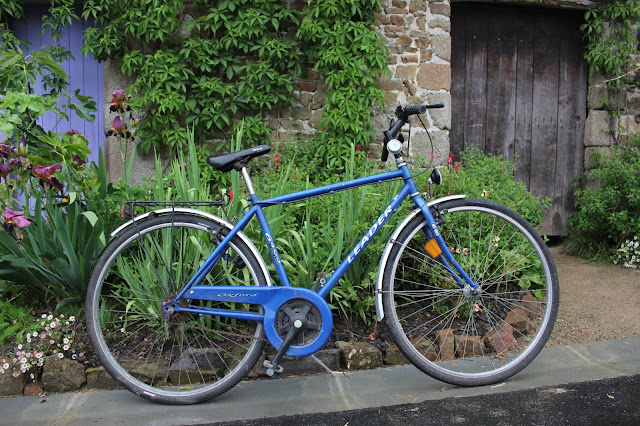
This model was one I had picked up just as its owner was about to throw it in the skip at our local dump. He apologised for having already removed the Shimano gearing system but I told him what I was going to use it for. He was very pleased that his well-used bicycle was going to get a second life rather than end in the jaws of a crusher! Although very much unroadworthy it actually looks really good after a shower of rain.
In the following articles I will go into more detail on what to remove because I have specific film footage to go with the exercise. Here therefore, I am just going to give some general pointers as to dismantling. The first thing to note, particularly if like us you are living at the seaside, where there are permanent caravans and second homes, is that most of these bikes will have been ridden along the beach, sometimes even in the sea and in true holiday spirit, completely neglected and left to rust ,
With the exception of a lovely but unrideable one I inherited from my neighbour and which we have been using on our previous washing machine, most of the bikes we find are in the 'cheap and cheerful category. We usually get them when the owner has returned for the next holiday and found them in a sad state and carted them off to be dumped. In the main therefore these are 'cheap' supermarket bicycles made for a price with low end saddles and accessories but actually with some superb engineering design and manufacture which goes into individual mechanical parts. This makes them the ultimate recuperation item!
With the exception of a lovely but unrideable one I inherited from my neighbour and which we have been using on our previous washing machine, most of the bikes we find are in the 'cheap and cheerful category. We usually get them when the owner has returned for the next holiday and found them in a sad state and carted them off to be dumped. In the main therefore these are 'cheap' supermarket bicycles made for a price with low end saddles and accessories but actually with some superb engineering design and manufacture which goes into individual mechanical parts. This makes them the ultimate recuperation item!
When dismantling a bicycle therefore, you should consider that most of the bolts nuts and screws will probably have seized and you should arm yourself with a release oil like WD40, with which to un-seize them.
If you have them, bicycle spanners can be very useful, with luck, as we did once, you may even pick up a bicycle with a tool kit still in situ.
And now here's the film of this procedure:
And now here's the film of this procedure:
In the next article we shall start to put everything back together and be well on our way to having a smart and fully functioning system.
Until next time and from a sunny day in Normandie,
Cheers, Andy
© Andy Colley 2022
RELATED ARTICLES
Convert Your Washing Machine to Pedal Power Part 3 - Putting It Back Together (Top-Loader)
Now that the machine was stripped of the superfluous bits...read more

Convert Your Washing Machine to Pedal Power Part 1 - Getting Started (Top-Loader)
The
most frequent reasons for machine failure is of an electrical or
electronic nature. Neither of these preclude using it, as long as the
drum is watertight. Even if you don't already own a broken machine I can
guarantee that one of your neighbours, friends.....read more
 How to Convert your Washing Machine to Pedal Power 1 - The Basic Model (Front-Loader)
The electronic fault that arose in our automatic washing machine
rendered it useless. I knew that the machine was watertight and...read more







Where's the next article? I want to see how you put it all together to make it work.
ReplyDeleteHi Melody, I am really sorry that I only just found your comment. Something changed with Blogger back in the early part of this year and I no longer had any notice of comments being posted and I presumed until just recently that this was because there weren't any! So now I'm playing catch up and also realising that I didn't finish this thread. I have it all done already in film on my Youtube channel - Organikmechanic but tomorrow I will be writing up the rest in article form, which will probably be more useful. Sorry again for the mix up and please do ask if there is any further information you need. All the very best Andy
DeleteHi Andy - this is absolutely amazing. My wife and I live rural off-grid in South Africa with our 3-week old daughter and 5-week old bicycle washing machine (inspired by and modelled on yours). I'm having a fair bit of difficulty with the stability of the machine (particularly with the chain slipping off) and I'm getting a bit desperate because the cloth nappies that need washing are relentless! I've got a few ideas, but I was wondering if I could get some input from you? I'm a physics teacher by profession but I'm very much a DIY rookie and my background is theoretical physics rather than hands-on-practical-with-finicky-moving parts! So I'm not sure how viable my ideas are to improve things. If you're willing, I'll write up a blog post about what I've done so far (I'm planning on doing this anyway at some stage) and I can point you towards that? Thanks in anticipation! Adam
ReplyDeleteHi Adam I am really sorry that I only just found your comment. Blogger stopped informing me back in the early part of this year of comments being posted and I presumed until just recently that this was because there weren't any! So now I'm playing catch up. I too had the chain falling off problem back when I did my first conversion with the front loading machine. This was down to the drum twisting on the support springs. This is why I secured the drum against the outer casing of the machine with two wooden wedges. In this model - the top-loader, I actually bolted the drum to the side walls of the machine to make it rigid and it has paid off - no chain problem! The other thing is - you need to check your alignment between the two chain wheels to make sure that they are in line with each other. Please do get back to me and let me know if you wrote your blog and how things are going with your machine. Again sorry for the mess up but Blogger seems to be doing things and not always letting us know which is not great - to say the least! Cheers Andy P.S. I used to teach maths and design although my background is in engineering
Delete