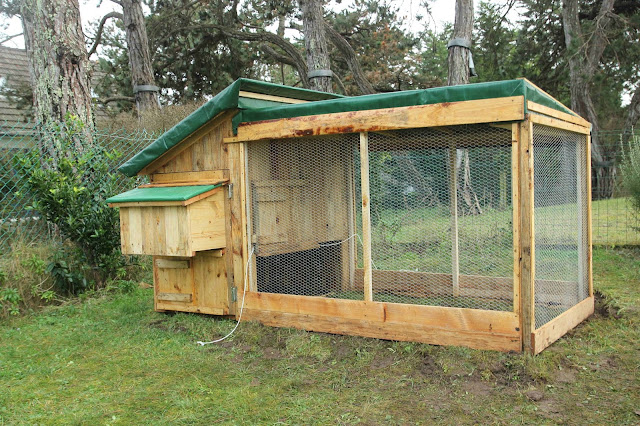
One of the greatest problems poultry keepers have, in our experience, is getting people to look after hens for short-notice, short-term breaks. Most smallholders or homesteaders have similar friends, neighbours and family members who are willing and able to come and either live in their house or visit on a daily basis to look after poultry or livestock whilst they are away on holiday. We have a long-standing and reciprocal agreement with friends to do just this for three weeks every Summer.
What happens though if you get invited out to dine, party, stay the night or unexpectedly have the chance to get away for just a few days? In that case, this project is for you because it allows even the most underconfident of neighbours to feed, water, collect eggs and put your flock to bed without ever having to go into the coop or enclosure. Thus they avoid what they most fear and what often puts them off from saying 'yes' - escapee chickens running amok!
DESIGN
The criteria for this coop was that is would provide not only those facilities mentioned above but also that it would be interesting enough to provide amusement for 4 bantam hens and a young Polish cockerel/rooster, all of whom are normally free-range. Furthermore, when their owner was in residence, the birds would be able to use the coop, the run of which has a fully opening front section, as a home-base for their daily activities.
In addition and probably because all these birds come from our 'Jungle Fowl' stock and have a propensity to roost outdoors on clear nights, the idea was to train them to come and eat their evening meal inside the run and thus go to roost in the coop. The chickens live in a gated beach front residence and a rooster crowing at day break is not something everyone wants as an alarm call.
I also decided to add a wire layer to the run roof to avoid puddling from the heavy rain and a rainy day area beneath the coop. This would both insulate the living space and allow for the chickens to be outside and with the opportunity to dust bathe, even on the wettest of days. As a further feature for outdoor sunbathing, the run sides were built up with an additional pallet wood plank width to serve as a wind break.
Untreated Pallet Wood Planks:
MATERIALS
- Standard Length (120cm or 48") - 52
- Long Length (150cm or 59") - 8
Heavy Duty Tarpaulin - 4m² or 43ft²
Chicken Wire: (12mm or ½"pitch 1m or approx 1 yard wide) - 4m or approx 4 yards
Hinges - 3 pairs
Screws
Nails
Linseed Oil & Natural Pigments
Door Furniture - I make all my latches/fasteners from pieces of pallet wood
As mentioned above I started by cutting a small rebate into each long edge of the pallet planks.
Each of the walls of the coop were made up of a frame cut to 25mm 1" square timber from pallet wood to which were nailed the prepared planks.
I began the build with one completely covered side and then went on to construct the opposite elevation to this, which was to incorporate the nest box and a bob hole or sliding door.

The door opened and shut by way of an upper and lower guide, each made from selected thicknesses of pallet planking.
Supported by the centre rail of the door, the nest box was made up of two side sections which were made from horizontally-laid planks. These are screwed to the door frame, a pallet wood stretcher is then fixed to the base plank of the side. These then form the frame work to support the base of the nest box. A front panel was preassembled using just a top batten to which the vertically oriented planks were attached. The batten was the exact internal dimension of the nest box and the planks at the two ends extended at least 2cm (1") beyond the batten. This panel pushes straight into place and is then screwed to the sidewall edges and then to the lower batten.
The surplus on the front of the nest box could then be trimmed to width in situ with my jigsaw.
A tarpaulin cover was then added. A small retaining plank was screwed onto the inside of the door to prevent straw and eggs from being in danger of falling when the door was opened. I attached an inner tube rubber along the hinged side of the lid for extra water-proofing due to our very wet climate. The lid of the nest box, however, was further protected by the large overhang of the main roof.
The planking at the two vertical sides of this elevation were the full height of the panel and extended beyond the timber frame so as to furnish a means of screwing this elevation to the side walls. This same technique was used on the rear elevation.
Hinges - 3 pairs
Screws
Nails
Linseed Oil & Natural Pigments
Door Furniture - I make all my latches/fasteners from pieces of pallet wood
CONSTRUCTION - CHICKEN COOP
As mentioned above I started by cutting a small rebate into each long edge of the pallet planks.
Each of the walls of the coop were made up of a frame cut to 25mm 1" square timber from pallet wood to which were nailed the prepared planks.
I began the build with one completely covered side and then went on to construct the opposite elevation to this, which was to incorporate the nest box and a bob hole or sliding door.
This could be used by the temporary carer to place the food and water in
the run before remotely opening the roost bob hole door! This second
elevation was also hinged at the top and bottom so that the whole side
could be opened for easy cleaning of the roost area.

SIDE ELEVATION - BOB HOLE DOOR
The door itself was made up of three cut pallet planks which were nailed to upper and lower battens of pallet wood.The door opened and shut by way of an upper and lower guide, each made from selected thicknesses of pallet planking.
SIDE ELEVATION - NEST BOX
The surplus on the front of the nest box could then be trimmed to width in situ with my jigsaw.
A tarpaulin cover was then added. A small retaining plank was screwed onto the inside of the door to prevent straw and eggs from being in danger of falling when the door was opened. I attached an inner tube rubber along the hinged side of the lid for extra water-proofing due to our very wet climate. The lid of the nest box, however, was further protected by the large overhang of the main roof.
FRONT ELEVATION
The centre rail for the framework was wider than the rest of the frame timber, this to provide a support for the flooring planks.The planking at the two vertical sides of this elevation were the full height of the panel and extended beyond the timber frame so as to furnish a means of screwing this elevation to the side walls. This same technique was used on the rear elevation.
FRONT ELEVATION - BOB HOLE
The construction of the bob hole was the same as on the side elevation except I added a staple to each side edge of the door, so as to allow the attachment of a cord to open and shut the door from the outside of the run. Furthermore I also added a threshold (see below) to the frame beneath the bob hole to attach the ramp.FRONT ELEVATION - RAINY DAY AREA
The wall of the front elevation only extended down as far as the centre support of the sides, so as to provide a sheltered area beneath the coop. This also meant that when the birds were in free-range mode they would still be assured of a dry area in which they could dust bathe.REAR ELEVATION
This was similar in construction to the front wall, except obviously the pallet planks extended to the ground and the dimensions followed the slope of the single pitched roof.ROOF
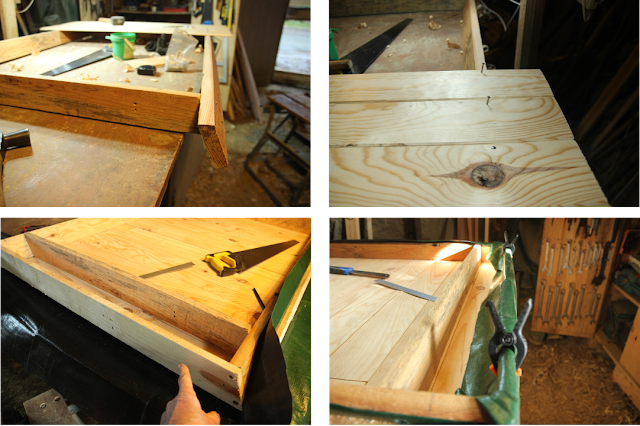
The frame for the roof was such that there was an inner plank on the two side elevations, so that when fitted the roof could be screwed through these to the side walls.Once the frame was made the top face was clad with the tongue and grooved panelling, which itself was covered with tarpaulin
Because the roof was to be single pitched i.e. sloping to the rear of the coop, the front and rear elevations of the roof were angled so that when the roof was in place, these faces would be vertical. This to ensure runoff of water form the roof was effected.
The entire roof had an overhang of approximately 3" -4" or 75mm to 100mm on all edges. The front and rear frames of the roof were spaced so as to fit over the front and rear coop walls and two additional side planks were attached so as to do likewise. (pointing photo above)The roof simply pushes on to the walls of the coop and because of the
tongue and groove is light though solid and easy to handle. No other
securing is necessary as it is deep enough to fit snuggly to the coop.
FIXTURES & FITTINGS
The interior of the coop had a stand alone roost with detachable droppings pit for ease of cleaning and to stop the hens from walking in their own droppings when in residence. This was made from pallet wood and chicken wire.We had thought of using a plain plank as a ramp up into the coop but as we had to think about the definite eventuality of chicks, we added little steps which would be easier for little feet to negotiate.
THE RUN
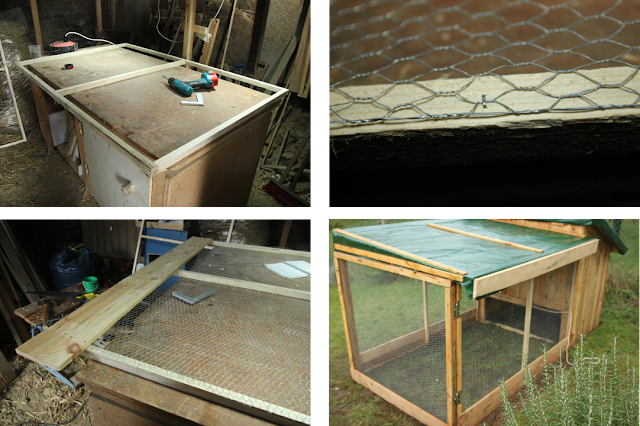
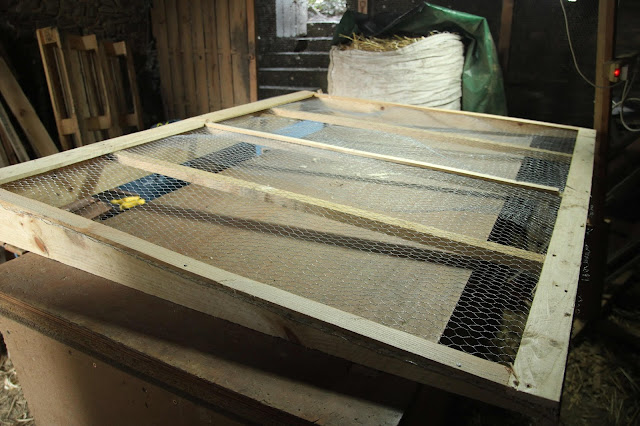
The sides of the run, as with the coop were based on cut-down pallet plank frames, with chicken wire stapled to them. The front of the run was a frame within a frame, as this allowed for the whole front to open for easy access during free-ranging.The top and bottom rails of the run on each side elevation extended beyond the profile of the side panel to allow for the run to be screwed to the coop. This was done to allow for the run to be easily removed, if and when the whole unit needed to relocated and also to allow for an extension to the sides of the run if the flock became larger.
As already mentioned the side elevations had an extra plank added to the bottom rail to allow for a wind proof area for the birds to lie down and take sun baths.
RUN ROOF
This was made with a slope to allow for our climate, which can be stormy and particularly on the ocean front.As previously mentioned the roof was first fitted with a chicken wire top, prior to adding the tarpaulin, in order to avoid rain puddling on the top.
FINISHING
The woodwork was painted with linseed oil, which had first been tinted with a mixture of natural mineral and earth pigments. Information about using these can be found in the related articles belowFILM
If
you have enjoyed this article and found it interesting then share it
with your friends on social media or suchlike. Please also feel free to
ask questions and or make comments and if you found this helpful and would like to support this site you can always 
Until next time and from a cold day in Normandie,
Cheers, Andy
© Andy Colley 2018
RELATED ARTICLES

Pallet Wood Hen House/Chicken Coop & Prototype Tiny Tiny House - Part 1 Construction
We designed and have already built one of these coops not just as
accommodation for the hens but as a prototype we could build here in the
workshops... read more
 How to Make a Low Cost Router Table
I have several jobs lined up over the next few months which will involve
the use of a router. These include making several wooden doors. Much
of the planking I will be using will need to have moulded edges so...read more
 Using Natural Earth and Mineral Pigments in the Home and Garden
The Alchemy of Artists' Materials - whether painting a leaf motif or a
window frame, it's so much more fun than opening a tin of paint...read more


