

In addition, there would be a risk of an adult misaligning the telescope or even knocking it over. In order to avoid these scenarios, I decided that I needed a set of red lights to pinpoint each foot effectively.
Why Red?

The eye is very good at adapting to low levels of light aka dark adaption and it does this is two ways:
- Physically - dilation of the pupil - the iris opens quickly to let more light in.
- Chemically - rhodopsin increase - when in the dark the rods and cones build up a pigment, which is responsible for increasing the sensitivity of our eyes thus adapting them to the darkness.
 Your retina detects light through cells known as rods and cones. There are three types of cones sensitive to wavelengths, these detect colors: red, green and blue. Rods are just of one type, are more numerous than cones and are much more sensitive to light but unable to give us information about color.
Cones become dark adapted after a few minutes but rods can take over half an hour.
If a bright light is shone on the eyes, then both rods and cones lose their dark adapted nature and will need a rhodopsin 'reset' to enable them to regain this ability. That is of little matter to the cones but a major disruption to the rods and thus a long interruption in our viewing time.
Cones are of major use in daylight but rods become more sensitive as the light fades to show us the night sky in all its beauty.
Rods are most sensitive at around 500 nanometers, which is in the green to cyan range of the spectrum. Since rods are less sensitive to red light (below 650nm) you can use a red light source to view things without ruining your night vision by 'over-exposing' the rods.
 There is nothing so sorry looking as a garland of Fairy lights with some of the bulbs diminished or dead. You feel you can't throw them away as some of the lamps are burning bravely but then if you trim a tree in Winter or put them up in the garden in the Summer, they look so pathetically bare. Well the great news is you can use them individually. I've recycled them before and will continue to give these jolly little twinkling lights a second chance. I find that the fault in the lights usually occurs in a single lamp or as in the above case in one of the wires, rendering half the garland dimmed for good. The lights here are battery powered LEDs, which make them ideal for upcycling to tripod lights, as they have both the required battery pack and switch.

The first thing I did was to locate the lights of the correct colour. The garland had four colours blue, green, red and yellow and as you can see only the first two were working. So, to find the red lights I cut the pairs of wires midway leading into and out of the non-working LEDs. I removed approximately ¼"of insulation from the pair of wires going into the LED from one side of the garland and conected them with crocodile clips to the similarly stripped wires coming from the battery pack. Turning it on the colour of the lamp can be clearly seen.

Each red lamp found that way was marked with red insulation tape to keep it identifiable. I cut off the other two wires leading from the LED as they are not needed. Once I had my three red LEDs prepared I then went onto the next step, that of connecting them to the battery pack.
 The battery pack was to be hung from a hook underneath the top plate of the tripod and connecting wires to each of the LEDs would go down each leg to the LEDs at the feet.
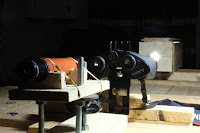
Left: Shows the pack in position at the end of the project.

Each end of the flex had its outer sheath removed to expose 1" - 2" of the wires within which were then stripped of the first ½" of insulation.

 The LEDs were to be connected in parallel to the power supply.
Firstly I soldered each LED to its respective length of flex.
At the other end, I twisted together the wires of each flex connected to one side of each LED and then twisted together the other three wires connected to the other side of each LED.

I made a quick check that all my soldered connections were good by temporarily connecting the battery pack to the two connection of the twisted together flex ensuring that the soldered connections did not come in contact with each other. Three lit up lamps meant success so I immediately turned off the power and wrapped each soldiered joint in insulating tape.

The LEDs and flex could now be put into place on the tripod legs. I secured them in position with cable ties, ensuring that there was a loop left in each flex to allow for leg length adjustment.

A small electrical connecting block was used to connect the other ends of the flex to the battery pack.
 The arrangement worked perfectly, at night the feet of the tripod were clearly visible without any obvious adverse effect on my night-adapted eyes.
Because of the festive origin of the lights, the battery pack had eight functions relating to the garland's display. So not only can the tripod have permanent illumination but also a twinkling on/off sequence which seems to draw even more attention to the feet. The 'slow fade', 'sequential' and 'fast fade' though, I felt were not as effective for the new role of the LEDs!
If you have enjoyed this article and found it interesting then share it with your friends on social media or suchlike. Please also feel free to ask questions and or make comments and if you found this helpful and would like to support this site you can always
Dead Fairy Lights Repurposed


The first thing I did was to locate the lights of the correct colour. The garland had four colours blue, green, red and yellow and as you can see only the first two were working. So, to find the red lights I cut the pairs of wires midway leading into and out of the non-working LEDs. I removed approximately ¼"of insulation from the pair of wires going into the LED from one side of the garland and conected them with crocodile clips to the similarly stripped wires coming from the battery pack. Turning it on the colour of the lamp can be clearly seen.

Each red lamp found that way was marked with red insulation tape to keep it identifiable. I cut off the other two wires leading from the LED as they are not needed. Once I had my three red LEDs prepared I then went onto the next step, that of connecting them to the battery pack.

Left: Shows the pack in position at the end of the project.
Recuperated Flex Upcycled
I'd been storing a length of two core flex from a power tool that had malfunctioned for the last time and decided to use this. It was of sufficient length to be cut into three equal lengths to run the length of each leg from the feet to the battery pack. They were cut as to allow for the adjustment of the legs on uneven ground and to adjust the working height of the telescope when observing objects nearer the celestial pole.
Each end of the flex had its outer sheath removed to expose 1" - 2" of the wires within which were then stripped of the first ½" of insulation.
Putting it All Together


Firstly I soldered each LED to its respective length of flex.
At the other end, I twisted together the wires of each flex connected to one side of each LED and then twisted together the other three wires connected to the other side of each LED.

I made a quick check that all my soldered connections were good by temporarily connecting the battery pack to the two connection of the twisted together flex ensuring that the soldered connections did not come in contact with each other. Three lit up lamps meant success so I immediately turned off the power and wrapped each soldiered joint in insulating tape.

The LEDs and flex could now be put into place on the tripod legs. I secured them in position with cable ties, ensuring that there was a loop left in each flex to allow for leg length adjustment.

A small electrical connecting block was used to connect the other ends of the flex to the battery pack.
Lighting Ceremony

Because of the festive origin of the lights, the battery pack had eight functions relating to the garland's display. So not only can the tripod have permanent illumination but also a twinkling on/off sequence which seems to draw even more attention to the feet. The 'slow fade', 'sequential' and 'fast fade' though, I felt were not as effective for the new role of the LEDs!
If you have enjoyed this article and found it interesting then share it with your friends on social media or suchlike. Please also feel free to ask questions and or make comments and if you found this helpful and would like to support this site you can always
There will be a film coming shortly. Until next time and from a sunny day in Normandie,
Cheers, Andy
© Andy Colley 2020
RELATED ARTICLES
 Binocular Collimation Quick and Easy Method without Prism Adjustment

I was initially put off from correcting an optical fault in an old pair
of Porro prism binoculars because all I had seen or read online involved
prism adjustment...read more
How
to make a robust, lockable solar filter for your telescope from
repurposed materials and purchased AstroSolar film. This will allow you
to enter the amazing world of solar astronomy...read more
It was whilst I was making the solar filter for my telescope that I seriously started to think about how I was to find the object of study in the eyepiece....read more

 Home-Made Locking Solar Filter
How
to make a robust, lockable solar filter for your telescope from
repurposed materials and purchased AstroSolar film. This will allow you
to enter the amazing world of solar astronomy...read more
 How to make a solar finderscope from scrap

It was whilst I was making the solar filter for my telescope that I seriously started to think about how I was to find the object of study in the eyepiece....read more

World War 1940s Binoculars - Perfect for Astronomy & Birdwatching
Despite their rough and ready appearance, WWII Binocular optics were
actually manufactured to a very high standard. The companies who made
them saved on the casings and strappings but were required by the Armed
Forces to furnish precision....read more
Unlike
the more modern pair I collimated, the objective
lenses on these could not be easily rotated in their respective cells. I
was thus faced with the possibility that I would have to
resort to prism adjustment and this I was loathe to do! It was at this...read more
 Collimating World War 2 Binoculars
Unlike
the more modern pair I collimated, the objective
lenses on these could not be easily rotated in their respective cells. I
was thus faced with the possibility that I would have to
resort to prism adjustment and this I was loathe to do! It was at this...read more

Table Top Binocular Collimation Part 1 Materials & Fabrication
Following
on from my previous collimation experiment, I decided that in the
Winter it would be much better to be indoors! However, this was quite a
challenge on many levels...read more
 Table Top Binocular Collimation Part 2 Modifications

I observed that true
to the laws of physics, once the collimator lens was set at a distance
from the cross wire reticle equivalent to the lens’ focal length and the
light was turned on, the image of the wires were in focus in the
binocular eyepiece...BUT...read more
 Table Top Binocular Collimation Part 3 The Experiment

Following
on from my previous collimation experiment, I decided that in the
Winter it would be much better to be indoors! However, this was quite a
challenge on many levels...read more

No comments:
Post a Comment