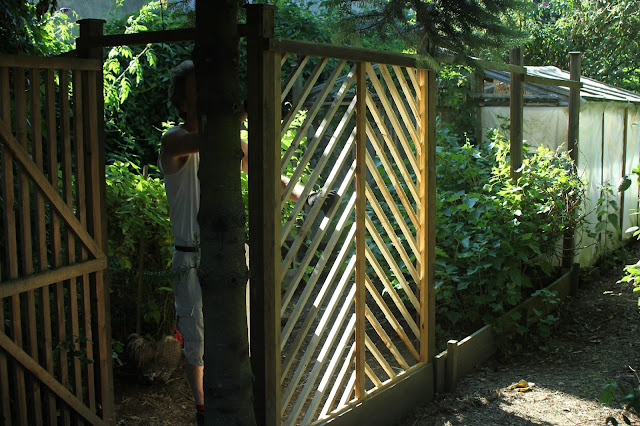
The garden gazebo with its home-made trellis panels and posts is now about to take shape and provide us with an elegant outside dining area, far from the madding poultry. The previous blog article on this project, how to construct the pallet wood posts and frame, can be found here

Construction Continued
The perimeter of the garden gazebo now being complete, the next stage was to make it chicken proof, starting with:
The Door
 This was a rectangular frame of 50mm x 25mm (2” x 1”) wood for the perimeter with two diagonal braces of the same wood to stiffen the structure, to which were nailed laths of about 25mm ( 1”) wide timber. Once checked for fit, the door was coated in linseed oil and then hung in place.
The Trellis
The most time-consuming, but most satisfying part of the project. The trellis comprised a framework to which laths were nailed. The laths were cut to width from pallet planks and I had toyed with several forms of trellis pattern, before finally deciding on a chevron style. The main advantage was that for this design I would never need a lath longer than a pallet plank length. The normal square-patterned trellis would require laths the full height of the panel (normally 1800mm (approx 6’).
The size for each trellis panel was measured. I had decided that the trellis would fit between the vertical posts and be screwed to the top batten and bottom gravel boards that joined the posts.
The frame of the trellis was made from long pallet planks sawn to 40mm – 50mm width (1¾” – 2”). A third plank bisected the panel between the top and bottom edges. I made lapped joints at each plank intersection. Normally, the cutting of even such a simple joint can take a little time, but I found that by setting my table saw to a cutting height of half the plank thickness and making numerous cuts at intervals of the saw blade width, the joint could be created easily, accurately and quickly. The faces of the joint resulting from using the saw were not perfectly smooth but, as I was not going to glue the joint, I did not consider this to be a problem. You can find the link to my home-made table saw at the bottom of the page.
The frame was nailed at the joints. I used 50mm (2”) nails.......
........which I bent over on the reverse side.
As usual with a rectangular frame the squareness of it was checked by measuring the diagonals.
The fit of each frame between the appropriate posts was checked before the laths were attached.
To achieve the chevron pattern I made a pair of guides (one a mirror image of the other). Each guide comprised a short straight plank to which was screwed, at 45º, a pallet plank of 80mm (2¾”) width. In use the guide was positioned such that the short plank rested against what would be the vertical edge of the frame, the 45º part of the guide would rest on either the frame perimeter or the central plank of the frame.
The first lath to be nailed to the frame was near to the top of the centre plank. I used 40mm (1½” – 15/8”) nails that were just less than the thickness of the lath and frame combined. Leaving the guide in place, the next lath was laid against the opposite edge of the guide and nailed in place. The guide was lifted out and laid against the edge of the recently nailed lath, the position for the adjacent lath being the other edge of the guide. A check could be maintained on the correct angle for each lath by keeping the short plank of the guide against the frame edge.
The surplus length of lath extending over the edge of the frame was removed by sawing flush to the frame edge, Some of the offcuts were long enough to be used elsewhere on the panel. Once one half of the panel was completed, the same process could be undertaken on the other side, this time using the ‘mirror-image’ guide.
To complete the design, I also incorporated a panel of small square trellis, along the South wall of the gazebo, again using a guide in the same way as with the chevron pattern.
Once completed, each panel was then put in place between the upright posts a g-clamp holding it to the top batten of the perimeter frame, screw holes were drilled in the top and bottom rails of the panel through which the fixing screws could secure it to the top batten and the gravel board of the framework.
To finish each panel I made and attached a weatherstrip to protect the top edge. The strip was a pallet plank wide enough to cover the combined thickness of trellis and top batten. The upward facing side of the plank was chamfered so as to shed rainwater. I used a router with a 45° chamfer bit to produce this but the same result could be easily produced with a hand plane.
Finally, the whole trellis and framework was given a coat of linseed oil to protect it from the vagaries of the weather.
Here’s to fewer intrusions at mealtimes! Now if you'd like to, sit back and watch the film.
All the best and thanks for dropping by. Please feel free to share this article, comment and/or ask for further information.
Bon appétit!
Cheers, Andy
© Andy Colley 2015
RELATED POSTS
CROSS CUT SAW TABLE
USING NATURAL PIGMENTS
PLANKMAKER'S HOLDFAST
HOW TO DISMANTLE PALLETS - THREE WAYS


