Showing posts with label organic gardening. Show all posts

Home-made low cost pallet wood greenhouse, viable, safe, year-round food production.

The following article goes into detail on materials, uses, modifications and upgrades to suit your needs, budget and woodworking experience. 

The 5 Euro/Dollar/Pound Greenhouse...


its organic produce..

Home-made low cost pallet wood greenhouse - $5
Good companions, Courgettes and Tagetes erecta

its tenants..


We use our organic poultry to weed a control pests in the greenhouses. Depending on the scale of the job we alternate between the chickens and the quail. Above, Vladamir, Diavolo and Co., pretending not to notice that the quail have a big heap of compost to play in. At the end of the courgette season the quail move in to clean up the woodlice from the rotted compost so that we can plant the next lot of vegetables.

and its next lot of produce..
  

In line with tradition, we planted our garlic on the shortest day and harvested it on the longest.


Build a greenhouse to suit your budget

Anybody with the ability to assemble flat pack furniture can get to grips with this design in its cheapest form.

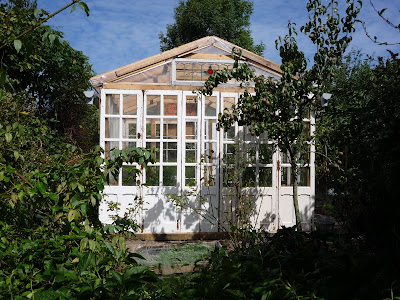
Home-made low cost old window glass and pallet wood greenhouse


We designed three models of greenhouse, which were made on the same principles of construction. The most expensive (left), made from recycled glass windows and pallet wood, will cost more if you purchase the leaded light and wooden posts. Our cost was 50 Euros but I estimate it would cost around 100 Euros if you needed to purchase the above items.

With water shortages, uncertain weather and continuing fallout from Fukushima, you can provide your family with year round vegetables, fruit, herbs and flowers. The 7 Euro Greenhouse incorporates an old glass window and has purchased polythene on all sides. In Summer, its gable ends and door panels can be swapped for wire mesh, to allow for  ventilation.Home-made low cost old window glass pallet wood greenhouse


The glass greenhouse has walls made of recuperated windows, is more robust and remains warmer longer, once heated by the sun. With the addition of fleece covers, we can grow more tender vegetables throughout the year. In addition we can grow medicinals and tropicals. For more information see link at end of this article.
Start small - work up!


Our first design - the 5 Euro Greenhouse is still up and running after 4 years and a couple of mini hurricanes as well as deep snow.

Home-made low cost pallet wood greenhouse $5 greenhouse

Materials - Pallets

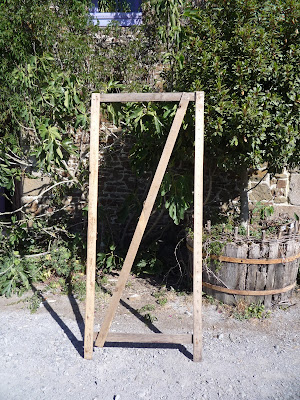
For the sides and door: I used 6 of the pallet wood shelving frames (illustrated below), which if you can't get you can make from 5 standard pallets (120cm x 80cm), this would mean 3 sections each side rather than 2 in my design.
For the roof trusses: 4 standard pallets
For the bottom rails to allow raised beds: 1.5 standard pallets
To make the jig for the trusses: 2 standard pallets
Home-made low cost pallet wood greenhouse - pallets


The greenhouse walls were made using the vertical uprights taken from a set of pallet shelving which originally had served to hold pot plants. They were 80cm wide and 170cm tall. I was able to recuperate some wire fencing from our local dump and cut it to fit these rectangular frames. I have since recuperated several of these shelving systems so they seem to be a standard throw-away pallet item. If however, you can not get hold of them just use your stock of pallet wood to create something similar. I used four of these frames (shown opposite) for the side walls and two more for the door and end wall.


Mass Production: Home-made pallet jig

Home-made low cost pallet wood greenhouseThe first thing I always consider, in a design of this sort is to create a way of getting a uniformity of construction. This is not just for aesthetics but because it makes everything easier when you come to fit the project together! To this end I set up a simple jig - out of pallet wood of course!

Make a cheap but robust pallet wood greenhouse

To fabricate the 5 identical roof trusses needed for this design, I constructed a jig from two pallets joined together to create a work-surface of roughly 2.40m in length. Wooden blocks were then screwed at key positions so as to act as 'stops' when the truss components were laid onto the pallet.

Something perhaps not so obvious in the Youtube film, is that my design incorporates a vertical piece of wood at the lower end of each truss. This enables each truss to be fitted to the inside face of the greenhouse wall. Once screwed into place, this addition prevents the tendency for the truss to move outwards. I felt that this vertical piece of wood, pushing against the inside face of the greenhouse, would be more secure than just relying on a screw or nail to hold the truss in place.

Once attached to the opposite walls the trusses were joined to each other at the side of the roof apex using pallet wood planks. This way of linking each truss means the whole roof structure becomes stiffer and provides a 'smooth' surface for the polythene roofing at the apex. See photo above.


To upgrade the 5 Euro Greenhouse, purchase some horticultural grade 200 micron polythene for around 30 Euros.

Pallet wood greenhouse design and construction

Our Little Helpers

And now if you'd like to, sit back and watch the film:


RELATED PROJECTS with live links to our detailed articles


If you're feeling more ambitious and have a good local source of discarded glass windows, then you might think of building our Glass Window Greenhouse 


Our Pallet Wood Chicken Coop - Hen House design and construction. This is also a prototype Tiny House and can be made in kit form and transported easily to where needed.


Our Dry Toilet System Save water, save money and make yourself some great compost!

Wheelbarrow rebuild using pallet wood

I made a pallet wood replacement for our wheelbarrow and it served its purpose for about 8-10 years. During the last few months of life, I could see the inherent mechanical weaknesses in my version and so as the frame and wheel were still in running order, I determined...read more


All the best and thanks for dropping by. Please feel free to share this article, comment and/or ask for further information.

Cheers, Andy
© Andy Colley 2014

Including more greenhouse projects)


Home-made Insect Hotel from repurposed materials. Bee Cosy Bug House for happy Mason bees

 
Green gifts home-made


Give the bees a gift - 'B is for Bee Cosy'


An insect hotel makes a great project and a gift you can be proud of. The following film shows you a detailed 'how-to' but if you need any more help. please get in touch. 


The Bee Cosy for cosy bees is an elegant green gift for you to make using 99% recuperated materials. This time the design uses more wood recycled from a fruit crate and in addition dried plant stems and thin branches from the garden. The Bee Cosy is a little more difficult than the Apple House bird feeder in the previous blog post: http://thegreenlever.blogspot.fr/2011/11/is-for-apple-house-diy-green-gifts.html

Insect house for mason bees

I know from experience this present is well received by friends, family and the bees and lacewings, its future tenants! The house will provide not only a Winter shelter for many small creatures including some 200 varieties of solitary bees but year round living accommodation too. These superb insects are an essential part of any garden, they pollinate and in the case of the lacewings consume vast quantities of garden pests such as aphids. Overwintering insects in an hotel encourages them to stay on and multiply in the Spring.


It's been a fantastic year in the garden, we've just gathered the third crop of figs and the greenhouses are still providing nasturtiums, tomatoes, lettuce, rocket, basil and lemon balm for Autumn salads. 


Planning Accommodation for Solitary Bees


For the interior section of the Bee Cosy I looked at various sites on the web, which had information on insect hibernation. Because the solitary bees are so diverse, they can easily be put off using a Bee Cosy if the accommodation is not to their liking. To make your Insect Hotel as attractive as possible you need a selection of hollow stems but the cube block from a pallet also makes an ideal nest box. You will need to drill the holes to the recommended diameter and depth for bees, although making some larger or smaller will also attract ladybirds, earwigs and the giant but friendly, European Black Bees. The rule I followed for the pallet block was a maximum diameter of 10 mm, I used a 8 mm drill.


Insect house repurposing pallet wood blocks

 These holes are drilled right through the standard pallet cube/block

Some of the solitary bees are really tiny, the beautifully named, Harebell bee often reuses a vacated woodworm hole, so will need a nest no bigger than 2mm in diameter! You can therefore,  drill your block will several sizes of drill between 2-10 mm or make a separate house to attract a specific bee. You will also notice as you look through some of the sites that they recommend lining the holes with parchment paper, I believe this is because bees can get put off by sawdust or splinters but I just made sure I'd  tidied up the block. When the bees find the accommodation to their liking they will stay throughout the year, using the hole as a nursery, so your Bee Cosy could become the base of an expanding colony for the garden.


Loss of Habitats. Wither the Lacewing?


The stemmed section of the Bee Cosy is for all insects but also hopefully to accommodate lacewings. Why lacewings? Well this hugely beneficial insect is in decline because it no longer has the habitats in which to survive the Winter. The Lacewing has unfortunately fallen prey to the mania for tidy gardens and in particular to the whole army of people brandishing  snippers and secateurs, who issue forth in the Autumn to attack herbaceous borders and cart garden debris off to the local tip. Giving someone an insect house means they can still cut off the flower, herb and vegetable stems but these are then just relocated to a handy 'hotel'. 


Swallowtail caterpillar
Slightly angry Swallowtail caterpillar amongst the fennel stems.


Gardening for insects means leaving as many habitats as possible available for Winter use. The making of the Bee Cosy is in fact the only time we ever raid the borders to obtain these stems, which will provide a plethora of winter holiday homes for a whole myriad of insects.


When choosing stems and branches to use for nesting tubes, remember to think about toxicity, for example I used elderberry branches as recommended on various sites, although they are slightly toxic. All plants are not toxic to all species. 


Finishing off and siting your insect house


Using natural pigments on an insect hotel
Ready for a wrap

The final Bee Cosy was decorated with a wash of acrylic water-based varnish, which had been tinted with natural mineral-based pigments. We have already used these on the Apple House and will be using them and other ecological finishes in the upcoming 'pallet presents', we therefore decided to devote the next blog to their use.


Insect house and pallet wood hen houseIn order to help with positioning the Bee Cosy, I include a nail with the finished gift and a simple instruction on the best place to locate it. Solitary bees being cold-blooded need the warmth of the sun, so the Cosy should face south east or south. They tend also to like an uninterrupted flight path when nearing their home but need shelter form prevailing winds. Placing it amongst or near flowers is also a good idea.


Peace over the Hen House and the Bee Cosy!


Fantail dove and pallet wood hen house


How long will it take to make one of these? Around about four hours, including cutting the stems, perhaps a more satisfying experience that wandering around the shops or surfing the net trying to find an original gift!

Update: Last year in this very insect hotel above, a wren decided it was the ideal spot for a nest and removed all the hollow stems and filled the Bee Cosy with a beautiful moss and feather nest, which unfortunately was blow away in the wind before completed. We have since replaced this with one of our open-fronted nest boxes (the design is on this blog see 'Browse by Project' bottom right of this page). However, we did make our other stand-alone and wall-mounted designs with a layer of wire netting to stop this happening, as it was also frustrating for the poor wren! This has not been a problem with our tree-hanging designs, so it might also depend on positioning, as well as how many wild birds you have nesting in your area - we have a forest garden.


More designs on this blog


A step-by-step tutorial for our Luxury Insect Hotel for discerning arthropods (shown left) and two simpler but effective designs for Mason bees and lacewings, follow this link for The Gîte & the Chalet (Chalet pictured right).


If you enjoyed this article, then please feel free to share it, comment and/or ask questions.

Cheers, Andy


Some useful sites:


© Andy Colley 2014