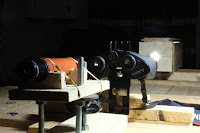
I had already established the approximate distances between the
components so I screwed the binocular support to the table such that the
binocular objectives would be about 90cm (36”) from the collimator
lens.
The collimation scope was fitted to its mount which was on
the eyepiece side of the binoculars. As I had previously mentioned, the
support for this scope had a base which fitted between the table laths
and could mimic the collimator's movement from side to side.
Only the collimator had a fixed vertical height, the other two components in the layout could both have their heights adjusted.
The
first stage was to ensure that the collimated light source was centred
on the centre line of the binocular. To do this, I inserted the
cardboard discs into the dew cap rings of the objective lenses and adjusted the collimator lens
so that the image of the target was visible on the one disc.
It was
easy to see if the cross wire centre was coincident with that of the
disc centre and any discrepancies were easily rectified viz, horizontal
difference slide the collimator in its guides, vertically; slacken the
binocular mount locknut and move the binoculars up or down. It was also
possible to slide the collimator to the other objective to confirm or
otherwise that the second objective lens centre was also coincident with
the collimated beam centre. The main reason why this would not be so
would be that the binoculars were not level on their mount. Obviously
any correction to this parameter would require the checking of the other
objectives’ position until the two objectives were both centred on the
centre of the light beam.
The next parameter to check was that the
binoculars were square to the light beam i.e., they were not off-axis
(tilted or skewed). This posed a problem as there was not a flat surface
on the binocular body which I could use as a reference. I finally
realised that the binocular dew cap rings were the only machined flat surface
on the front end of the binoculars. I used this feature by securing a
flat mirror over the objective lens, held flat against the dew cap ring
with an elastic band stretched from the eyepiece end of the binoculars.
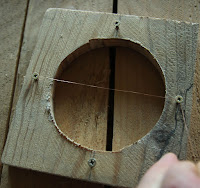
The reflected light was then visible on the front wall of the collimator
on which I had drawn a vertical and horizontal line with their
intersection coincident with the lens centre. The lens was refocused. A
perfectly squared binocular and hence mirror would superimpose the cross
image onto the drawn lines. The arrangement was an optical lever very
similar to that used in a ballistic galvanometer. The image was brought
into alignment with the drawn cross by tilting and/or skewing the
binocular mount. Once this was achieved, I removed the mirror and
refocussed the lens so that I could check that the cross centre was
still in the centre of the cardboard disc, any shift was corrected as previously described and
the mirror replaced to check that squareness to the light beam had not
been compromised.
Once this was satisfactorily achieved, the card
discs were removed and the lens refocused once again but to the third
position i.e., the one that produced the collimated beam. This was
confirmed by looking into the binocular eyepiece.
That being so the spotter scope was slid into position, looking through the binocular eyepiece and the image of the cross wire studied through it.
I
had set the distance between the spotter scope and the eyepiece of the
binoculars such that the image from the eyepiece was slightly smaller
than the view in the scope. This was so that I could ensure the scope
was looking straight into the centre of the eyepiece-the image was
surrounded by an annular dark ring.
Properly aligned binoculars would give an image of the cross wires of the spotting scope superimposed on the target image.
 I
had decided to correct any misalignment by adjusting the position of
the objective lens within its eccentric retainer ring. To do this I had
to unscrew and remove the dew cap ring. This I was able to do firstly on
the right hand half of the binoculars. There was sufficient adjustment
to attain the alignment of the two sets of cross wires. If there hadn’t
had been enough I would have had to resort to prism adjustment.
I
was also able to ensure the binoculars were still aligned to the
collimator by repeating the operation with the mirror only this time the
mirror was resting against the machined flat face of the binocular body and
not the dew cap ring.
I then shifted the collimator to centre on
the left-hand objective lens of the binoculars and moved the finder
scope into position behind the eyepiece. The image in the left-hand half
of the binoculars was coincident with the cross wire in the finder
scope, so no adjustment was necessary in this case.
I could now remove the
binoculars from their mount and look through them to see if the quality
of the image had improved, which it had! The realignment process was a
success.
INSTRUMENTS: Flat Double Sided Mirror
Precautions
Whilst
I was checking the alignment with the mirror I leant on the table and
saw the cross-wire shadow move on the front wall of the collimator by
about ¼” the original position resumed as soon as I removed my weight.
Don’t lean on the apparatus!
...and if you're listening Santa
..and now sit back and watch the film:
In Conclusion
I
was pleased with the end results that I obtained by using this 'kitchen
table' arrangement and once the initial 'teething problems' had been
overcome, I found the apparatus easy to use. It would be interesting to
develop an optical array that could produce two collimated images so
that both sides of the binoculars could be tested simultaneously,
obviating the need to move the collimator.
If
you have enjoyed this article and found it interesting then share it
with your friends on social media or suchlike. Please also feel free to
ask questions and or make comments and if you found this helpful and would like to support this site you can always 
Until next time and from a cold day in Normandie,
Cheers, Andy
© Andy Colley 2018
RELATED ARTICLES
Table Top Binocular Collimation Part 1 Materials & Fabrication
Following
on from my previous collimation experiment, I decided that in the
Winter it would be much better to be indoors! However, this was quite a
challenge on many levels...read more
Table Top Binocular Collimation Part 2 Modifications
I observed that true
to the laws of physics, once the collimator lens was set at a distance
from the cross wire reticle equivalent to the lens’ focal length and the
light was turned on, the image of the wires were in focus in the
binocular eyepiece...BUT...read more
 Binocular Collimation Quick and Easy Method without Prism Adjustment
I was initially put off from correcting an optical fault in an old pair
of Porro prism binoculars because all I had seen or read online involved
prism adjustment...read more


