Showing posts with label Sharpening knives. Show all posts

Accessory for my honing guide for knife sharpening with a flashlight

I have successfully used the method described in my last post to sharpen most of  my knife blades. But, I've found that for the smaller blade on my Swiss Army Knife, it is harder to keep the straight edge against the flat face of the blade. 


To this end I decided to find something to replace my less efficient fingers.


This took the form of a torsion spring off the brake calipers of a bicycle I had recuperated. 


I cut the small tang off the spring and that was it ready for use!.


How to Use


The first step was to slide the spring onto the end of the straight edge.


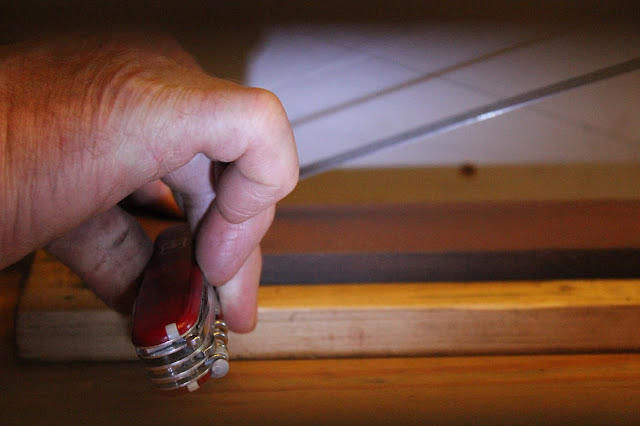
Next, resting the straight edge on a piece of scrap wood, I inserted the tip of the knife blade between the spring and the straight edge.


This was a tight fit and the wood block ensured there was no chance of self injury when pushing the blade into place.


The straight edge was now firmly held in place against the blade face. The position of the straight edge could be altered so that only the knife edge came into contact with the face of the whetstone during the sharpening process.


Here it is in action.


Of course, you can use this little device to hold the straight edge on broader blades but bear in mind that to sharpen the other side of the blade you need to attach the spring and the straight edge to the other face of the blade. 

Whatever you do, always use a wooden block when pushing the blade in place. Be safe!


Of course you don't have to dismantle the nearest bicycle to obtain a suitable spring, an extension spring of suitable diameter would work just as well.

Here's the film. Happy sharpening!


Thanks for dropping by and please feel free to share this article, comment, ask questions and if you'd like to be assured of getting the next post, then sign up to follow this blog.

All the best, Andy

© Andy Colley 2014

Sharpening knives using my home-made honing guide flashlight method

After posting my previous blog post and film on my method for sharpening wood chisels and plane irons using a flashlight, here I received a question from a fellow 'Instructables' member EmcySquare, asking if this same technique could be adapted for sharpening knives. Here it is and here am I using it to sharpen my Swiss Army knife.

Home-made honing guide flashlight method

Introduction


This method is to enable the beginner at sharpening to get a feel for the correct angle by using a home-made low-cost guide. After using it for the first few strokes, you should begin to get an idea of when you are achieving the correct angle but you can always refer back to your guide for confirmation. The flashlight method works very well with the wood chisels and plane irons because they have sufficient length to cast a shadow onto the guide lines I drew on the 'screen'. The problem when trying to apply this to a knife, is that the blade is unable to cast a useable shadow. However, having given this some thought and with a minor modification, this is no longer a problem. 

The Angle


Unlike the chisels and planes, which are usually sharpened to an angle  of 30° on one side, knives are sharpened at a more acute angle on both sides. Manufacturers specify the sharpening angle for their products and this angle may alter depending on the duty the blade is to undertake. Here are a couple of useful sites which detail the different angles and explain the sharpening process in depth: http://www.sharpeningsupplies.com/selecting-bevel-angle.aspx and http://sharpeningmadeeasy.com/index.htm In my case, the two knives I wanted to sharpen both needed an angle of 20°. 
 

The Sharpening Process


The main principle is to hold the knife on the whetstone at the correct angle throughout the sharpening strokes. The method I created uses a flashlight to project the shadow of the item being sharpened onto a vertical screen onto which the sharpening angle had been drawn.


The first stage was to mark the angle from the point on a horizontal base line, using a protractor and then the line was drawn from the origin.


Once the screen was in position the flashlight was mounted in the holder, as described in the previous blog and the whetstone was placed in between them. 


To determine the required blade angle, I held a small steel rule flat onto the side of the knife blade at right angles to the knife edge. 


When the light was turned on and the edge of the knife was placed on the stone, the shadow of the rule was seen on the screen and the knife was inclined until the shadow of the rule was coincident with the line drawn on the screen. This angle was checked each time the knife was drawn back to its starting position.


There were two alternatives to sharpen the other side of the blade. First when the blade was at the opposite end of the stone the  blade was flipped over and the rule held on the opposite face of the knife but this time the rule was angled towards me. The angle was checked by the alignment of the shadow with a second line on the screen drawn at 20° from the horizontal in the opposite direction. The disadvantage of this was that my arm was now blocking the light so it was not as easy to view the correct angle. 


The alternative to this was to turn the knife over so it was held in the other hand. Being right-handed I found this to be a little more difficult at first, but practice makes perfect!


And of course the broader the blade, the easier it is to hold the rule in place.


So now you can sharpen to any angle you wish. If you are sharpening to the same angle with every knife you will soon become used to attaining this without constant reference to the guide. Happy sharpening!

Now have a look at the film to see the process in action. 


At the end of the film, I asked for comments and suggestions and here are some great tips I have already had and put to good use: 


from canneddirt:
"Small variation: After pushing the blade away from you with the handle in your right hand, switch the handle to your left and hone the other side. That way your arm doesn't block the flashlight."

and from fellow- 'Instructables'


EmcySquare
"you could benefit of a simple way to fix the straight angle to the blade, like a magnet or some screws. Strong falt magnets can be found in old computer hard drives.
- for the back panel where the shadow is cast, I'm going to use a cutting mat, since it has all squares and parallel lines. You can keep the board vertical and incline it the amount of angles you need. This way you have multiple parallel lines to use as a reference even while you slide the blade back and forth
." 


Pointy: 
"Simple solution for countering the shadow: Flip the blade over to your other hand.
In the beginning this will feel a bit off, but your get used to it soon enough.


Thanks for dropping by and please feel free to share this article, comment, ask questions and if you'd like to be assured of getting the next post, then sign up to follow this blog.

All the best, Andy

© Andy Colley 2014